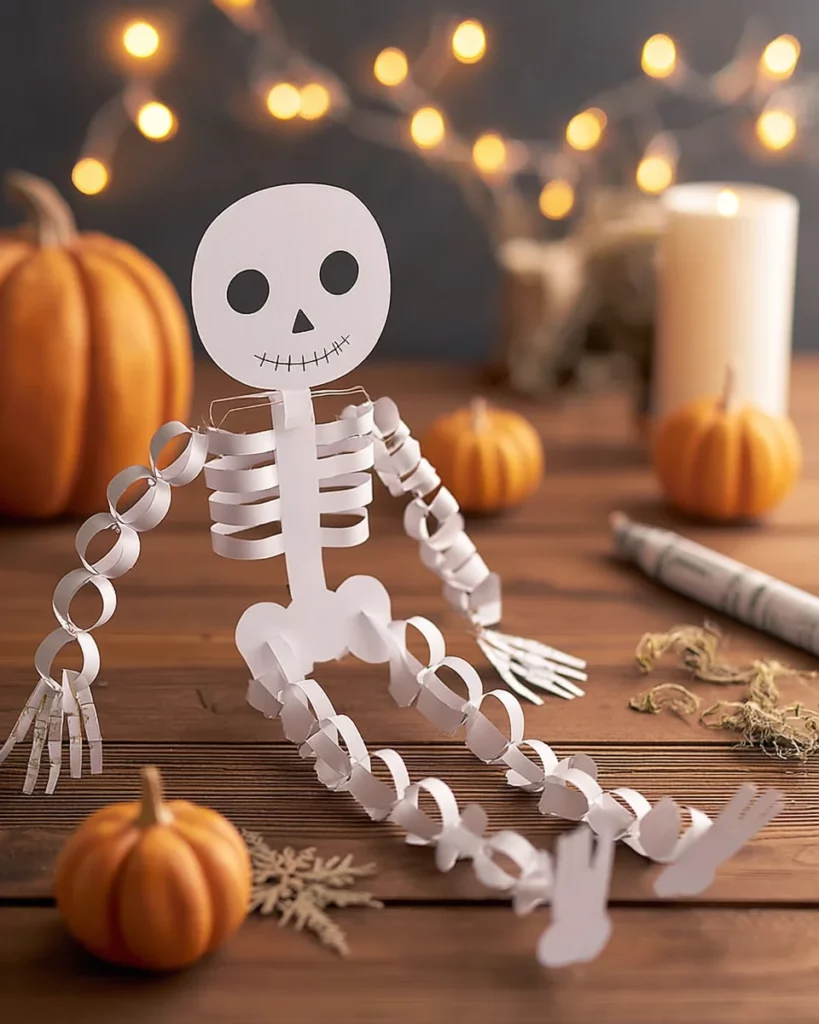
Skeleton Paper Garland: Create a Spooky Halloween Craft!

Introduction to Skeleton Paper Garland
When the leaves start turning, and the air gets a little crisp, it’s time to think of Halloween fun … as a busy mom (or dad) who isn’t sure how she’ll juggle everything to keep the kids happy during the busiest time of year. If that sounds familiar, we lick our crafty chops over this project: Skeleton Paper Garland. A little spooky endeavor that can be put together with great ease and without much fuss, besides letting your precious ones bond over creativity. All of that jazzed up your Halloween decor without spending a fortune.
Why You’ll Love This Skeleton Paper Garland
Perfect, simple charm – that is the Skeleton Paper Garland. Quick to craft, taking about an hour, it’s perfect for busy families. And the more silly Halloween decorations you create, the more giggles and smiles you’ll get, so who’s the real winner here? Oh, to be young again and able to see wonder in a child’s eyes! Well, involving your little ones also spurs your creativity – just fun paper for them will serve as a canvass of fun! Trust me, this garland becomes a cherished piece of your Halloween tradition.
Materials Needed for Skeleton Paper Garland
Gathering the ingredients for your Skeleton Paper Garland is like collecting treasures for a crafty adventure! Here’s what you’ll need:
- White construction paper: This is where your skeletons take shape. Go for a bright white to let your designs pop.
- Black construction paper: You can use this for the background or any extra decorations you want to include. It creates a dramatic effect!
- Scissors: A pair of trusty scissors is essential for cutting out those lively skeletons. Using safety scissors for younger kids is a good idea!
- Glue stick: This is perfect for securing any decorations on your skeletons. It’s messy-free and easy to handle.
- Black markers or crayons: These are key for adding spooky faces or fun designs to your skeletons. Let your creativity run wild!
- String or yarn: You’ll need something sturdy to hang your skeletons. Choose a color that complements your creations.
- Hole puncher (optional): This tool makes it easy to create neat holes in your skeletons’ heads for stringing them together. Super helpful!
- Plastic tray: Use this to catch any scraps and keep your workspace tidy. Trust me, it makes cleanup a breeze!
You’ll find exact quantities of these ingredients at the end of the article, ready for you to print! Happy crafting!
How to Make Skeleton Paper Garland
Crafting your Skeleton Paper Garland is an exciting journey filled with laughter and creativity. Let’s dive into the steps that will bring your spooky creation to life. Gather your supplies and get ready to have some fun!
Step 1: Draw Skeleton Templates
Start by sketching out your skeleton shapes on the white construction paper. Aim for 6 to 10 skeletons. They can be big or small, spooky or silly—however your mood strikes you! If sketching isn’t your strong suit, don’t worry. Freehanding simple bones will also work! Your creativity is your guide.
Step 2: Cut Out Skeleton Shapes
Next, it’s time to cut! Grab those scissors and carefully cut around your skeleton templates. If you have little hands helping, assist them with safety scissors. Watching their faces light up as they see each skeleton take form is absolutely priceless!
Step 3: Decorate the Skeletons
Now for the fun part—decorating! Use black markers or crayons to add personality to your skeletons. Give them funny facial expressions, unique clothing, or maybe even a festive bow tie. Encourage your kids to unleash their imagination! Let those skeletons shine with their spooky details!
Step 4: Punch Holes for Hanging
With a hole puncher, carefully create holes at the tops of each skeleton’s head. This is where you’ll string them together. Supervise your kids during this step to ensure they’re safe. It’s like giving each skeleton their very own party hat!
Step 5: Prepare the String or Yarn
Cut a long piece of string or yarn—something sturdy that will hold your delightful skeletons. The length is up to you, depending on how long you want your garland. Imagine it stretching across a room, bringing spooky cheer everywhere!
Step 6: String the Skeletons Together
Now, slide each skeleton onto the string through the holes you punched. Make sure to space them evenly, creating a delightful rhythm. Tie knots at each skeleton’s head to keep them in place. This adds a special touch, keeping your decoration secure!
Step 7: Hang Your Garland
Finally, it’s time to display your masterpiece! Find the perfect spot to hang your garland. Whether it’s along a doorway, window, or even across a mantel, let it be the life of your Halloween celebration. Step back and admire all your hard work—it’s always great to see those Halloween vibes!
Tips for Success
- Set up a designated craft space to keep things organized and make cleanup easier.
- Use a variety of sizes for your skeletons to add visual interest.
- Encourage your kids to experiment with different colors and patterns for decorating.
- Take breaks if working with younger children; keep the experience enjoyable.
- Have extra construction paper and supplies handy for last-minute creative bursts!
Equipment Needed for Skeleton Paper Garland
- Scissors: Regular scissors or safety scissors for little hands work well.
- Glue stick: A glue stick is best for easy handling, but liquid glue can work too.
- Hole puncher: If you don’t have one, simply cut small slits for the string.
- Plastic tray: Use any flat surface to catch scraps, like a cardboard box!
Variations on Skeleton Paper Garland
- Colorful Skeletons: Use colored construction paper instead of white for vibrant skeletons. Think blues, greens, or even metallics to give a unique twist to your garland!
- Embellishments: Add fun decorations like stickers, googly eyes, or even feathers for a whimsical touch. Let your kids choose their favorite embellishments.
- Themed Decorations: Create a themed garland by adding icons like pumpkins, bats, or ghosts to your skeletons. This makes your decoration even more festive!
- Glow-in-the-Dark: Use glow-in-the-dark paint or stickers for an enchanting effect at night. Your garland will come alive in the dark, adding an extra spooky vibe!
- Different Shapes: Experiment with other spooky shapes like skulls, ghosts, or ghouls alongside the skeletons for an all-out Halloween showcase!
Serving Suggestions for Skeleton Paper Garland
- Doorway Decoration: Hang the garland above doorways to greet your guests with spooky vibes as they enter.
- Table Centerpiece: Drape the garland across dining tables for a festive Halloween feast.
- Window Display: Adorn windows with the garland, allowing it to flutter in the breeze for added effect.
- Photo Backdrop: Use it as a backdrop for fun Halloween photos, capturing joyful moments with family and friends.
- Halloween Party Favors: Create smaller versions of the garland to give away as spooky party favors!
FAQs about Skeleton Paper Garland
As you embark on your Skeleton Paper Garland adventure, you might have a few questions bubbling up. No worries! I’ve got you covered with answers to some common queries about this delightful Halloween craft.
Can I use different colors of construction paper?
Absolutely! Using various colors adds a fun and lively twist to your skeletons. Let your kids choose their favorite colors to make the garland truly unique!
How can I make the decorations last longer?
If you want to preserve your Skeleton Paper Garland longer, consider laminating the skeletons. This way, you can enjoy your spooky creation for years to come without the wear and tear.
What is the best way to display the garland?
Hanging it above doorways or windows works wonders, but draping it across a mantel creates a centerpiece-worthy display! Creativity knows no bounds here!
Can younger kids participate in this craft?
Definitely! Younger kids can help with decorating and threading the string through the holes. Just ensure they use safety scissors for cutting, and supervise the hole-punching step.
What if I want to make a larger garland?
No problem! Just increase the number of skeletons you create, and use a longer piece of string or yarn to accommodate them. The more, the merrier, especially for Halloween!
Final Thoughts on Crafting the Skeleton Paper Garland
Creating this Skeleton Paper Garland isn’t just about crafting; it’s about making memories with loved ones. The laughter, the creativity, and those priceless moments shared with family will stick with you long after Halloween fades. Each skeleton becomes a piece of your family’s spooky story.
So, gather your kids, unleash your inner artist, and dive into this festive project together. Embrace the chaos that crafting brings, and let it transform your home into a haunted haven. After all, the joy isn’t just in the garland but in the time spent together making it. Happy crafting!
Print
Skeleton Paper Garland: Create a Spooky Halloween Craft!
- Total Time: 1 hour
- Yield: 1 Skeleton Paper Garland
- Diet: N/A
Description
Create a spooky and adorable skeleton paper garland for Halloween with this fun and easy craft.
Ingredients
- White construction paper (for the skeletons)
- Black construction paper (for the background and optional decoration)
- Scissors
- Glue stick
- Black markers or crayons
- String or yarn (for hanging the garland)
- Hole puncher (optional)
- Plastic tray (for easier cleanup)
Instructions
- Begin by drawing skeleton templates on the white construction paper. Aim for about 6-10 skeletons.
- Carefully cut out the skeleton shapes, assisting younger children with safety scissors.
- Let kids decorate the skeletons using black markers or crayons with spooky details.
- Use a hole puncher to create holes at the top of each skeleton’s head, with adult supervision.
- Cut a long piece of string or yarn for hanging the garland.
- String the skeletons through the holes, spacing them evenly and tying knots to keep them in place.
- Hang the garland in your chosen spot and admire your decoration!
Notes
- Encourage creativity and personalization in decorating the skeletons.
- Safety scissors are recommended for younger children.
- Experiment with different shapes and sizes of skeletons.
- Prep Time: 15 minutes
- Category: Craft
- Method: Paper Crafting
- Cuisine: N/A