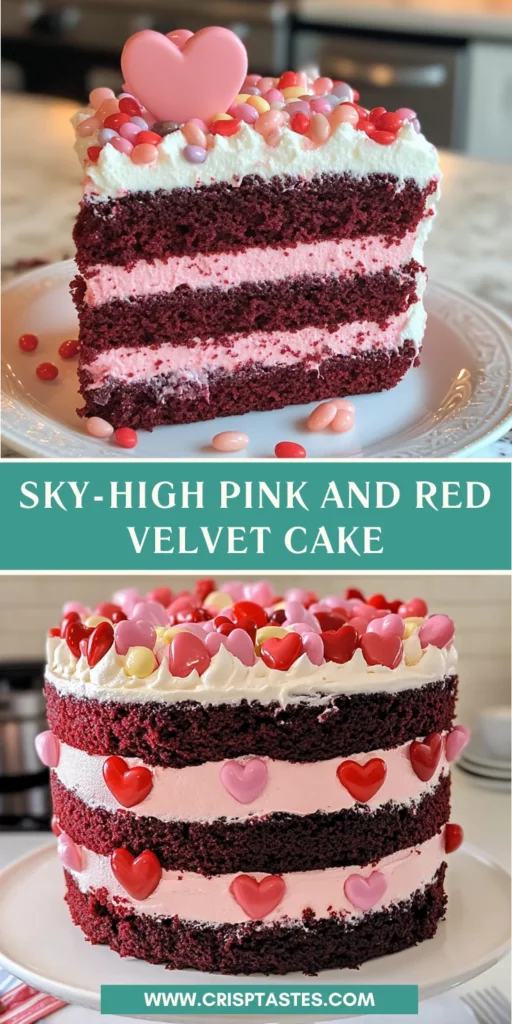
Sky-High Pink and Red Velvet Cake

Introduction to Sky-High Pink and Red Velvet Cake
Welcome, fellow dessert enthusiasts! If you’re looking for a show-stopper that will wow your guests, the Sky-High Pink and Red Velvet Cake is just what you need. This delightful treat isn’t just a cake; it’s a masterpiece that combines the classic velvety charm of red velvet with a playful pop of pink. Perfect for birthday parties, anniversaries, or even a casual afternoon gathering, this cake is a wonderful solution for busy moms and professionals who want to impress without feeling overwhelmed. Trust me, once you slice into this beauty, you’ll see those delighted faces light up!
Why You’ll Love This Sky-High Pink and Red Velvet Cake
This Sky-High Pink and Red Velvet Cake is not only a feast for the eyes but also a delight for your taste buds! With its moist layers and rich cream cheese frosting, it’s sure to make any occasion extra special. Plus, it’s a breeze to prepare, which is perfect for busy schedules. Whether you’re celebrating or simply treating your family, this cake brings joy with every slice!
Ingredients for Sky-High Pink and Red Velvet Cake
Gathering your ingredients is the first step towards creating this stunning Sky-High Pink and Red Velvet Cake. Don’t worry; most are pantry staples! Here’s what you’ll need:
- All-purpose flour: This is the backbone of your cake, providing structure and tenderness.
- Granulated sugar: Sweetness is key! Sugar also helps keep the cake moist.
- Baking soda: This leavening agent gives your cake that perfect lift.
- Salt: A touch of salt enhances the sweetness and balances flavors.
- Cocoa powder: The unsweetened kind lends that classic red velvet flavor.
- Vegetable oil: For a moist texture, oil outperforms butter in cakes!
- Buttermilk: This adds a delightful tang and makes the cake incredibly tender.
- Eggs: They bind everything together and add richness.
- Food coloring: Red and pink gel or liquid options brighten these layers, making them visually stunning.
- White vinegar: A secret ingredient! It reacts with baking soda to create a fluffier cake.
- Vanilla extract: The comforting warmth of vanilla elevates the flavors.
- Unsalted butter: The base for your creamy frosting—softened for easy mixing.
- Full-fat cream cheese: Essential for rich, tangy frosting that can’t be beat.
- Marshmallow cream: This adds a light, fluffy texture that is absolutely heavenly.
- Powdered sugar: The ultimate sweetener for that luscious frosting.
- Heavy cream or milk: To adjust the consistency of your frosting to your liking.
- Heart-shaped jelly beans: These are optional but add a fun, festive touch to your beautiful cake.
For precise measurements, check the bottom of this article where you can find everything listed for easy printing. Happy baking!
How to Make Sky-High Pink and Red Velvet Cake
Step 1: Preheat and Prepare
Start by preheating your oven to 350°F. This step is crucial! While it warms up, line your four 8-inch cake pans with parchment rounds. This will help you avoid wrestling with the cakes later. Don’t forget to spray the pans with nonstick cooking spray. Trust me, this will make releasing those stunning layers so much easier!
Step 2: Make the Red Velvet Batter
In a medium bowl, sift together the all-purpose flour, granulated sugar, baking soda, cocoa powder, and salt. This sifting process ensures that everything blends well. Now, in another bowl, whisk together the vegetable oil, buttermilk, eggs, red food coloring, vinegar, and vanilla until smooth. Combine the wet and dry ingredients gently until just mixed. The goal here is a tender batter that’s ready to shine!
Step 3: Bake the Red Velvet Cakes
Pour the red velvet batter evenly into two of your prepared cake pans. Bake them for about 30 minutes. To check for doneness, insert a toothpick into the center. If it comes out clean, your cakes are ready! Allow them to cool for about 10 minutes before transferring them to a wire rack.
Step 4: Make the Pink Velvet Batter
Wash your mixing bowls before diving into the pink velvet cake. Just like the red velvet, sift together your dry ingredients; but this time, skip the cocoa powder! In the same way, mix the wet ingredients, adding pink food coloring instead. Combine the dry and wet ingredients until just mixed. Feel free to unleash your creativity with the pink batter—it’s all about fun!
Step 5: Bake the Pink Velvet Cakes
Divide the pink batter into the remaining two prepared pans. Bake for the same 30 minutes. Again, perform the toothpick test to ensure your cakes are baked through. If it’s clean, they’re good to go! Set these aside to cool after baking, just like their red velvet siblings.
Step 6: Cool and Freeze
Let all four cakes cool completely on wire racks. This is essential for easier handling later on. Once cooled, wrap each cake layer in plastic wrap and pop them into the freezer for at least an hour. This simple step prevents crumbs from escaping during assembly and gives you nicely set cakes.
Step 7: Prepare the Cream Cheese Frosting
In a stand mixer, combine softened unsalted butter, full-fat cream cheese, and marshmallow cream. Beat them together until light and fluffy. Add vanilla extract and a pinch of salt for flavor. Gradually add in the powdered sugar and heavy cream to reach your desired frosting consistency. Whip it on high speed until it’s perfectly whipped and oh-so-lush!
Step 8: Assemble the Cake
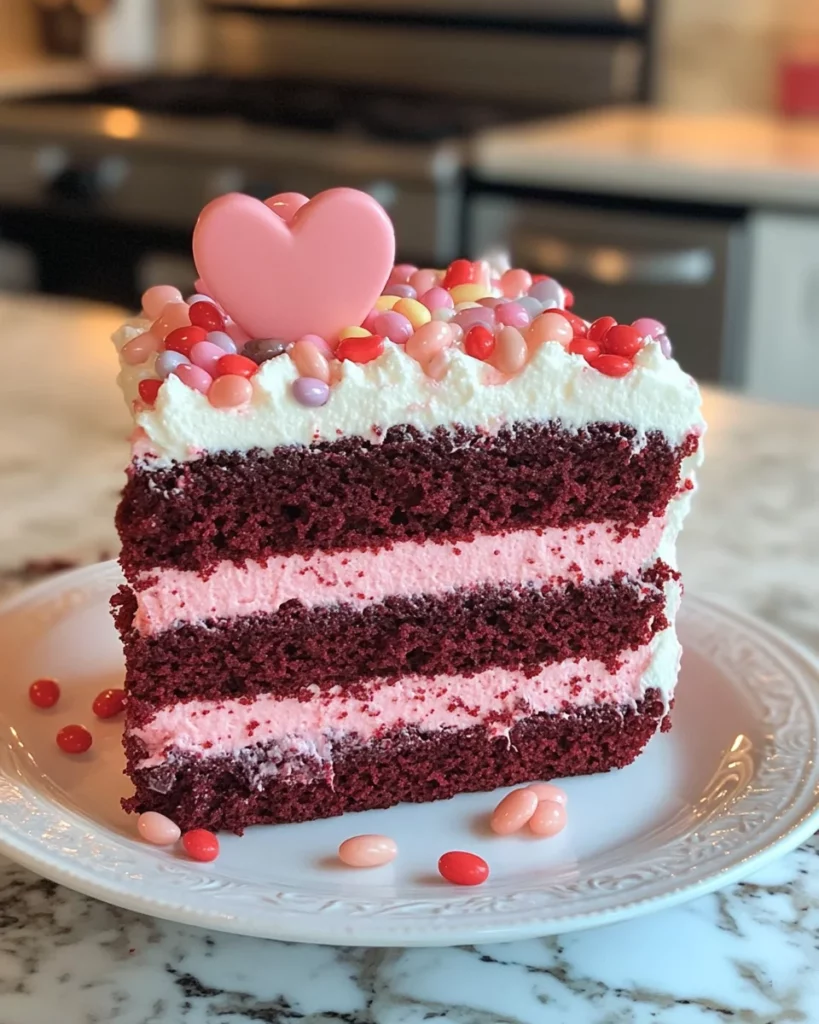
Now for the fun part! Carefully cut each cake in half, giving you a total of 8 layers. Place one red velvet layer on a cardboard cake circle. Slather a generous amount of frosting on top before placing a pink velvet layer. Repeat this process until all layers are stacked. You’re building a stunning, towering masterpiece!
Step 9: Apply the Frosting
For a polished finish, apply a thin layer of frosting as a crumb coat around the entire cake. This locks the crumbs in place. Chill the cake for at least an hour until firm. Next, generously frost the top and sides. Use a heated spatula to smooth the frosting beautifully. Your Sky-High Pink and Red Velvet Cake will be a sight to behold!
Tips for Success
- Measure your ingredients accurately for the best results.
- Use room temperature ingredients for better blending and texture.
- If you’re short on time, bake the layers ahead of time and freeze them.
- For a cleaner cut, use a serrated knife to slice through the cake layers.
- Don’t rush the cooling process; it’s key to a successful assembly.
Equipment Needed for Sky-High Pink and Red Velvet Cake
- Four 8-inch cake pans (or two pans and bake in batches).
- Parchment paper rounds for easy cake removal.
- Stand mixer (or hand mixer works fine too).
- Mixing bowls, one for dry and one for wet ingredients.
- Toothpick for checking doneness.
Variations of Sky-High Pink and Red Velvet Cake
- Chocolate Version: Swap the red velvet layer for a rich chocolate cake using cocoa powder and chocolate frosting.
- Gluten-Free Option: Use a gluten-free flour blend in place of all-purpose flour for a gluten-free treat.
- Fruity Twist: Add crushed fresh strawberries or raspberries to the pink batter, enhancing the fruit flavor and adding natural color.
- Lemon Zest: Incorporate lemon zest into the frosting for a zesty kick that pairs beautifully with the cake.
- Vegan Adaptation: Substitute eggs with flax eggs, and use plant-based cream cheese and butter for a vegan-friendly version.
Serving Suggestions for Sky-High Pink and Red Velvet Cake
- Pair with a scoop of vanilla ice cream for a delightful temperature contrast.
- Serve with a side of fresh berries to add a touch of natural sweetness.
- Complement the cake with a refreshing cup of iced tea or sparkling lemonade.
- For a festive look, garnish each slice with a heart-shaped jelly bean.
FAQs about Sky-High Pink and Red Velvet Cake
How can I make my Sky-High Pink and Red Velvet Cake less sweet?
If you find the cake too sweet, consider reducing the amount of sugar in both the cake and frosting. You can also balance the sweetness by adding a dash of lemon juice to the frosting or incorporating tangy cream cheese.
Can I bake the cake layers in advance?
Absolutely! You can bake the layers ahead of time. Just make sure to wrap them well in plastic wrap and store them in the freezer. This will keep them fresh until you’re ready to assemble your Sky-High Pink and Red Velvet Cake.
What’s the best way to store leftovers?
Store any leftover cake in an airtight container in the refrigerator for up to five days. This will keep your cake fresh while avoiding dryness. If your cake isn’t frosted, you can also freeze it to enjoy later!
Can I use regular food coloring instead of gel?
Yes, you can use regular liquid food coloring, but keep in mind that you may need more to achieve the desired color. Gel food coloring offers richer hues with less liquid, making it a fantastic choice for vibrant cakes.
What other toppings can I use besides jelly beans?
Get creative! Fresh fruit, edible flowers, or sprinkles are fun alternatives to decorate your Sky-High Pink and Red Velvet Cake. You could also drizzle some chocolate ganache for an elegant touch!
Final Thoughts
Every slice of this Sky-High Pink and Red Velvet Cake is a celebration of love, creativity, and flavor. As someone who adores transforming simple ingredients into spectacular moments, I can assure you that this cake does exactly that. Whether you’re baking for a birthday, a family gathering, or even a cozy night in, this cake is sure to bring smiles and laughter around the table. It’s not just about the taste; it’s about the joy you share while enjoying this stunning creation. So, roll up your sleeves, and let the baking magic begin—you’ll create memories that will last a lifetime!
Print
Sky-High Pink and Red Velvet Cake
- Total Time: 1 hour 15 minutes
- Yield: 12 servings 1x
- Diet: Vegetarian
Description
This Sky-High Pink and Red Velvet Cake is a stunning dessert that will impress your guests. With layers of velvety red and pink cake, all topped with luscious cream cheese frosting, it’s perfect for any celebration.
Ingredients
- 10.5 oz all-purpose flour, 2 1/2 cups
- 10.5 oz granulated sugar, 1 1/2 cups
- 1 tsp baking soda
- 1 tsp salt
- 1 TBSP unsweetened cocoa powder
- 1 cup vegetable oil
- 1.5 cups buttermilk, at room temperature
- 2 large eggs, at room temperature
- 1 TBSP red gel food coloring, or 2 TBSP red liquid food coloring
- 1 tsp white vinegar
- 1 tsp vanilla extract
- 10.5 oz all-purpose flour, 2 1/2 cups
- 10.5 oz granulated sugar, 1 1/2 cups
- 1 tsp baking soda
- 1 tsp salt
- 1 cup vegetable oil
- 1 ½ cups buttermilk, at room temperature
- 2 large eggs, at room temperature
- 1 tsp pink gel food coloring, or 2 tsp pink liquid food coloring
- 1 tsp white vinegar
- 1 tsp vanilla extract
- 1 lb unsalted butter, at room temperature
- 2 lbs full-fat cream cheese, at room temperature
- 3.5 oz marshmallow cream or fluff, 1/2 cup
- 2 TBSP vanilla extract
- 3 lbs powdered sugar
- 1/4 cup heavy cream, or milk
- 1/4 tsp salt
- 2 cups heart-shaped jelly beans
Instructions
- Preheat oven to 350 F. Line four 8-inch cake pans with parchment rounds, and spray the pans with nonstick cooking spray.
- For the red velvet cake: sift together flour, sugar, baking soda, cocoa, and salt in a medium bowl. In a separate bowl, combine oil, buttermilk, eggs, food coloring, vinegar, and vanilla, and mix until smooth.
- Stop the mixer, add the dry ingredients, and mix on low until the flour streaks disappear. Turn the speed to medium and mix until smooth. Divide the batter between two cake pans.
- Wash the bowl and paddle, and repeat the process for the pink velvet layer cakes, omitting cocoa powder. Bake red and pink velvet cakes for 30 minutes, until a toothpick inserted in the center comes out clean.
- Cool the cakes completely on a wire rack. Wrap in plastic wrap and freeze for at least 1 hour before assembling.
- To make the frosting: combine butter, cream cheese, and marshmallow cream in a stand mixer. Cream until light and fluffy. Add vanilla and salt, and mix.
- Add powdered sugar and cream, and mix on low until moistened. Turn speed to medium-high and whip until fluffy. Adjust texture as needed.
- To assemble: cut each cake in half for a total of 8 layers. Place a red velvet round on a cardboard cake circle, spread with frosting, and layer with a pink velvet round. Repeat until all layers are stacked.
- Apply a thin crumb coat of frosting to the top and sides of the cake and chill for at least an hour until firm.
- Apply a thicker layer of frosting to the cake and smooth the sides with a heated spatula for a polished finish.
Notes
- Freeze layers ahead of time for easier assembly.
- Adjust sweetness and texture of frosting as desired by adding more cream or sugar.
- Use heart-shaped jelly beans to decorate the cake for a festive touch.
- Prep Time: 45 minutes
- Cook Time: 30 minutes
- Category: Dessert
- Method: Baking
- Cuisine: American
Nutrition
- Serving Size: 1 slice
- Calories: 450
- Sugar: 50g
- Sodium: 300mg
- Fat: 25g
- Saturated Fat: 15g
- Unsaturated Fat: 5g
- Trans Fat: 0g
- Carbohydrates: 55g
- Fiber: 2g
- Protein: 5g
- Cholesterol: 80mg