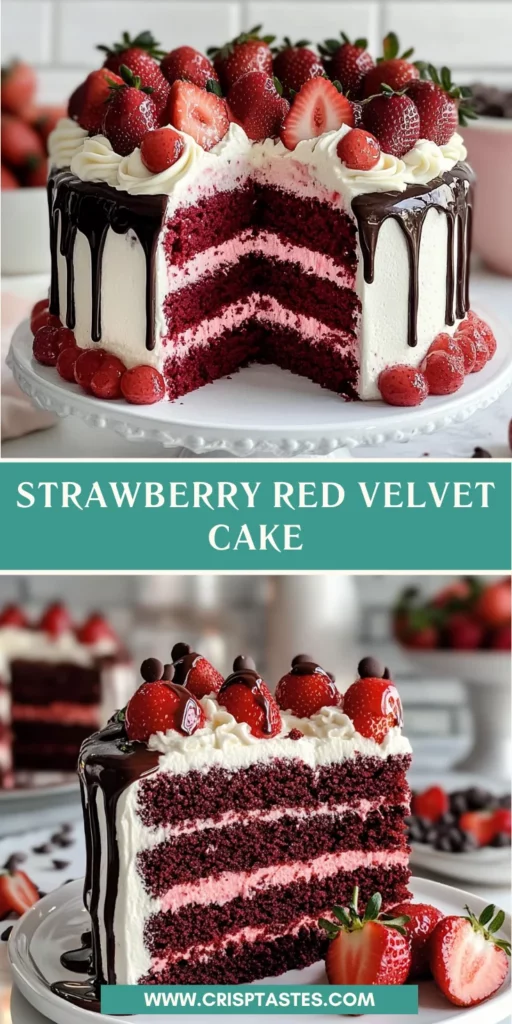
Strawberry Red Velvet Cake

Introduction to Strawberry Red Velvet Cake
There’s something magical about a Strawberry Red Velvet Cake that draws you in, isn’t there? It’s vibrant, it’s luscious, and it tastes heavenly! Whether you’re looking to impress guests or whip up a sweet surprise for your family after a long day, this cake is your perfect ally. As a busy mom, I know how essential it is to create beautiful memories without spending hours in the kitchen. With layers of strawberry buttercream and a delightful chocolate drip, this cake will surely steal the show and brighten your day!
Why You’ll Love This Strawberry Red Velvet Cake
This Strawberry Red Velvet Cake is not just a feast for the eyes; it’s a breeze to make! With its quick prep time and straightforward instructions, you’ll have a stunning dessert ready in no time. The unique combination of rich red velvet and fresh strawberries delivers a taste so delightful, your loved ones will be asking for seconds. Plus, it’s gluten-free, making it a winning option for everyone!
Ingredients for Strawberry Red Velvet Cake
Gathering the right ingredients is the first step to achieving your baking masterpiece. For this Strawberry Red Velvet Cake, here’s what you’ll need:
- Gluten-Free Flour: I use a 1:1 gluten-free flour blend that includes xanthan gum. This ensures a fluffy texture.
- Cocoa Powder: A mix of Dutch and natural cocoa powders adds a rich chocolate flavor. Don’t skip this step; it balances the sweetness beautifully!
- Baking Powder and Baking Soda: These act as your leavening agents, helping the cake to rise perfectly.
- Kosher Salt: A pinch enhances flavor and balances the sweetness.
- Unsalted Butter or Vegan Baking Stick: This is your fat component for rich flavor. Room temperature butter blends well for a smooth batter.
- Granulated Sugar: Sweetness is vital! It helps create a lovely structure while adding that delightful sweetness.
- Cornstarch: Mixed with water, it brings moisture and binds the ingredients, ensuring a tender crumb.
- Milk: Adds moisture to the cake. Keep a portion separate for creating vegan buttermilk.
- White Vinegar: This reacts with the milk, curdling it to create vegan buttermilk. It contributes to the cake’s fluffiness.
- Pure Vanilla Extract: Enhances the overall flavor, giving that homemade touch.
- Red Liquid Food Coloring: The signature of the Red Velvet! It gives the cake its iconic hue.
- Fresh or Frozen Strawberries: Used for the delicious buttercream frosting. Their natural sweetness makes it oh-so-yummy!
- Confectioners’ Sugar: Essential for the frosting, ensuring it’s smooth and sweet.
- Chocolate Chips and Unsalted Butter: These come together for the decadent chocolate drip that crowns the cake.
For exact measurements of these ingredients, they are available at the bottom of the article and can be easily printed. Happy baking!

How to Make Strawberry Red Velvet Cake
Making a stunning Strawberry Red Velvet Cake is simpler than you might think! Just follow these clear steps, and you’ll be on your way to creating a show-stopping dessert that will delight your family and guests alike.
Step 1: Prepare the Oven and Cake Pans
First things first, preheat your oven to 350 degrees Fahrenheit. While the oven warms up, grab two 8-inch round cake pans.
Grease them well and line the bottoms with parchment paper. This ensures your beautiful cakes release easily after baking. Trust me; nobody likes a broken cake!
Step 2: Mix the Dry Ingredients
In a large mixing bowl, start whisking together the gluten-free flour, both cocoa powders, baking powder, baking soda, and salt.
Mixing these dry ingredients thoroughly will prevent any clumps and help your cake rise evenly. It’s like a solid foundation for your cake castle!
Step 3: Create the Vegan Buttermilk
Measure out 1 cup of milk and pour it into a large measuring cup. Add in one tablespoon of white vinegar, mix it with a spoon, and let it sit for 5-10 minutes.
This will create a simple vegan buttermilk, a magic trick for achieving that perfect fluffy texture in our cake!
Step 4: Prepare the Cornstarch Mixture
In a small bowl, combine the cornstarch with water until it becomes thin and watery. Set this mixture aside for later; it helps add moisture and acts as a binder in our cake.
Step 5: Cream the Butter and Sugar
In a mixing bowl, beat the room temperature unsalted butter or vegan baking stick with the granulated sugar, using a mixer until it turns light and fluffy.
About 2-3 minutes will do the trick. This step is crucial as it incorporates air, making your cake extra tender!
Step 6: Combine Wet Ingredients
Take the vegan buttermilk you prepared earlier and stir in the other ⅓ cup of milk, the teaspoon of white vinegar, red food coloring, and vanilla extract.
Whisk until everything is combined, and you see that lovely, vibrant red color. It’s like a warm hug in a bowl!
Step 7: Incorporate Dry and Wet Ingredients
With the mixer on low speed, alternately add the dry mixture from step two and the wet mixture from step six in three sections, starting and ending with the dry ingredients.
Make sure everything is combined well. But remember: don’t overmix! We want our cake to be light and fluffy, not dense like a brick.
Step 8: Bake the Cakes
Divide the batter evenly between the two prepared cake pans. Smooth the tops with a spatula.
Bake in the preheated oven for about 45 minutes, or until the tops spring back lightly when touched. While the cakes bake, you can sip your favorite cup of tea. Multitasking at its finest!
Step 9: Cool and Slice the Cakes
Once baked, let the cakes cool in the pans for about 10-15 minutes. Then transfer them to a cooling rack to cool completely.
When cool, use a serrated knife to slice each layer in half horizontally. This will give us four beautiful layers to work with!
Step 10: Make the Strawberry Buttercream
In a saucepan, combine quartered strawberries with granulated sugar over medium heat. Stir for 5-8 minutes until they become liquefied.
Strain this mixture to remove any seeds, leaving you with a lovely strawberry liquid. Beat your room temperature butter until creamy, then mix in the confectioners’ sugar, strained strawberry liquid, water, salt, and vanilla.
Step 11: Assemble the Cake
Start by placing one of your cake layers on a cake stand or serving plate. Frost the top with about ⅕ of the strawberry buttercream.
Repeat this layering process with the remaining layers, ending with the last layer placed bottom side up. This gives a nice flat surface on top for frosting!
Step 12: Chill the Cake
Once assembled, chill the cake uncovered in the fridge for about 15-20 minutes. This will help the frosting set nicely.
Step 13: Prepare and Apply the Chocolate Drip
For the chocolate drizzle, melt the chocolate chips with the butter in a microwave-safe bowl. Stir occasionally until melted and smooth.
Allow the mixture to cool slightly before you carefully drizzle it over the top of the chilled cake. Let it cascade down the sides for that decadent look!
Tips for Success
- Make sure all your ingredients are at room temperature for the best texture.
- Use parchment paper to line your cake pans for easy release.
- Don’t overmix the batter; stop as soon as it’s combined!
- Keep an eye on the cakes while baking to avoid overbaking.
- Sift confectioners’ sugar to eliminate lumps in your frosting.
Equipment Needed
- Mixing Bowls: A variety of sizes; a large bowl is essential for mixing the batter.
- Whisk: Use a hand whisk or electric mixer for creamy butter and well-combined ingredients.
- Measuring Cups and Spoons: Accurate measurements are key for the perfect cake.
- Spatula: Ideal for scraping down the sides and smoothing frosting.
- Cake Pans: Two 8-inch round pans; you can substitute with any similar-sized pans.
- Cooling Rack: Helps cakes cool evenly; a plate works in a pinch!
- Microwave-Safe Bowl: For melting chocolate; regular bowls are fine, but watch the heat!
Variations
- Fruit Swaps: Instead of strawberries, try using raspberries or blueberries to create a delicious berry mix that adds a unique twist to the flavor.
- Flavored Frosting: Infuse the buttercream with lemon zest or almond extract for an exciting flavor profile that complements the strawberry beautifully.
- Dairy Alternatives: Substitute regular milk with almond or coconut milk for a dairy-free option if you’re catering to allergies or dietary preferences.
- Nutty Crunch: Add crushed nuts like pecans or walnuts between the cake layers for added texture and a nutty taste.
- Layer of Cream Cheese: Mix in a layer of cream cheese frosting between the cake layers for a delightful tanginess that pairs perfectly with the sweetness.
Serving Suggestions
- Pair your Strawberry Red Velvet Cake with a scoop of vanilla ice cream for a delightful contrast.
- Serve with freshly whipped cream and a sprinkle of crushed strawberries on top for added elegance.
- A glass of chilled sparkling water or a fruity iced tea makes a refreshing drink alongside this sweet treat!
- For a beautiful presentation, garnish each slice with a whole strawberry or fresh mint leaves.
FAQs about Strawberry Red Velvet Cake
Can I use regular flour instead of gluten-free flour?
Absolutely! If gluten isn’t a concern for you, feel free to substitute with all-purpose flour. However, make sure to adjust the measurements accordingly for the best results.
How do I store leftover cake?
The Strawberry Red Velvet Cake can be stored in an airtight container in the fridge for up to five days. If you’re planning to store it longer, you can freeze it for up to three months!
What can I substitute for the strawberries in the frosting?
You can use other berries like raspberries or blueberries for the frosting. Just remember to adjust the sugar to balance the sweetness, as different berries have varied levels of tartness.
Is this cake suitable for kids?
Definitely! The Strawberry Red Velvet Cake is not only visually appealing but also deliciously satisfying. Plus, the red color tends to excite little ones, making it a perfect treat for celebrations.
Can I make this cake ahead of time?
Yes, making this cake ahead of time is a great option! You can bake and frost it one day ahead. Just make sure to keep it refrigerated and covered to maintain its freshness.
Final Thoughts
There’s something truly special about sharing a slice of Strawberry Red Velvet Cake with family and friends. Its vibrant color and luscious flavors invite joy into any gathering, turning ordinary moments into cherished memories. As I’ve discovered, this cake isn’t just a dessert; it’s a centerpiece that sparks conversations and brings smiles. Plus, knowing it’s gluten-free allows everyone to indulge without worry. So, whether you’re celebrating a special occasion or simply craving something sweet, I hope you find joy and satisfaction in every bite of this delectable creation. Happy baking, my fellow home chefs!
Print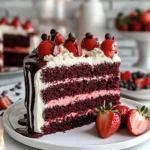
Strawberry Red Velvet Cake
- Total Time: 1 hour 15 minutes
- Yield: 12 servings 1x
- Diet: Gluten Free
Description
A delicious and visually stunning Strawberry Red Velvet Cake with layers of strawberry buttercream and a chocolate drip.
Ingredients
- 2.5 cups gluten free flour (I use a 1:1 gluten free flour with xanthan gum)
- ¼ cup cocoa powder (I use 2 tablespoons of dutch or natural unsweetened and 2 tablespoons of dark)
- 1 teaspoon baking powder
- 1 teaspoon baking soda
- 1 teaspoon kosher salt
- ½ cup unsalted butter or vegan baking stick, room temperature
- 1.5 cups granulated sugar
- 4 heaping tablespoons cornstarch mixed with 6 tablespoons water
- 1 ⅓ cups milk, keep ⅓ separate
- 1 tablespoon plus 1 teaspoon white vinegar, kept separate
- 1 teaspoon pure vanilla extract
- 1 tablespoon plus 1 teaspoon red liquid food coloring (I use McCormick)
- 3 ½ cups strawberries, fresh or frozen (for the buttercream)
- 1 ½ cups granulated sugar (for the buttercream)
- 8 cups confectioners’ sugar (for the buttercream)
- 1 cup unsalted butter or vegan baking stick (for the buttercream)
- ¼ cup plus 2 tablespoons water (for the buttercream)
- 2 teaspoons pure vanilla extract (for the buttercream)
- 2 pinches kosher salt (for the buttercream)
- ¾ cup chocolate chips (for the drip)
- 6 tablespoons unsalted butter or vegan baking stick (for the drip)
Instructions
- Preheat the oven to 350 degrees Fahrenheit and grease and line two 8 inch cake pans with parchment paper. Set aside.
- In a large bowl, whisk together the gluten free flour, cocoa powders, baking powder, baking soda and salt.
- Measure out 1 cup of milk in a large measuring cup and add in 1 tablespoon of white vinegar. Mix with a spoon and let sit for 5-10 minutes to create vegan buttermilk.
- In a small bowl, mix together the cornstarch and water until it is thin and watery. Set aside.
- Beat together the butter or vegan baking stick and granulated sugar until light and fluffy, about 2-3 minutes.
- Add the cornstarch mixture in two parts, mixing until combined.
- Stir your vegan buttermilk and add the other ⅓ cup of milk, the teaspoon of white vinegar, red food coloring, and vanilla. Whisk to combine.
- With the mixer on low speed, alternate adding dry and wet ingredients in three sections, starting and ending with dry ingredients. Mix until fully combined.
- Divide the batter between the two cake pans and smooth the tops.
- Bake for 45 minutes until slightly springy when touched. Cool in the pan then transfer to a cooling rack.
- Once completely cooled, slice each cake in half horizontally to create 4 layers.
- For the frosting, combine quartered strawberries and granulated sugar in a saucepan, stirring for 5-8 minutes until liquefied. Strain the strawberry liquid to remove seeds.
- Beat room temperature butter until creamy, then add confectioners’ sugar, water, strained strawberry liquid, salt, and vanilla. Beat until smooth.
- To assemble, place one cake layer on a stand, frost with ⅕ of the frosting, and repeat for remaining layers.
- Place the last layer of cake bottom side up for a flat top. Frost the top and sides with a thin layer of icing.
- Chill the cake uncovered in the fridge for 15-20 minutes to stabilize.
- For the chocolate drip, melt chocolate chips with butter and let cool before decorating the cake.
Notes
- Ensure all ingredients are at room temperature for best results.
- Keep an eye on the cake during baking to avoid overbaking.
- Use a sifter for the confectioners’ sugar to avoid lumps in the frosting.
- Prep Time: 30 minutes
- Cook Time: 45 minutes
- Category: Dessert
- Method: Baking
- Cuisine: American
Nutrition
- Serving Size: 1 slice
- Calories: 420
- Sugar: 30g
- Sodium: 100mg
- Fat: 18g
- Saturated Fat: 10g
- Unsaturated Fat: 5g
- Trans Fat: 0g
- Carbohydrates: 60g
- Fiber: 2g
- Protein: 4g
- Cholesterol: 35mg