The Best Apple Crisp

Introduction to The Best Apple Crisp
Imagine your kitchen, warm, and comforting, with the smell of apples and cinnamon in the air. That’s what you get when you cook up The Best Apple Crisp. An easy and tasty dessert is something I find quite important as a busy mom to be able to quickly please loved ones and hungry sweet tooth! And not only that, this recipe is so simple and allows freshness to shine for a wonderful treat that warms the heart and feeds the soul. So, be assured everyone at the table will have a smile after this dessert!
Why You’ll Love This The Best Apple Crisp
Indulgence need not be associated with the best apple crisp; it’s an easy way to bring happiness to your day. Well, that and the fact that this fast recipe requires little in the way of preparation-there is no wonder, then, why it is suited to those busy evenings. Crunchy topping under soft, sweet apples equals flavor explosion in every bite – and who can resist that th’ mostingly sweet smell wafting through your house? It’s comfort food, and feels like it should be matched with a nice scoop of vanilla ice cream.
Ingredients for The Best Apple Crisp
Creating The Best Apple Crisp is easy when you have the right ingredients on hand. Let’s take a closer look at each component, which contributes to this delightful dessert:
- Fresh Apples: These are the stars of the show! I recommend using a mix of sweet and tart apples like Granny Smith and Honeycrisp for a well-balanced flavor.
- Granulated White Sugar: This sugar helps bring out the natural sweetness of the apples, creating a delightful contrast with the cinnamon.
- Cinnamon: This warm spice adds a comforting aroma and flavor that screams fall, making it a classic pairing with apples.
- Vanilla Extract: Just a dash of vanilla enhances the overall flavor profile, making it more inviting and aromatic.
- All-Purpose Flour: Flour is essential for binding the topping together, creating that perfect crumbly texture we all crave.
- Old-Fashioned Oats: These hearty oats add a wonderful chewiness to the topping, making it even more satisfying to bite into.
- Brown Sugar: The deep, rich sweetness of brown sugar adds to the overall flavor and complements the apples beautifully.
- Salt: A pinch of salt balances the sweetness and enhances the flavors within the dish.
- Butter: Melted butter helps to achieve that delightful crumbly texture in the topping, ensuring it browns perfectly when baked.
All these ingredients work together to create a dish that isn’t just delicious but also a staple in many homes. For exact measurements, scroll down to the bottom of the article where you can find them available for printing!

How to Make The Best Apple Crisp
Step 1: Preheat Your Oven
First things first, preheat your oven to 350 degrees Fahrenheit. This step is crucial! A properly preheated oven helps the apple crisp bake evenly. While your oven warms up, grease a deep dish pie plate or large baking dish with butter or cooking spray. This simple act ensures the crisp doesn’t stick, allowing for effortless serving.
Step 2: Prepare the Apples
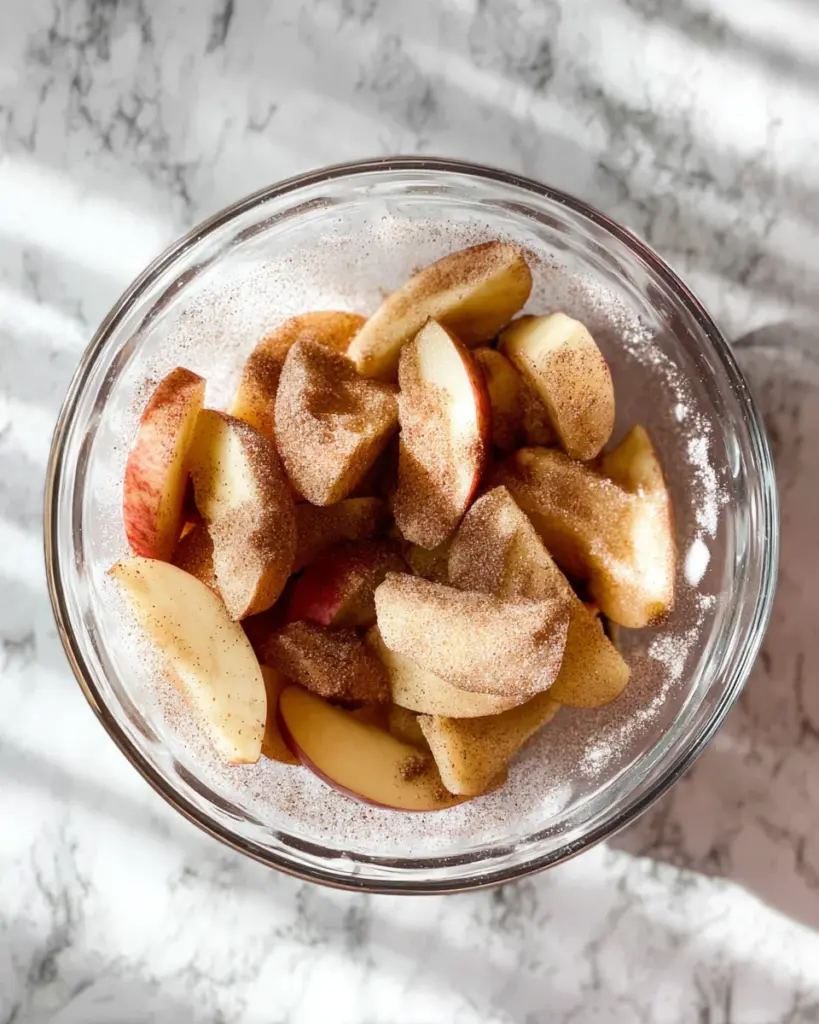
Now, let’s focus on the apples, the heart of The Best Apple Crisp. In a large bowl, combine your sliced fresh apples with granulated sugar, a sprinkle of cinnamon, and a splash of vanilla extract. Mix everything until the apples are evenly coated. This not only enhances their natural sweetness but also creates a warm, inviting aroma. Try to take a little taste of the mixture—you’ll want to savor the sweet blend of flavors!
Step 3: Make the Crisp Topping
Next up is the crisp topping, which brings that delightful crunch to our dish. In a separate medium-sized bowl, combine all-purpose flour, old-fashioned oats, brown sugar, a pinch of salt, and some cinnamon. Mix these dry ingredients together. Once that’s done, pour in the melted butter and stir until the mixture resembles coarse crumbs. This little step ensures you achieve that perfect texture we all love in a crisp. It’s both crumbly and satisfying!
Step 4: Assemble and Bake
Now for the fun part—assembling the apple crisp! Pour the prepared apple mixture into your greased dish, spreading it out evenly. Next, sprinkle the crumbly topping over the apples, ensuring every last piece is covered. Pop it in your preheated oven and bake for 45-60 minutes. Keep an eye out; the fruit should be soft, and the topping would be golden brown when it’s done. The aroma wafting through your home will make it hard to wait, but trust me, the end result is worth it!
Tips for Success
- Use a mix of apple varieties for enhanced flavor and texture.
- Slice apples uniformly to ensure even baking.
- Let the apple mixture sit for a few minutes before combining with the topping to let the flavors meld.
- For added crunch, consider incorporating nuts like pecans or walnuts into the topping.
- If you prefer a sweeter crisp, adjust the sugar to your taste.
Equipment Needed
- Deep dish pie plate or large baking dish – A sturdy baking sheet works too.
- Mixing bowls – Any size will do, just make sure they’re sturdy enough for vigorous mixing.
- Measuring cups and spoons – If you’re in a pinch, use a regular cup and tablespoon.
- Rubber spatula or wooden spoon – A fork can work for mixing as well!
Variations
- Nutty Delight: Add chopped walnuts or pecans to the crisp topping for a delicious crunch and extra flavor.
- Berry Blend: Toss in a handful of fresh blueberries or cranberries along with the apples for a fruity twist.
- Maple Flavor: Substitute brown sugar with pure maple syrup for a unique, sweet flavor profile.
- Gluten-Free: Use almond flour or gluten-free all-purpose flour in place of regular flour to make a gluten-free version.
- Spiced Up: Experiment with additional spices like nutmeg or ginger for a warm kick in the flavor.
Serving Suggestions
- Serve warm with a generous scoop of vanilla ice cream on top for a delightful contrast.
- Pair it with a dollop of whipped cream for added lightness and creaminess.
- Drizzle warm caramel sauce over the crisp for an extra treat.
- Enjoy with a side of fresh berries for a refreshing touch.
- For drinks, serve alongside hot apple cider or a warm chai latte to complement the flavors.
FAQs about The Best Apple Crisp
Can I use frozen apples for this recipe?
I recommend using fresh apples for The Best Apple Crisp. However, if you only have frozen apples, they’ll work in a pinch. Just remember to thaw them and drain any excess moisture to prevent a soggy crisp.
What type of apples are best for apple crisp?
For the best flavor, use a mix of sweet and tart apples, like Granny Smith and Honeycrisp. This combination enhances the sweet-sour balance and makes every bite exciting.
How do I store leftovers?
If you have any leftover apple crisp, store it in the refrigerator, covered loosely with foil or plastic wrap. It should be good for about three days. Just pop it in the oven to warm up before serving again!
Can I make this dessert ahead of time?
Absolutely! You can prepare everything except for baking it. Assemble the apple filling and topping, then cover it and refrigerate for up to a day. Just remember to pop it in the oven when you’re ready to bake!
What can I do if the topping is too dry?
If your crisp topping seems too dry before baking, simply mix in a bit more melted butter until you reach that lovely crumbly texture. A good topping should be moist but still have that satisfying crunch once baked!
Final Thoughts
There’s something enchanting about baking The Best Apple Crisp. It’s more than just a dish; it’s a comforting embrace after a busy day. The warm, gooey apples topped with a crunchy, sweet layer evoke memories of family gatherings and cozy evenings. I love watching my kids dig in, their faces lighting up with joy. This recipe captures the essence of home and happiness in each bite. Whether you’re enjoying it solo or sharing with others, The Best Apple Crisp is sure to create delicious moments worth savoring. So grab your ingredients and get ready to create some joy in your kitchen!
Print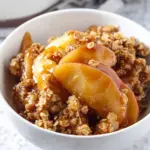
The Best Apple Crisp
- Total Time: 1 hour 0-15 minutes
- Yield: 8 servings 1x
- Diet: Vegetarian
Description
A simple and delightful apple crisp recipe made with fresh apples and a crumbly topping.
Ingredients
- 5 cups fresh apples, sliced
- 1/2 cup granulated white sugar
- 1/2 tsp cinnamon
- 1 teaspoon vanilla extract
- 1/2 cup all purpose flour
- 1/3 cup old fashioned oats
- 2/3 cup packed brown sugar
- 1/4 tsp salt
- 1/2 teaspoon cinnamon
- 1/4 cup (1/2 stick) butter, melted
Instructions
- Preheat oven to 350 degrees. Grease a deep dish pie plate or large baking dish with butter or cooking spray and set aside.
- Combine the sliced apples with the sugar, cinnamon, and vanilla extract in a large bowl and mix until all of the apples are evenly coated. Pour into the prepared baking dish.
- In a separate medium size bowl, combine the flour, oats, brown sugar, salt, and cinnamon. Pour in the melted butter and stir until well coated and crumbly. Sprinkle the crumb mixture evenly over the top of the apples.
- Bake in the preheated oven for 45-60 minutes until fruit is soft and the topping is golden brown. Allow to cool slightly before serving. Serve warm with vanilla ice cream on top. Enjoy!
Notes
- Best served warm.
- Pairs wonderfully with vanilla ice cream.
- Store leftovers in the refrigerator.
- Prep Time: 15 minutes
- Cook Time: 45-60 minutes
- Category: Dessert
- Method: Baking
- Cuisine: American
Nutrition
- Serving Size: 1 serving
- Calories: 250
- Sugar: 20g
- Sodium: 150mg
- Fat: 10g
- Saturated Fat: 5g
- Unsaturated Fat: 3g
- Trans Fat: 0g
- Carbohydrates: 37g
- Fiber: 3g
- Protein: 2g
- Cholesterol: 20mg