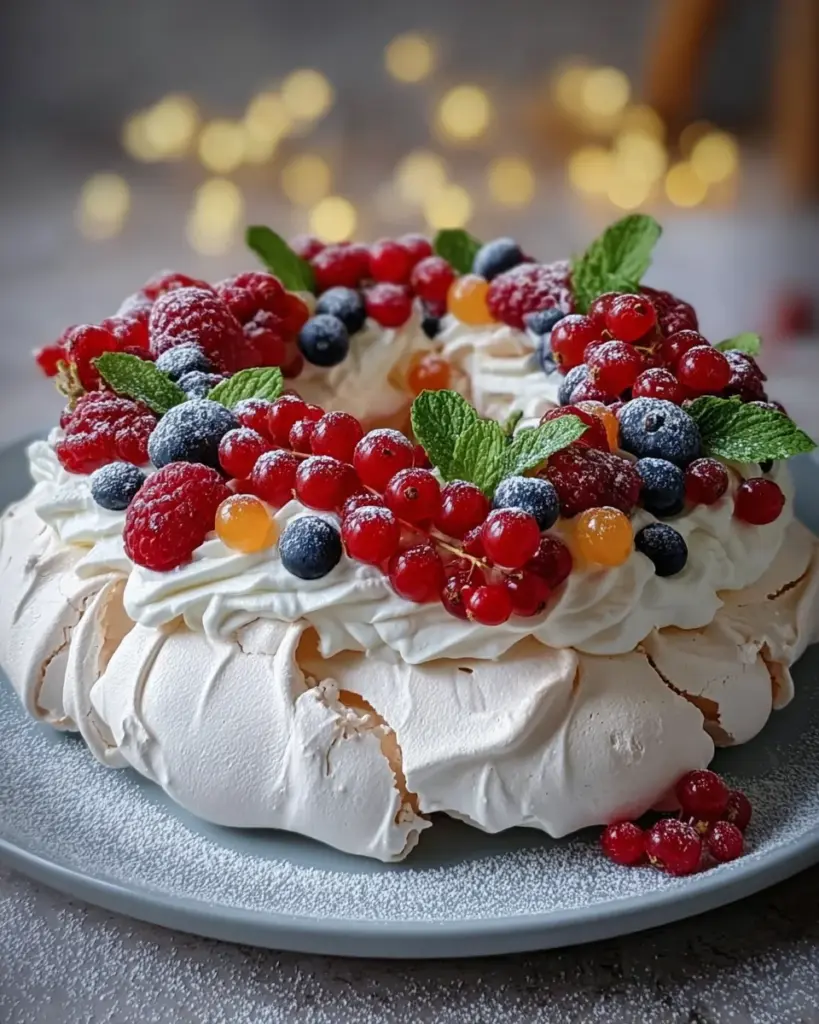
The Crown Jewel of Your Holiday Table

Introduction to The Crown Jewel of Your Holiday Table
Ah, the holidays! A time filled with laughter, warmth, and of course, food. If you’re anything like me, you want every gathering to feel special, but juggling a busy schedule can be overwhelming. That’s where The Crown Jewel of Your Holiday Table comes in. This pavlova is not just a dessert; it’s the perfect centerpiece that impresses without invasive fuss. With its crisp exterior and fluffy center, every bite feels like a little piece of heaven. So, let’s dive into this delicious adventure that makes you the star of your holiday celebrations!
Why You’ll Love This The Crown Jewel of Your Holiday Table
This pavlova is truly a dream come true! Not only does it look stunning, but it’s also incredibly easy to make. In just a little over an hour, you can create a dessert that will steal the show at your holiday gatherings. The light, airy texture combined with fresh berries and cream bursts with flavor, making it a delightful treat that you—and your guests—will savor. Who wouldn’t love that?
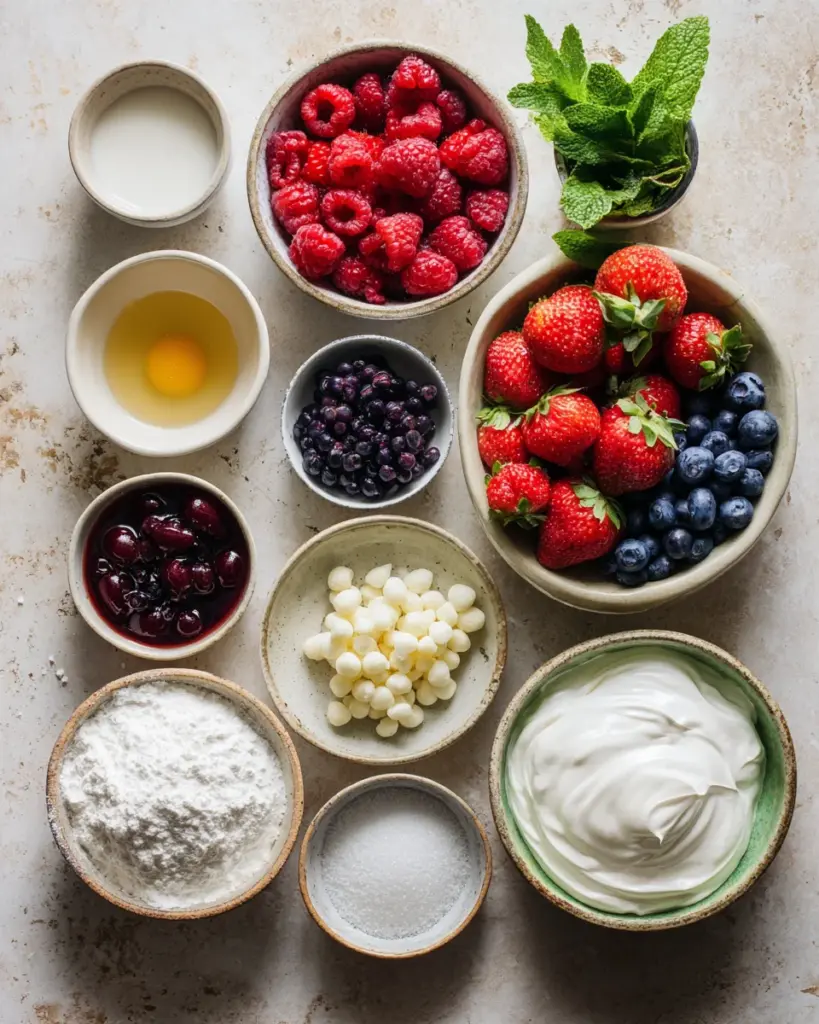
Ingredients for The Crown Jewel of Your Holiday Table
Here’s what you’ll need to create this stunning pavlova that will become the talk of the table:
- Meringue Base: A combination of egg whites, which provide the essential fluffiness, and caster sugar, ensuring that sweet crunch we adore.
- White Vinegar: This helps stabilize the egg whites, resulting in that perfect light and airy texture.
- Vanilla Extract: For an added layer of warmth and flavor, this gem will elevate your pavlova.
- Cornstarch: This magical ingredient ensures a soft, marshmallow-like interior, giving your meringue that melt-in-your-mouth quality.
Now onto the luxurious toppings:
- Thickened Cream: The star of the show, whipped to perfection for that creamy finish!
- Icing Sugar: A sprinkle of sweetness to enhance the whipped cream.
- Vanilla Bean Paste: A luxurious addition that brings intense vanilla flavor with lovely little specks to your cream.
To make your pavlova festive and bright, consider garnishing it with:
- Mixed Fresh Berries: Raspberries, strawberries, blueberries, and red currants add color and tartness, making each bite pop.
- Native Citrus Pearls: Finger lime or desert lime provides a delightful zesty burst that’s sure to impress.
- Ground Macadamia Nuts: For a bit of crunch and nutty richness, sprinkle these over the top.
- Fresh Mint Leaves: These add a fresh and vibrant note to the pavlova, enhancing its appeal.
- Icing Sugar: Finish it off with a light dusting for a snowy effect!
Exact measurements for each ingredient can be found at the bottom of the article, ready for your handy printable version.
How to Make The Crown Jewel of Your Holiday Table
Creating this pavlova is an exciting culinary adventure. Follow these straightforward steps and let your inner pastry chef shine!
Step 1 – Preheat and Prepare
Start by preheating your oven to 120°C (250°F). This low temperature is crucial for baking the meringue perfectly. While it warms up, line a baking tray with parchment paper. This will prevent the pavlova from sticking and allow it to come off easily once it’s done.
Step 2 – Whipping the Egg Whites
Next, it’s time to whip the egg whites. Using a clean bowl, beat them until soft peaks form. It’s like watching clouds fluff up in the sky! Gradually add the caster sugar while mixing. Keep beating until stiff peaks develop. Your egg whites should shine like a happy sunny day! To ensure success, remember to use room temperature eggs—this will help them whip up beautifully.
Step 3 – Incorporating the Ingredients
Now comes the fun part! Gently fold in the cornstarch, vinegar, and vanilla extract using a spatula. This step is delicate, so take your time to maintain the volume you’ve created. Aim to keep your mix light and airy, like a delightful cloud of sweetness.
Step 4 – Shaping and Baking
Once everything is nicely mixed, spoon the meringue into a festive wreath shape on the baking paper. Create a hollow center—this is where your toppings will go, acting like a cozy nest for all that delicious cream and fruit! Bake in the preheated oven for 1 hour. Then, turn off the oven and let the meringue cool inside. This step prevents cracks, resulting in a smooth pavlova.
Step 5 – Cooling Process
When the pavlova is done, be patient! Leave it to cool inside the oven for a while. This cooling period helps achieve that marshmallow-like interior we all cherish. Plus, it allows the pavlova to stabilize and get ready for its glorious toppings.
Step 6 – Whipping the Cream
While your pavlova cools, let’s whip up that cream! In a clean bowl, combine thickened cream, icing sugar, and vanilla bean paste. Beat until soft peaks form. You want it to be smooth and velvety, similar to a fluffy cloud. Avoid over-whipping; once it starts to look shiny, stop. We want it perfect for topping our star dessert.
Step 7 – Assembling Your Pavlova
The exciting moment has arrived—it’s time to assemble your pavlova! Once cooled, gently top the meringue with the whipped cream like icing on a cake. Decoratively arrange your fresh berries over the cream, creating a colorful masterpiece! Add splashes of native citrus pearls, a sprinkle of ground macadamia nuts, and fresh mint leaves for that touch of flair. Finally, finish it off with a light dusting of icing sugar for a festive look, resembling soft snowfall!
Tips for Success
- Make sure your egg whites are at room temperature; they whip up better this way.
- Cleanliness is key! Your bowl and whisk should be free from grease.
- If possible, bake your pavlova a day ahead. Let it cool overnight for a better texture.
- Keep an eye on the oven temperature—it’s essential for avoiding cracks.
- Feel free to mix and match your berry toppings according to the season!
Equipment Needed for The Crown Jewel of Your Holiday Table
- Mixing Bowl: Any large, clean bowl will do. Stainless steel or glass is preferred.
- Electric Mixer: A handheld mixer is perfect, but a stand mixer works great too!
- Baking Tray: Line it with parchment paper for easy removal.
- Spatula: Use a rubber spatula for folding and spreading the meringue.
- Whisk: Handy for whipping the cream, but you can use a fork in a pinch!
Variations of The Crown Jewel of Your Holiday Table
- Chocolate Pavlova: Incorporate cocoa powder into the meringue for a rich chocolaty twist. Top with chocolate whipped cream and berries for a decadent treat.
- Vegan Version: Use aquafaba (chickpea brine) in place of egg whites. Make sure to use vegan-friendly cream and toppings to keep it plant-based.
- Flavored Cream: Instead of plain whipped cream, consider infusing it with flavors like almond extract or coffee for a unique taste sensation.
- Sugar-Free Option: Substitute caster sugar with a sugar alternative, like erythritol, for a healthier take on this classic dessert.
- Seasonal Fruits: Customize your toppings according to the season. Try crunchy apples in the fall or tropical fruits like mango and passionfruit in the summer.
Serving Suggestions for The Crown Jewel of Your Holiday Table
- Pair your pavlova with a light dessert wine or bubbly for a festive touch.
- Serve alongside a refreshing fruit salad to enhance the berry toppings.
- Consider a scoop of vanilla ice cream for an extra indulgent experience.
- Present on a beautiful cake stand for instant elegance at any gathering.
- Add a sprig of mint on top for a pop of color and flavor.
FAQs about The Crown Jewel of Your Holiday Table
Can I make the pavlova in advance?
Absolutely! In fact, I recommend baking the pavlova a day ahead. Once cooled, store it in a cool, dry place. This prevents humidity from ruining its crispiness, ensuring you have a flawless dessert ready for your holiday table!
Why did my pavlova crack?
Cracking can happen for a few reasons. Most commonly, it’s due to sudden temperature changes. Be sure to avoid opening the oven door while baking and let your pavlova cool inside the oven to help maintain its structure.
What are the best toppings for pavlova?
While I adore fresh berries, feel free to let your creativity shine! You can use tropical fruits, chocolate shavings, or even a drizzle of salted caramel. Each topping adds a unique flavor and personality to your pavlova, making it truly yours!
Is pavlova gluten-free?
You’re in luck! Pavlova is naturally gluten-free, making it a fantastic choice for those with gluten sensitivities. Just be cautious with any toppings or additional elements to ensure they fit your dietary needs.
How should I store leftover pavlova?
Leftover pavlova is best stored separately from the toppings. Keep the meringue in an airtight container to maintain its crispiness and store whipped cream and fruits in the refrigerator. Assemble them just before serving for the best texture!
Final Thoughts
As you gather around the holiday table, it’s moments like these that remind us of what truly matters—family, friends, and delicious food. The Crown Jewel of Your Holiday Table isn’t just a dessert; it embodies love and celebration. The joy of watching your loved ones dive into that beautiful pavlova is unparalleled. Each slice sparks laughter, shared memories, and heartfelt conversations. So go ahead, embrace this delightful recipe and let it be a sweet reminder that even in our busy lives, we can create something magical together. Enjoy every moment of this culinary journey!
Print
The Crown Jewel of Your Holiday Table
- Total Time: 1 hour 20 minutes
- Yield: 8 servings 1x
- Diet: Gluten Free
Description
A stunning and delicious pavlova that is the perfect centerpiece for your holiday table, featuring a crisp meringue base, soft marshmallow interior, and topped with fresh berries and whipped cream.
Ingredients
- Meringue Base
- 4 egg whites (room temperature)
- 1 cup (220g) caster sugar
- 1 tsp white vinegar
- 1 tsp vanilla extract
- 2 tsp cornstarch
- Topping
- 300ml thickened cream
- 2 tbsp icing sugar
- 1 tsp vanilla bean paste
- Decorations
- Mixed fresh berries (raspberries, strawberries, blueberries, red currants)
- 1 tbsp native citrus pearls (finger lime or desert lime)
- 1 tbsp macadamia nuts, finely ground
- Fresh mint leaves
- Icing sugar, for dusting
Instructions
- Preheat oven to 120°C (250°F) and line a tray with baking paper.
- Whisk egg whites until soft peaks form, then gradually add sugar, beating to stiff peaks.
- Fold in cornstarch, vinegar, and vanilla.
- Spoon mixture into a wreath shape on the tray, leaving a hollow center.
- Bake for 1 hour, then turn off the oven and leave it to cool inside.
- Whip cream with icing sugar and vanilla until soft peaks form.
- Once pavlova is cool, top with whipped cream.
- Decorate with berries, native citrus pearls, and macadamia dust.
- Finish with mint and a snow-like dusting of icing sugar.
Notes
- Make sure that the egg whites are at room temperature for better whipping.
- Use a clean bowl and whisk to ensure that there are no grease particles that could affect the egg whites.
- For best results, bake the pavlova a day in advance and leave it in the oven to cool overnight.
- Prep Time: 20 minutes
- Cook Time: 1 hour
- Category: Dessert
- Method: Baking
- Cuisine: Australian
Nutrition
- Serving Size: 1 slice
- Calories: 300
- Sugar: 25g
- Sodium: 50mg
- Fat: 20g
- Saturated Fat: 10g
- Unsaturated Fat: 5g
- Trans Fat: 0g
- Carbohydrates: 35g
- Fiber: 2g
- Protein: 3g
- Cholesterol: 60mg