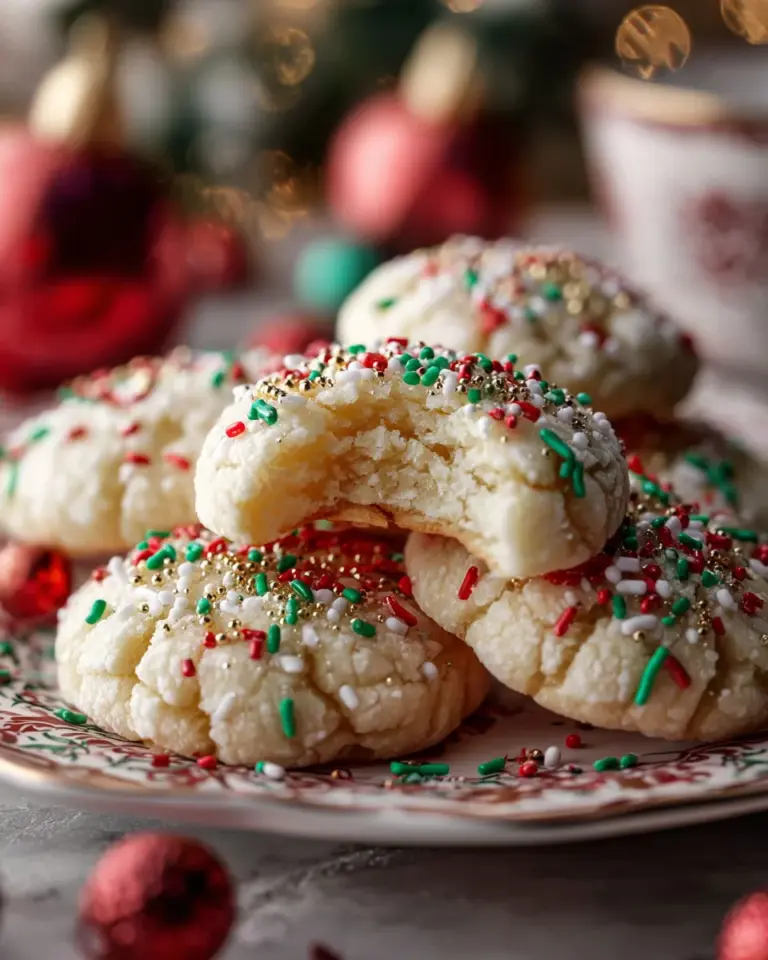
Thumbprint Heart Cookies are a must-try delight!

Introduction to Thumbprint Heart Cookies
As a busy mom, I know how the day can fly by in a whirlwind of activities, leaving little time for a sweet treat. That’s where these Thumbprint Heart Cookies come in, offering a delicious escape in just under 30 minutes! Perfect for surprising your loved ones or even treating yourself, these delightful heart-shaped cookies filled with jam are a nostalgic reminder of simpler times. Each bite yields a heavenly shortbread experience that’s simultaneously comforting and joyous. Trust me, once you make these, you’ll find it hard to resist whipping up a batch on any occasion!
Why You’ll Love This Thumbprint Heart Cookies
If you’re looking for a quick and tasty dessert, these Thumbprint Heart Cookies are your answer. They require minimal ingredients and can be whipped up in a flash, making them perfect for busy days. The buttery shortbread brings warmth to every bite, while the jam adds a lovely surprise. Plus, they’re sure to impress the little ones and even the pickiest of eaters. Who can resist a cookie that’s both sweet and heart-shaped?
Ingredients for Thumbprint Heart Cookies
Making these Thumbprint Heart Cookies is a breeze with just a handful of ingredients! Below, I’ve listed all you’ll need to create these delightful treats. Remember, the exact quantities are at the bottom of this article if you’d like to print them out.
- Egg: This little powerhouse binds the ingredients together, creating a tender and fluffy texture.
- Butter: Softened butter adds richness and flavor. It’s the secret to that melt-in-your-mouth quality!
- Light Brown Sugar: It brings a lovely caramel flavor while helping the cookies stay moist. You can also use granulated sugar if that’s what you have on hand.
- All-Purpose Flour: This is the foundation of the cookies, giving them structure without being too heavy. Be sure to scoop gently to avoid packing it!
- Salt: Just a pinch enhances all the flavors, pulling everything together beautifully.
- Vanilla Extract: This adds a warm, inviting flavor that pairs perfectly with the buttery goodness.
- Jam of your choice: This is where you can get creative! Think raspberry, strawberry, or cherry—the options are endless. Each variety brings its own unique twist to the cookie.
Feel free to experiment with different jams to suit your taste. Personalizing your cookies not only makes them special but also adds a fun element to baking. You’re sure to delight family and friends with these scrumptious little treasures!
How to Make Thumbprint Heart Cookies
Ready to bake some irresistible Thumbprint Heart Cookies? Let’s dive right into the steps! Follow along, and I’ll share helpful tips to make your baking experience a breeze.
Step 1: Prepare Your Oven
First things first, preheat your oven to 350 °F (175 °C). This step is crucial! An adequately preheated oven ensures even baking and that perfect golden edges that we all adore.
Step 2: Cream the Butter and Sugar
In a large bowl, cream your softened butter with light brown sugar until it’s light and fluffy. This process is all about texture. The air incorporated during this mixing makes your cookies light and chewy rather than dense and heavy.
Step 3: Add Egg and Vanilla
Next, add in that egg and a splash of vanilla extract. The egg is your binding agent, working like a team player to hold everything together. Plus, it boosts the flavor, making each bite even more delightful!
Step 4: Combine Dry Ingredients
Now, it’s time to mix in the all-purpose flour and salt. Do this gently, and remember: overmixing can lead to tough cookies. We want them to be soft and tender, so just mix until everything is combined. Simple, right?
Step 5: Shape the Cookie Dough
Here comes the fun part! Roll the dough into balls, about 1 tablespoon each. You want them to be uniform in size for even baking. Use your palms to make them smooth, and don’t worry if they’re not perfectly round—homemade is all about love!
Step 6: Create Indentations
With your finger or the back of a spoon, make a small indentation in the center of each ball. If you’re feeling creative, you can even use a heart-shaped cutter to make those shapes pop! Just remember, these will hold your jam later.
Step 7: Add Your Jam
Time to fill those indentations with jam! Choose your favorite flavor—be it raspberry, strawberry, or cherry. Just a spoonful will do, so you don’t overflow. This is where the magic happens, as the jam creates that sweet surprise!
Step 8: Bake the Cookies
Place the baking sheet in your preheated oven and let them bake for 10-12 minutes. Keep an eye on them; the edges should turn lightly golden. If your kitchen starts to smell heavenly, you’re on the right track!
Step 9: Cool and Store
After baking, give your cookies a few minutes to cool on the baking sheet. This helps them set before transferring to a wire rack. Once cooled, store them in an airtight container to keep them fresh and delicious!
Tips for Success
- Use room temperature butter for better creaming with sugar.
- Experiment with flavored extracts like almond for a twist.
- Keep your cookie dough chilled for easier handling.
- Swap in whole wheat flour for a nuttier flavor.
- Make sure to check the cookies a minute or two before the timer goes off.
Equipment Needed
- Baking sheet: A standard cookie sheet works fine, but a non-stick one is ideal.
- Parchment paper: If you don’t have this, a silicone baking mat can work too.
- Mixing bowls: Two or three bowls of different sizes will do the trick.
- Measuring utensils: Use measuring spoons and cups for accuracy.
- Wire rack: If you don’t have one, a large plate can serve as a cooling spot.
Variations
- Add zest: Incorporate lemon or orange zest for a fresh burst of flavor.
- Nutty delight: Mix in finely chopped nuts like walnuts or pecans for added texture.
- Gluten-free option: Substitute all-purpose flour with a gluten-free blend for a similar taste.
- Chocolate twist: Use chocolate ganache or Nutella instead of jam for a decadent version.
- Seasonal spices: Add cinnamon or nutmeg for a cozy, warm flavor that’s perfect for fall.
Serving Suggestions for Thumbprint Heart Cookies
- Pair with a steaming cup of tea or coffee for a delightful afternoon treat.
- Serve on a pretty platter with fresh strawberries or raspberries for a pop of color.
- Dust with powdered sugar for an elegant touch.
- Bundle cookies in cellophane bags tied with ribbon for a charming gift.
- Perfect for picnics, or as a sweet surprise in lunchboxes!
FAQs about Thumbprint Heart Cookies
Do you have questions about making these delicious Thumbprint Heart Cookies? You’re not alone! Here are some common queries I often hear, along with my answers to help you on your baking journey.
Can I use different types of jam for fillings?
Absolutely! Feel free to get creative with your jam choices. Raspberry, strawberry, or even apricot can delight your taste buds. Each flavor brings a fun twist!
Can I make the dough ahead of time?
Yes! You can prepare the dough in advance. Just wrap it tightly in plastic wrap and refrigerate for up to two days. This way, you can bake fresh cookies whenever you want!
What should I do if my cookies spread too much while baking?
If your cookies spread more than desired, it might be due to the butter being too soft. Make sure to chill your dough for a bit before baking for a firmer result.
How long can I store Thumbprint Heart Cookies?
Store these lovely cookies in an airtight container for about a week. If they last that long, I recommend freezing them if you want to enjoy them a month later!
Can I make these cookies vegan?
Yes, you can swap the egg with flaxseed meal or a chia seed mixture. Use a plant-based butter alternative, and you’re set for a delicious vegan version!
Final Thoughts
Making Thumbprint Heart Cookies brings such joy to my kitchen. There’s something wonderfully heartwarming about transforming simple ingredients into sweet, love-filled bites. Whether you’re baking for a holiday, a special occasion, or simply to indulge, each cookie is a delicious reminder of the love and care you put into your cooking. Plus, gathering your loved ones around to share these treats is where the real magic happens! I hope this recipe becomes a cherished part of your baking routine, just as it has in mine. Happy baking, and may your cookies be filled with love!
Print
Thumbprint Heart Cookies
- Total Time: 27 minutes
- Yield: Approximately 24 cookies 1x
- Diet: Vegetarian
Description
Thumbprint Heart Cookies are delicious shortbread cookies in the shape of a heart, filled with jam, perfect for Valentine’s Day or any sweet occasion.
Ingredients
- 1 egg
- 3/4 cup butter (about 170 g), softened
- 1/2 cup light brown sugar, lightly packed
- 1 1/2 cups all-purpose flour
- 1/4 teaspoon salt
- 1/2 teaspoon vanilla extract
- ~1/4 cup jam of your choice (raspberry, strawberry, cherry, etc.) for filling
Instructions
- Preheat your oven to 175 °C (350 °F).
- In a large bowl, cream the softened butter with the brown sugar until light and fluffy.
- Add the egg and vanilla extract, then mix well.
- Incorporate the flour and salt until the dough is well combined but not overmixed.
- Form dough balls (about 1 tablespoon each) and place them on a baking sheet lined with parchment paper.
- With your finger or the back of a spoon, make a small indentation in the center of each ball.
- Fill each indentation with a bit of jam.
- Bake for 10-12 minutes (the edges should be lightly golden).
- Allow to cool for a few minutes before transferring to a wire rack to cool completely.
Notes
- These cookies can be made with any flavor of jam you prefer.
- For a festive touch, use heart-shaped cookie cutters.
- Store in an airtight container for freshness.
- Prep Time: 15 minutes
- Cook Time: 12 minutes
- Category: Dessert
- Method: Baking
- Cuisine: American
Nutrition
- Serving Size: 1 cookie
- Calories: 100
- Sugar: 5g
- Sodium: 60mg
- Fat: 5g
- Saturated Fat: 3g
- Unsaturated Fat: 2g
- Trans Fat: 0g
- Carbohydrates: 12g
- Fiber: 0g
- Protein: 1g
- Cholesterol: 15mg