Toilet Paper Roll Bats: Craft Fun for Halloween Decor!

Introduction to Toilet Paper Roll Bats
With Halloween fast approaching if you’re anything like me, you know the juggle between work and family life. Enter these cute little Toilet Paper Roll Bats. They’re the perfect solution to getting into the spirit of the season without wasting so much of your time. Not to mention, they are environmentally friendly, made from stuff you already have at home. In only 15 minutes – yup, you heard right – you get a great little bat decoration that your kids will love. Let’s jump into this fun project that will give a creative reprieve from your busy day!
Why You’ll Love This Toilet Paper Roll Bats
Toilet Paper Roll Bats are made with joy and fit right into your busy schedule because prep lasts 15 minutes, meaning you can do it in between chores or after school runs. Plus, they inspire creativity. Your little ones will love making their own bat family, and you’ll love all the sweet moments spent together. It is an easy fun project filled with ‘smiles’ for carrying your home’s festive look!
Ingredients for Toilet Paper Roll Bats
Gather these simple ingredients to bring your Toilet Paper Roll Bats to life:
- Toilet Paper Rolls: These serve as the body of your bats. Save those empties instead of tossing them! They’re perfect for crafting.
- Black Paint or Black Paper: Either will help create that spooky bat look. If you’re using paint, acrylic works great. For paper, construction paper or craft paper will do.
- Scissors: Essential for cutting the wings and making precise cuts. A good pair is worth having in your craft toolbox.
- Googly Eyes: These add character! You can use any size, or even draw eyes with a marker for a different vibe.
- Glue: You’ll need this to hold everything together. White craft glue or a hot glue gun makes assembling easier.
- String: To hang your bats upside down! Twine or yarn can add a rustic touch, while fishing line offers an invisible look.
Feeling adventurous? Try using glitter or stickers to decorate your bats further. You can find all the ingredients with exact quantities at the bottom of the article and available for printing, making it easy to gather what you need!

How to Make Toilet Paper Roll Bats
Ready to unleash your inner artist? Crafting Toilet Paper Roll Bats is a delightful journey! Follow these easy steps, and soon you’ll be surrounded by a fluttering family of bats.
Step 1: Prepare the Toilet Paper Roll
Start by taking those empty toilet paper rolls. If you didn’t already know, they’re versatile! Paint them with black paint or wrap them in black paper. If your kids want a splash of creativity, let them choose different textures. Just be sure to let the paint dry completely before moving on!
Step 2: Create the Bat Wings
Next, grab your scissors and black paper to create the wings. Cut out a bat-shaped pattern. It can be as simple or intricate as your heart desires. Need a template? A quick Google search will supply plenty of ideas! Don’t worry if they don’t match perfectly; bats come in all shapes and sizes.
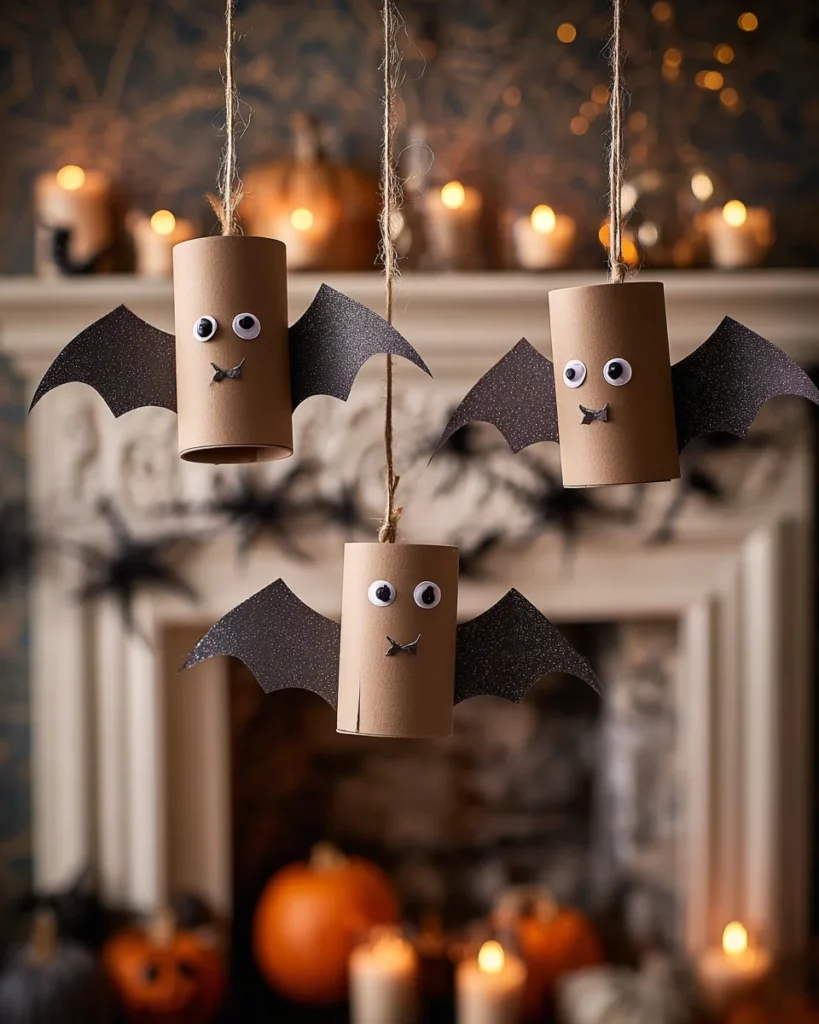
Step 3: Assemble the Bat
It’s time to put your bat together! Use glue to attach the wings onto the sides of your painted roll. This is where your bat’s personality shines! Stick on googly eyes, or draw playful eyes and a funny smile—or maybe some little fangs for a spooky twist! Remember, the goal is to have fun and let your imagination run wild.
Step 4: Hang Your Bat Decoration
Finally, grab a piece of string to hang your bat upside down. You can poke a small hole at the top of the roll or simply use glue for the string. Hang them from door frames or the ceiling. Voilà! You’ve created a festive Halloween decoration that brings joy and laughter to your home!
Tips for Success
- Make this a family activity; everyone can contribute their ideas and creativity!
- Use different materials like glitter or fabric scraps for fun textures.
- If your kids are young, supervise while using scissors for safety.
- Try using leftover wrapping paper or craft supplies for unique designs.
- Have fun and embrace the mess; creativity often comes with a bit of chaos!
Equipment Needed
- Scissors: A good pair is essential. Safety scissors work well for little hands.
- Paintbrush: Use this to spread paint evenly, or a sponge for a fun effect.
- Glue: A glue stick is perfect for kids, while a hot glue gun helps for faster drying.
- Craft Paper: Any kind you have on hand can substitute for black paper.
Variations
- Glow-in-the-Dark Bats: Use glow-in-the-dark paint or paper for a spooky twist after dark!
- Bat Families: Customize different sizes and shapes to create a whole family of bats—tiny babies included!
- Decorative Accessories: Add sequins, stickers, or feathers for a lively touch, giving each bat its unique flair.
- Colorful Bats: Instead of black, use a variety of colors for a cheerful and festive look. Think purple, orange, or even sparkles!
- Seasonal Themes: Change the decorations to match other holidays! Use lighter colors for spring or add Santa hats for Christmas!
Serving Suggestions
- Casual Display: Hang your Toilet Paper Roll Bats above a festive table for a playful centerpiece.
- Pair with Treats: Serve with Halloween-themed snacks like popcorn balls or spooky cookies to complete the vibe.
- Drink Ideas: Offer punch or spooky-looking drinks that match the Halloween theme, like spooky slime punch!
- DIY Craft Stations: Set up a crafting station for guests to create their own bat decorations during a party.
FAQs about Toilet Paper Roll Bats
Can I use materials other than toilet paper rolls? Yes, you can! Paper towel rolls, cardboard tubes, or even old plastic bottles work just as well. The key is to have a stable base for your bats.
How long does it take to make these bats? The total crafting time for Toilet Paper Roll Bats is about 15 minutes. It’s a quick and enjoyable project, perfect for busy families!
What age group is this craft suitable for? This craft is ideal for children aged 5 and up. Younger kids might need assistance with scissors, but they can definitely enjoy painting and assembling with a little help.
Can I store these bats for future use? Absolutely! You can keep your crafted bats in a box or bag. They’re easy to pull out every Halloween for decorations.
Are these bats safe for young children? While the materials are generally safe, always supervise young kids during crafting, especially when scissors and glue are involved. Have fun while ensuring everyone stays safe!
Final Thoughts
Creating these Toilet Paper Roll Bats isn’t just about crafting; it’s about cherishing moments together as a family. As the laughter fills your home and creativity flourishes, you’ll find joy in even the simplest tasks. These little bats can spark an entire Halloween tradition, making memories that linger long after the season’s over. Plus, you’ll feel good knowing you recycled! So, grab those materials and let your imagination take flight. Celebrate this spooky season with love, laughter, and a fluttering array of bats bringing charm to your home!
Print
Toilet Paper Roll Bats: Craft Fun for Halloween Decor!
- Total Time: 15 minutes
- Yield: Various bat decorations
- Diet: Vegan
Description
A fun and eco-friendly craft for Halloween using recycled toilet paper rolls to create cute bat decorations.
Ingredients
- Toilet paper rolls
- Black paint or black paper
- Scissors
- Googly eyes
- Glue
- String
Instructions
- Paint or wrap the roll in black paper.
- Cut bat wings from black paper and glue them to the sides.
- Stick on googly eyes and draw a smile—or fangs—for personality.
- Hang upside down with string.
Notes
- This craft is great for recycling efforts.
- Kids can create a bat family to decorate the house.
- It’s a simple and engaging project for Halloween.
- Prep Time: 15 minutes
- Cook Time: None
- Category: Craft
- Method: DIY
- Cuisine: N/A
Nutrition
- Serving Size: N/A
- Calories: N/A
- Sugar: N/A
- Sodium: N/A
- Fat: N/A
- Saturated Fat: N/A
- Unsaturated Fat: N/A
- Trans Fat: N/A
- Carbohydrates: N/A
- Fiber: N/A
- Protein: N/A
- Cholesterol: N/A