4th of July Charcuterie Board

Introduction to 4th of July Charcuterie Board
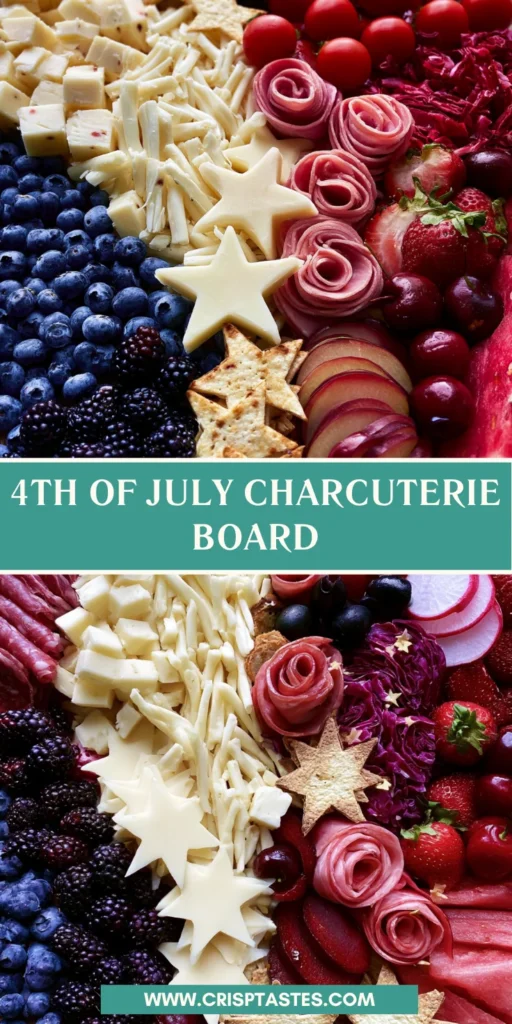
As the 4th of July approaches, the excitement in the air is palpable! I love bringing people together to celebrate with delicious food, and this 4th of July Charcuterie Board does just that. It’s colorful and festive, making it perfect for the occasion. Plus, it’s a no-cook solution that can be put together in no time, which is just what busy moms like me need! Imagine the smiles on your loved ones’ faces as they dig into this delightful platter. It’s truly a feast for the eyes and the taste buds!
Why You’ll Love This 4th of July Charcuterie Board
This 4th of July Charcuterie Board is a hit for busy moms and professionals alike! It’s quick to assemble, letting you focus on the fun rather than the fuss. Plus, it’s incredibly versatile—fill it with sweet fruits and savory delights that everyone will adore. The colorful presentation wins hearts every time, making it an impressive centerpiece for your Independence Day celebration. Celebrate with flavors that are as vibrant as the holiday itself!
Ingredients for 4th of July Charcuterie Board
To create the perfect 4th of July Charcuterie Board, gather these delightful ingredients that will pack a punch of flavor and color:
- White cheddar cheese: Creamy and sharp, it adds a delicious kick. Cubed for easy snacking.
- Mozzarella string cheese: Melty goodness! Shredded or left whole for the kids to pull apart.
- Bruschette mini toasts: Crunchy bites that serve as a perfect base for toppings.
- Cherry tomatoes: Juicy and sweet, these add vibrant red pops and refreshing flavor.
- Red radish: These crisp slices offer a peppery crunch that balances the sweetness.
- Pitted black olives: Savory and briny, they offer a bold flavor contrast on the board.
- Red cabbage: Both crunchy and colorful, it adds texture and a splash of deep color.
- Ham: Savory slices rolled into rosettes; they add a delightful meaty touch.
- Swiss cheese: Sliced into star shapes, it adds fun and a nutty flavor.
- Blueberries: Tiny bursts of sweetness that are both visually appealing and healthy.
- Strawberries: Bright red and luscious; they serve as a classic summer favorite.
- Blackberries: Sweet, dark berries that complement the other fruits beautifully.
- Cherries: Juicy and sweet, these add an indulgent treat on the board.
- Plums: Sliced for a sweet-tart balance that enhances the overall flavor palette.
- Watermelon: Refreshingly sweet and hydrating; it’s perfect for summertime snacking.
- Tortillas: Cut into stars; these add a playful touch and can be used for dipping!
For exact quantities, check the bottom of the article, where all measurements are available for printing. Feel free to customize this board with your favorite ingredients! Use whatever fruits and cheeses are in season or what your family loves best. The key is to keep it colorful and fun!
How to Make 4th of July Charcuterie Board
Crafting your 4th of July Charcuterie Board is a joyous experience full of vivid colors and delightful flavors! Follow these steps for a stunning assembly that will wow your guests.
Step 1: Prepare the Ingredients
Before diving into the fun of assembly, let’s prep all those delicious goodies!
Wash and dry your fruits and vegetables gently. I love to do this part in the early morning sun, when they glisten, showcasing their freshness.
For the olives, drain them well and pat dry. No one wants soggy olives on their board! Next, roll your ham slices into delightful rosettes—this simple twist adds elegance.
Keep your produce cuts fresh by slicing them just before you start. It ensures those juicy bursts are at their best!
Step 2: Create the Red Section
Now, let’s build the vibrant red section on the right side of your board. Start with the larger ingredients like cherry tomatoes and radishes.
Layer these big beauties first, and then sprinkle in smaller elements like blueberries among them. The visual curiosity of shapes and sizes adds depth!
For a playful touch, consider placing cheese stars on top of these ingredients. They not only elevate the taste but also create a festive vibe!
Step 3: Layer the White Ingredients
Moving on! It’s time to arrange the striking white ingredients.
Alternate your cheeses and tortillas, staggering their heights for eye-catching layers. The star-shaped tortillas will grab your attention and spark conversation, turning functional food into art!
Remember, the goal is to keep it inviting. Each layer should invite another nibble, making it hard for anyone to resist this board.
Step 4: Assemble the Blue Section
Across from the red section, it’s time to create the beautiful blue area. Blueberries are a must—pack them in tightly to form a solid section of rich blue.
Interspersing white elements here will create a delightful contrast. Position small toasts or mozzarella among the blueberries for a visually delightful display.
As the colors blend, I love watching the look of awe on the faces of my friends. It’s the magic of creativity at its best!
Step 5: Final Touches for the 4th of July Charcuterie Board
Almost done! Take a step back and check your masterpiece for any gaps.
Fill those spaces with upright radishes or cornichons to keep it lively. Adding height makes everything feel fresh and inviting.
Finally, sprinkle more cheese stars across your creation like confetti. It’s the final festive touch to make your 4th of July Charcuterie Board shine!
Tips for Success
- Prep ingredients just before assembly for peak freshness.
- Get creative with shapes! Use cookie cutters for fun designs.
- Mix textures—combine crunchy, creamy, and juicy items for variety.
- Use a large board or platter for ample space to arrange ingredients.
- Encourage guests to mix and match flavors for their unique bites!
Equipment Needed
- Serving board or platter: A large wooden or marble board works beautifully. A large tray can also do the job!
- Knife: To slice fruits, veggies, and cheeses for easy serving.
- Small bowls: Great for holding olives and other small items.
- Cookie cutters: Use for fun shapes like stars in the cheese or tortillas.
Variations
- Cheese Variations: Swap out cheddar and Swiss for goat cheese or feta for a tangy twist on flavor.
- Meat Options: Try using turkey or cooked bacon for a different savory taste.
- Fruit Alternatives: Substitute peaches or pineapple for a tropical flare that’s perfect for summer.
- Gluten-Free: Use gluten-free crackers or veggie sticks instead of mini toasts if needed.
- Vegan Version: Replace dairy with plant-based cheeses, and add extra nuts and seeds for crunch!
Serving Suggestions
- Pair your 4th of July Charcuterie Board with refreshing lemonade or iced tea for a festive drink option.
- Set out festive napkins and plates to enhance the holiday spirit.
- Consider adding a small flag or two for a charming touch of patriotism.
- Serve with a side of dips like hummus or ranch for extra flavor.
FAQs about 4th of July Charcuterie Board
Can I prepare the 4th of July Charcuterie Board the day before?
While it’s best to assemble your 4th of July Charcuterie Board close to serving time, you can prep the ingredients in advance. Chop your fruits and veggies the night before and store them in the fridge. Just remember to layer them on the board right before the celebration!
What types of cheeses work best for a charcuterie board?
Any cheese you love can work! For a well-rounded board, consider incorporating a mix of soft, hard, and blue cheeses. Cheddar, brie, and gouda are popular choices that pair wonderfully with the sweet and savory elements on your board.
How can I make my charcuterie board vegetarian-friendly?
No worries! The 4th of July Charcuterie Board can easily be vegetarian. Simply leave off any meat options and add more plant-friendly protein like roasted nuts or chickpeas. Extra veggies and dips can also elevate the board’s appeal without meat.
What are some great dips to accompany my charcuterie board?
Dips are a fantastic addition! Consider offering hummus, tzatziki, or a savory cheese spread alongside your beautiful display. They provide options for different flavor profiles that complement your board well.
How do I store leftovers from the charcuterie board?
If you have any leftovers, store them in airtight containers. Cheese and fruits can typically last for a few days in the fridge, but it’s always best to enjoy your 4th of July Charcuterie Board fresh to savor the vibrant flavors!
Final Thoughts
Creating a 4th of July Charcuterie Board is like crafting a delicious work of art! It embodies the joy of summer gatherings and the spirit of celebration. As everyone laughs, chats, and indulges in the vibrant flavors, you’ll find the true essence of togetherness. The freedom to mix and match treats allows each person to create their unique flavor experience. Watching those smiles light up as they dive into your colorful creation will bring you immense joy. This board isn’t just food—it’s a centerpiece that fosters connection and creates lasting memories. Happy Independence Day!
Print
4th of July Charcuterie Board
- Total Time: 20 minutes
- Yield: Serves 8–10 1x
- Diet: Vegetarian
Description
A festive and colorful 4th of July Charcuterie Board that combines sweet and savory treats, perfect for celebrating Independence Day.
Ingredients
- 1 cup white cheddar cheese, cubed
- 1/2 cup mozzarella string cheese sticks, shredded
- 1/2 cup Bruschette mini toasts
- 1 cup cherry tomatoes
- 1/2 cup red radish, sliced
- 1/2 cup pitted black olives, drained
- 1/2 cup red cabbage, sliced
- 8 slices ham
- 7 Swiss cheese slices, cut into stars
- 1 cup blueberries
- 1 cup strawberries
- 1 cup blackberries
- 1 cup cherries
- 3 plums, sliced
- 1/4 watermelon, sliced
- 5 tortillas, toasted, cut into stars
Instructions
- Wash and dry all the fruits, drain and pat the olives dry, and roll the ham into rosettes. Slice the produce right before assembling to keep it fresh.
- Build the red section on the right side of the board, starting with the largest ingredients and layering smaller items around them. Arrange creatively with sweet and savory elements interspersed. Add cheese stars on top of the food items.
- Add the white elements, staggering the heights of cheese and tortilla stars to create a layered appearance.
- Build the blue section on the opposite side of the red section, packing ingredients tightly to achieve solid blue and red sections when viewed from above. Use white ingredients, such as mini toasts, to bridge the red and blue zones.
- Check for any remaining gaps on the platter and fill them in for a full red, white, and blue presentation. Arrange fillers upright for added height and visual interest, then scatter more stars across the board.
Notes
- Assemble the board close to serving time for maximum freshness.
- Feel free to substitute ingredients based on preference or availability.
- Consider providing small labels for each section to enhance presentation.
- Prep Time: 20 minutes
- Cook Time: 0 minutes
- Category: Appetizer
- Method: No-cook
- Cuisine: American
Nutrition
- Serving Size: 1 serving
- Calories: 250
- Sugar: 14g
- Sodium: 500mg
- Fat: 15g
- Saturated Fat: 6g
- Unsaturated Fat: 4g
- Trans Fat: 0g
- Carbohydrates: 20g
- Fiber: 4g
- Protein: 10g
- Cholesterol: 25mg