Banana Split Poke Cake

Introduction to Banana Split Poke Cake
Welcome to a delightful culinary adventure! Today, I’m thrilled to share my recipe for the Banana Split Poke Cake. If you’re like me, juggling a busy schedule yet wanting to create something truly special for your family, this dessert is a lifesaver. It’s an indulgent treat that’s surprisingly easy to whip up, making it perfect for busy moms and professionals. Imagine your loved ones’ faces lighting up as they dive into layers of creamy banana goodness. This cake is not just dessert; it’s a sweet way to show you care!
Why You’ll Love This Banana Split Poke Cake
This Banana Split Poke Cake is not just delicious; it’s a breeze to make! With minimal prep time and no fancy techniques, even the busiest of moms can pull it off. Each bite offers a delightful blend of flavors and textures, from silky banana pudding to crunchy toppings. Plus, it’s an impressive dessert that’s sure to wow guests at family gatherings and celebrations. Who wouldn’t love a cake that tastes like summer in every slice?
Ingredients for Banana Split Poke Cake
Gathering the right ingredients is just as fun as baking the cake itself. For this Banana Split Poke Cake, you will need some key players:
- Crushed pineapple: Use an 8 oz can, well-drained. Pineapple adds a tropical twist and moisture to the cake.
- Banana pudding mix: You’ll need two 3.4 oz boxes of instant mix. This enhances the banana flavor and creates that creamy texture we all love.
- Cold milk: Three cups are required to make that pudding smooth and delicious. Whole milk works best but feel free to choose your preferred type.
- Whipped topping: An 8 oz tub of thawed whipped topping adds a light, fluffy touch to our cake.
- Bananas: You’ll need two sliced ones. Fresh bananas provide a burst of flavor that truly embodies the classic banana split.
- Hot fudge sauce: A generous half-cup of this sweet sauce brings indulgence and pairs perfectly with the banana flavors.
- Chopped walnuts: A half-cup gives a delightful crunch. You can swap with pecans if you’re feeling adventurous!
- Crushed waffle cone pieces: Another half-cup for extra crunch and a nostalgic touch, reminiscent of ice cream treats.
- Maraschino cherries: A half-cup, of course! These little gems are the cherry on top of your cake’s presentation.
You can find these ingredients easily at your local grocery store, or substitute them based on your preferences. For instance, if you’re looking to reduce sugar, try a sugar-free pudding mix or lighter whipped topping. My detailed ingredient list with exact measurements is at the bottom of the article, available for easy printing!
How to Make Banana Split Poke Cake
Step 1: Prepare the Cake
First, it’s time to bake the cake! Preheat your oven according to the cake mix instructions. I usually use a 9×13-inch pan for easy serving. Pour the cake batter into the prepared pan and bake until golden and a toothpick comes out clean. This usually takes about 25 minutes. When it’s done, take it out and let it cool for 10-15 minutes. Just don’t leave it too long; we want it still warm when we poke those holes. Cooling your cake is crucial, as it allows our pudding to seep in nicely.
Step 2: Poke Holes in the Cake
Now for the fun part! Once cooled, grab the handle of a wooden spoon and gently poke holes all over the top of the cake. The holes should be about 1 inch apart. This step is essential because it allows the banana pudding to absorb into the cake, making every bite a delightful explosion of flavor. You want to be a bit generous with those holes to ensure maximum pudding goodness!
Step 3: Make the Banana Pudding Mixture
Let’s whip up that banana pudding! In a large mixing bowl, combine the banana pudding mix with the cold milk. Using a whisk, mix until the pudding thickens slightly but is still pourable — it should take about 2 minutes. Be sure to give it a good mix to avoid lumps. This mixture is the heart of our Banana Split Poke Cake, so you want it silky and smooth. If you’re feeling fancy, let it sit for a minute. This resting time allows flavors to meld together beautifully!
Step 4: Fill the Cake with Pudding
Now it’s time to infuse our cake with deliciousness! Carefully pour the prepared banana pudding into the holes. Move quickly here, so the pudding doesn’t set before you have a chance to fill those holes. Use a spatula to spread it around if needed, ensuring it fills every nook and cranny. This step transforms a simple cake into a moist pudding cake that will keep everyone coming back for seconds!
Step 5: Add the Whipped Topping
Next, let’s add some fluff! Gently spread the thawed whipped topping over the entire surface of the cake. Don’t rush this part; use a spatula to create an even layer. The whipped topping not only adds sweetness but also everything necessary to balance the richness of the banana pudding. Plus, it gives our cake a lovely, dreamy finish, just like a classic banana split!
Step 6: Add the Toppings
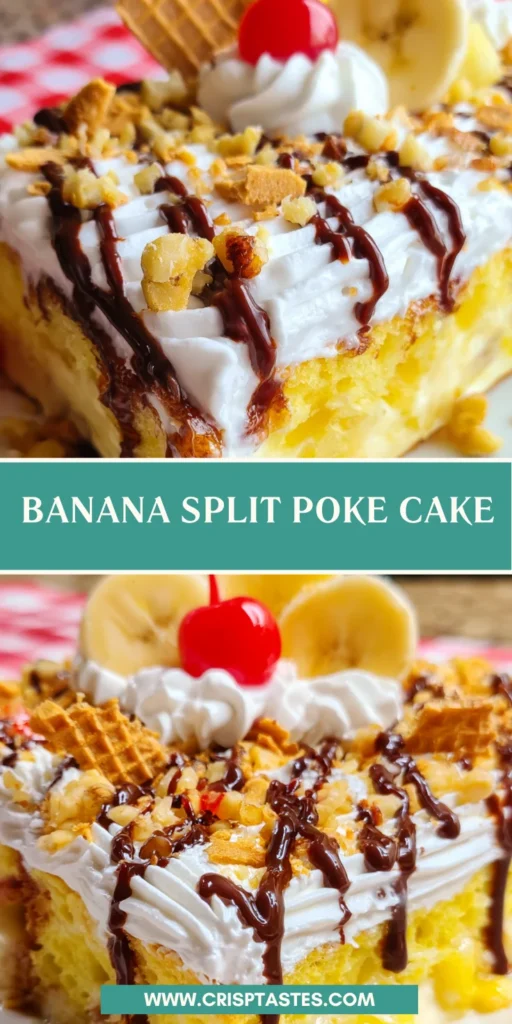
Now, time to dress it up! Drizzle hot fudge sauce over the topped cake, letting it snake its way across the surface. Then, sprinkle your chopped walnuts and crushed waffle cone pieces for that delightful crunch. Finish with those maraschino cherries, like cherry jewels atop a crown! Each layer adds a uniquely delicious texture, making every bite a delicious adventure that harkens back to our favorite summertime treat.
Step 7: Chill the Cake
This step is key for flavor melding. Cover your cake gently with foil or plastic wrap and pop it into the fridge for at least 2 hours. If you have the time, letting it chill overnight works wonders! This allows the cake to set and soak up all those yummy flavors together, creating a masterpiece worthy of any gathering.
Step 8: Serve the Cake
Finally, it’s time to indulge! When ready to serve, cut the cake into squares using a sharp knife. I like to place a slice on a plate and then top it with a few extra banana slices for a pop of color. Present it with some additional cherries as a finishing touch. Your loved ones won’t just see a cake; they’ll see love and care baked into every slice!
Tips for Success
- Ensure the pineapple is well-drained to prevent excess moisture.
- Use a gentle hand when poking holes; you want to create space for pudding, not tear the cake.
- Allow the cake to cool sufficiently before adding pudding.
- Experiment with toppings based on your family’s preferences—there’s no wrong way!
- For a twist, try adding different fruits like strawberries or blueberries.
Equipment Needed
- 9×13-inch baking pan: You can also use a glass dish if you don’t have a metal pan.
- Mixing bowls: One large bowl for the pudding and a smaller bowl for mixing other ingredients.
- Whisk: A fork can work in a pinch for mixing the pudding.
- Spatula: Helps with spreading whipped topping evenly.
- Wooden spoon: Perfect for poking holes in the cake!
Variations of Banana Split Poke Cake
- Chocolate Lovers: Swap the banana pudding for chocolate pudding mix for a decadent twist that chocolate fans will adore!
- Fruit Fiesta: Mix in other fruits, like strawberries or blueberries, for a colorful, fruity twist on the classic recipe.
- Nut-Free Option: Omit the walnuts (or any nuts) to make this a nut-free dessert that everyone can enjoy.
- Gluten-Free Version: Use a gluten-free cake mix along with gluten-free crushed waffle cones to keep it friendly for those with dietary restrictions.
- Healthier Alternative: Substitute a sugar-free pudding mix and light whipped topping to create a lower-calorie treat without sacrificing too much flavor.
- Peanut Butter Delight: Drizzle some peanut butter sauce on top alongside hot fudge for an extra layer of creamy goodness.
Serving Suggestions for Banana Split Poke Cake
- Pair with a scoop of vanilla ice cream for an indulgent treat.
- Serve alongside fresh strawberries or raspberries to brighten the plate.
- Top with extra whipped cream and a sprinkle of crushed nuts for added flair.
- Drizzle chocolate sauce over each slice for a touch of elegance.
- Accompany with a chilled glass of milk or a fruity soda for a fun twist.
FAQs about Banana Split Poke Cake
Got questions about making this delightful Banana Split Poke Cake? You’re not alone! Here are some common inquiries and my answers to help you along your baking journey:
Can I use fresh bananas instead of pudding for banana flavor?
While fresh bananas add texture and flavor, the banana pudding mix gives that creamy consistency. I recommend sticking with both for the best results!
How long will the Banana Split Poke Cake last in the fridge?
This cake can stay fresh for up to three days in the refrigerator. Just make sure it’s properly covered. Trust me; it won’t last long with how delicious it is!
Can I prepare the cake ahead of time?
Absolutely! You can bake the cake and poke the holes the day before, allowing it to chill overnight. Just add the toppings right before serving for that fresh, delightful crunch!
What if I don’t have hot fudge sauce?
If you’re out of hot fudge, chocolate syrup works as a great alternative! It’ll still provide that luscious, chocolaty finish you crave.
Is this dessert kid-friendly?
Yes, indeed! Kids love the fun combination of flavors and textures. Just be ready for them to ask for seconds!
Final Thoughts
This Banana Split Poke Cake is more than just a dessert; it’s a cherished way to bring joy to your family gatherings and celebrations. Each layered bite transports you back to sweet summer memories, filled with laughter and the carefree vibes of ice cream shops.
I hope you find joy in every step of making it, from the soothing whisking of pudding to watching your loved ones delight in each slice. This recipe is bound to become a beloved favorite in your home, just as it has in mine. Happy baking, and enjoy those precious moments with every forkful!
Print
Banana Split Poke Cake
- Total Time: 2 hours 45 minutes (including chilling time)
- Yield: 12 servings 1x
- Diet: Vegetarian
Description
A delicious and creamy banana split poke cake that combines layers of banana pudding, whipped topping, and a variety of delicious toppings.
Ingredients
- 8 oz can crushed pineapple, well drained (reserve 2 tablespoons juice)
- 2 each 3.4 oz boxes instant banana pudding mix
- 3 cups cold milk
- 1 tub 8 oz whipped topping, thawed
- 2 bananas, sliced
- ½ cup hot fudge sauce
- ½ cup chopped walnuts
- ½ cup crushed waffle cone pieces
- ½ cup maraschino cherries, drained
Instructions
- Let the cake cool for about 10-15 minutes, then use the handle of a wooden spoon to poke holes all over the cake.
- In a large bowl, whisk together the banana pudding mix and cold milk until slightly thickened but still pourable.
- Immediately pour the pudding into the holes.
- Let the pudding set for a few minutes, then spread the whipped topping evenly over the cake.
- Drizzle the hot fudge sauce over the top.
- Sprinkle the chopped walnuts and crushed waffle cone pieces evenly over the cake.
- Top with maraschino cherries.
- Refrigerate the cake for at least 2 hours to allow it to fully set.
- Slice and serve chilled.
- Just before serving, slice the bananas and arrange them evenly over the top of the cake.
Notes
- Make sure to drain the pineapple well to avoid excess moisture in the cake.
- Feel free to customize the toppings to your preference!
- Prep Time: 20 minutes
- Cook Time: 25 minutes
- Category: Dessert
- Method: Baking
- Cuisine: American
Nutrition
- Serving Size: 1 slice
- Calories: 350
- Sugar: 20g
- Sodium: 150mg
- Fat: 15g
- Saturated Fat: 5g
- Unsaturated Fat: 10g
- Trans Fat: 0g
- Carbohydrates: 55g
- Fiber: 2g
- Protein: 4g
- Cholesterol: 30mg