Buttermilk Pecan Pralines: Discover the Sweet Secret!

Introduction to Buttermilk Pecan Pralines
Ah, the first bite of a Buttermilk Pecan Praline is like a warm hug on a chilly day! As a busy mom and home cook, I know how precious those little indulgent moments can be. These delightful candies are not only creamy and sweet but also incredibly easy to whip up. Whether you’re needing a quick dessert for last-minute guests or just treating yourself after a long day, this recipe has you covered. With their rich flavor and delightful crunch, Buttermilk Pecan Pralines are the perfect way to bring a little joy into your day!
Why You’ll Love This Buttermilk Pecan Pralines
These Buttermilk Pecan Pralines are a true lifesaver in my kitchen! They come together in no time, making them an ideal treat for those busy afternoons. With just a handful of ingredients, you can create something that tastes incredibly indulgent without breaking a sweat. Plus, the nutty crunch paired with that creamy sweetness will leave everyone asking for more. Trust me, these pralines are sure to be a hit—easy, quick, and oh-so-delicious!
Ingredients for Buttermilk Pecan Pralines
To create those luscious Buttermilk Pecan Pralines, you’ll need a few simple ingredients that you might already have on hand. Here’s what to gather:
- Buttermilk: The star of the show! It gives these pralines their creamy texture and rich flavor. If you don’t have any, you can make a quick substitute by mixing milk with vinegar or lemon juice.
- Granulated Sugar: This sweet component helps create that delightful candy-like consistency. It’s crucial for achieving the perfect sweetness without being overpowering.
- Light Corn Syrup: This ingredient helps prevent the sugar from crystallizing. It also adds a lovely sheen to your pralines. If you’d like a healthier option, you might use honey instead, though the flavor will slightly change.
- Baking Soda: A little pinch goes a long way! It reacts with the acid in the buttermilk and causes your mixture to foam, lending a lightness to the texture.
- Salt: Just a touch is needed here to balance the sweetness and enhance the flavors. Trust me, it makes a world of difference!
- Pecan Halves: These nuts are the crunchy goodness in your pralines. Fresh pecans bring depth to the flavor; try to buy them in whole form for pretty presentation!
- Vanilla Extract: A splash of this aromatic liquid adds a warm note that complements the creaminess perfectly. Feel free to use pure vanilla for the best flavor.
- Butter: A tablespoon of this golden goodness adds richness and helps create a smooth texture. You can substitute with coconut oil for a dairy-free version, if needed.
For the precise measurements of each ingredient, check out the bottom of the article where I’ve included everything for easy printing!
How to Make Buttermilk Pecan Pralines
Let’s dive into creating these mouth-watering Buttermilk Pecan Pralines! This step-by-step guide will walk you through each part of the process. Ready? Grab your apron because we’re about to roll up our sleeves!
Step 1: Prepare Your Workspace
First things first, let’s get organized! Line two large baking sheets with waxed paper. This will be your designated cooling area for those sweet pralines. Having your space ready makes the whole process smoother.
Step 2: Combine and Boil Ingredients
In a large pot (a 5-quart or bigger works best), add buttermilk, granulated sugar, light corn syrup, baking soda, and salt.
Place the pot over medium heat and bring the mixture to a boil. Remember, it’s essential to stir continuously to dissolve the sugar and create a smooth blend. This is where the magic happens. Watch closely as it heats up!
Step 3: Stir and Monitor Temperature
As your mixture heats, it will start bubbling vigorously. Keep stirring to prevent any sticking or burning. Use a candy thermometer for a precise measurement; you’re looking for it to reach 236°F. This is the “soft ball” stage, and it’s crucial for that perfect candy texture.
Step 4: Mix in Pecans and Flavorings
Once you’ve reached the desired temperature, remove the pot from the heat. This is the fun part—stir in the pecan halves, vanilla extract, and butter. The mix will transform as you incorporate these delicious flavors.
Keep stirring until it thickens up a bit. You want it to hold its shape while still being creamy. This can take a little effort, but it’s so worth it!
Step 5: Beat and Drop Mixture
Now it’s time to beat the mixture by hand until it’s thickened. Take a moment to channel your inner arm wrestler! When it reaches a thick, creamy consistency, it’s ready to drop by spoonfuls onto your prepared waxed paper.
Step 6: Allow to Cool and Store
Let the pralines cool completely on the waxed paper. Once they’ve set up nicely, store them in airtight containers. You can keep these tasty treats for up to two weeks, if they last that long!
Tips for Success
- Always stir continuously while boiling to prevent any burning.
- Keep an eye on the mixture as it heats up; it can foam and overflow quickly.
- Use fresh, high-quality pecans for the best flavor and crunch.
- If the mixture gets too thick, a quick spin in the microwave can soften it for easier handling.
- Don’t worry about perfection—each praline has its unique charm!
Equipment Needed
- Large Pot: A heavy-bottom pot (5-quart or larger) for even heating. If you don’t have one, a deep saucepan can work too.
- Candy Thermometer: Essential for monitoring temperature. If you don’t have one, you can use the cold-water test as an alternative.
- Wooden Spoon: Perfect for stirring. A silicone spatula can also be a great choice!
- Baking Sheets: Use large baking sheets lined with waxed paper. Alternatively, parchment paper works just as well.
Variations
- Chocolate Drizzle: Melt some chocolate and drizzle it over the cooled pralines for an extra layer of sweetness.
- Spiced Pralines: Add a pinch of cinnamon or nutmeg to the mixture for a warm, spiced flavor that complements the pecans beautifully.
- Maple Flavoring: Substitute some of the vanilla extract with pure maple extract for a delightful twist in flavor.
- Nut Alternatives: Switch out pecans for walnuts, hazelnuts, or even almonds for a different taste and texture.
- Dairy-Free Option: Use coconut milk in place of buttermilk and replace butter with coconut oil for a vegan version of these pralines.
Serving Suggestions for Buttermilk Pecan Pralines
- Pair pralines with a hot cup of coffee or a creamy latte for a delightful afternoon treat.
- Serve on a decorative platter for special occasions, drizzled with chocolate for extra flair.
- Include them as a sweet surprise in gift baskets alongside homemade cookies and jams.
- For a festive touch, serve with a scoop of vanilla ice cream on top!
FAQs about Buttermilk Pecan Pralines
It’s totally normal to have questions while making Buttermilk Pecan Pralines! Here are some answers to help you out:
Can I use other nuts instead of pecans?
Absolutely! While pecans offer a unique flavor, walnuts or almonds can work just as wonderfully. Just make sure to toast them lightly for extra flavor!
What if my pralines don’t set properly?
Don’t worry! If your pralines are too soft, you can reheat the mixture gently and bring it back to the soft ball stage (236°F) before dropping spoonfuls again.
How long do Buttermilk Pecan Pralines last?
When stored in an airtight container, they can last up to two weeks. I bet they won’t last that long, though—everyone loves them!
Can I make these pralines ahead of time?
Definitely! Making them ahead of time is a great idea. Just be sure to store them properly, and they’ll be ready for any occasion!
How can I make my pralines more festive?
Consider adding a chocolate drizzle or even rolling them in crushed graham crackers or sprinkles before they set. It adds a fun touch!
Final Thoughts
Making Buttermilk Pecan Pralines isn’t just about creating a delicious treat; it’s about the joy that fills your kitchen and the smiles you bring to your loved ones. The sweet aroma, the creamy texture, and that delightful crunch come together to create your own little piece of heaven. Every batch offers the chance to connect with those you care about, adding a sprinkle of happiness to everyday moments. So go ahead, savor these delightful pralines, and relish the memories they create. Trust me, they’re more than just candy—they’re pure love in every bite!
Print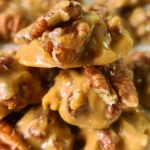
Buttermilk Pecan Pralines
- Total Time: 35 minutes
- Yield: Approximately 24 pralines 1x
- Diet: Vegetarian
Description
Delicious and creamy Buttermilk Pecan Pralines with a sweet and nutty flavor.
Ingredients
- 1 cup buttermilk
- 3 cups granulated sugar
- 3/4 cup light corn syrup
- 1 tsp baking soda
- 1/4 tsp salt
- 2 cups pecan halves
- 2 tsp vanilla extract
- 1 tbsp butter
Instructions
- Line 2 large baking sheets with waxed paper and set aside.
- In a large (5 qt or larger) pot, bring the buttermilk, sugar, corn syrup, baking soda and salt to a boil over medium heat.
- Stir continuously until the sugar has dissolved and the mixture reaches 236F (soft ball stage).
- Note that the baking soda causes the mixture to foam and rise as it begins to boil so be careful.
- Once the mixture has reached the softball stage, remove from heat and stir in pecans, vanilla, and butter.
- Beat by hand until the mixture begins to hold its own shape. It will be thick and creamy. This can take a while.
- Once the mixture thickens, quickly drop by spoonfuls onto the waxed paper to let cool.
- Store in airtight containers for up to 2 weeks.
Notes
- Ensure to stir continuously to prevent burning.
- Watch closely as the mixture begins to boil to avoid overflowing.
- Use fresh pecans for the best flavor.
- Prep Time: 15 minutes
- Cook Time: 20 minutes
- Category: Dessert
- Method: Boiling
- Cuisine: American
Nutrition
- Serving Size: 1 praline
- Calories: 150
- Sugar: 24g
- Sodium: 30mg
- Fat: 5g
- Saturated Fat: 1g
- Unsaturated Fat: 4g
- Trans Fat: 0g
- Carbohydrates: 25g
- Fiber: 1g
- Protein: 2g
- Cholesterol: 5mg