Cherry Cheesecake Tacos

Introduction to Cherry Cheesecake Tacos
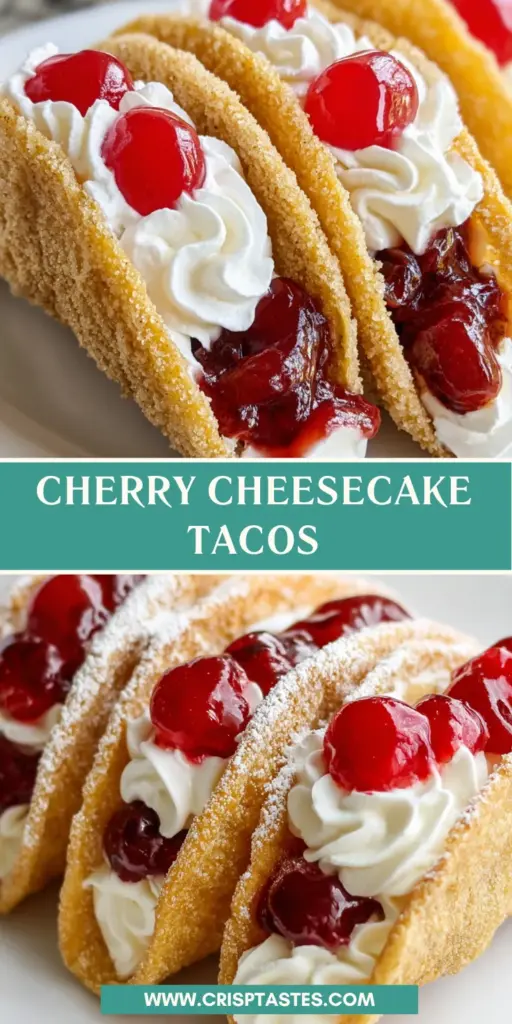
Hey there, fellow food lovers! If you’re anything like me, you’re always on the lookout for delicious ways to brighten your day. That’s where these Cherry Cheesecake Tacos come in! Picture this: creamy cheesecake nestled in crispy taco shells, topped with sweet cherries—it’s a delightful twist on dessert that’s sure to impress. Whether you need a quick treat for a busy weekday or want to shine at a gathering, these tacos are a fun solution. Let’s dive into this sweet adventure together!
Why You’ll Love This Cherry Cheesecake Tacos
These Cherry Cheesecake Tacos are the perfect blend of ease and deliciousness. In just 45 minutes, you can whip up a crowd-pleasing dessert that tastes like a gourmet treat without the hassle. Their creamy filling and crispy shell offer a delightful bite, leaving everyone wanting more. Plus, they’re a hit with kids and adults alike, making them an ideal choice for family gatherings or weekday indulgence.
Ingredients for Cherry Cheesecake Tacos
Gathering the right ingredients is the first step to crafting those delightful Cherry Cheesecake Tacos. Here’s what you’ll need:
- Cream cheese: This is the base of our cheesecake filling, giving it that rich, creamy texture. Softened cream cheese creates a smooth blend without lumps.
- Powdered sugar: Sweetness is crucial! Powdered sugar melts easily into the cream cheese, ensuring a delightful sweetness in every bite.
- Vanilla extract: A splash of this aromatic flavor adds depth to the cheesecake, making it taste extra indulgent.
- Cool Whip: Light and fluffy, this whipped topping adds airiness to the cheesecake filling. You can also use homemade whipped cream if you’re feeling adventurous!
- Cherry pie filling: This is where the magic happens. The sweet, juicy cherries atop our tacos bring a burst of flavor that perfectly complements the creamy filling.
- Street taco-size flour tortillas: These small tortillas are essential for our taco shape. They fry up crispy yet remain tender enough to hold the filling.
- Vegetable oil or shortening: Used for frying, choose your preferred oil. Canola or vegetable oil are great options for frying, while shortening is excellent for a richer taste.
- Granulated sugar: Mixed with cinnamon, this coating enhances the flavor of the crispy shells, making them irresistibly sweet.
- Ground cinnamon: A warm spice that adds cozy flavor, cinnamon perfectly complements the sugar coating and brings a delightful aroma.
Don’t worry about exact measurements just yet; check the bottom of the article for the full details. Now that you know what we’ll be using, we’re ready to dive into the fun part—making these scrumptious tacos!
How to Make Cherry Cheesecake Tacos
Now that we have our ingredients ready, it’s time to bring these Cherry Cheesecake Tacos to life! Follow these simple steps to create a dessert that will have everyone begging for seconds.
Step 1: Preheat the Oil
Before diving into frying, let’s get the oil ready. Preheat your vegetable oil or shortening in a deep stockpot or Dutch oven to 350°F. Use a thermometer to be precise. This temperature ensures that our taco shells turn golden and crispy without absorbing too much oil. If the oil is too cold, the tacos can become soggy. If it’s too hot, they may burn. Patience here pays off!
Step 2: Prepare the Cheesecake Filling
In a medium mixing bowl, beat the softened cream cheese, powdered sugar, and vanilla extract. Whip it until smooth and creamy. This should take about 2-3 minutes. The key to a luscious filling is ensuring that there are no lumps. Gently fold in the Cool Whip for that fluffy texture. Mix until it’s all combined, and this dreamy filling is ready to pipe!
Step 3: Pipe the Filling
To fill our tacos, we need a piping bag or a Ziploc bag with the corner snipped off. If you’re using a piping bag, fit it with a large star tip for a beautiful presentation. Transfer the cheesecake mixture into the bag and keep it in the refrigerator while preparing the shells. Keeping it chilled helps maintain that delightful texture during assembly!
Step 4: Fry the Taco Shells
It’s the exciting part—frying the tortillas! Using long-handled tongs, pinch together two sides of a tortilla to form a taco shape. Submerge it in the hot oil for about 1-2 minutes, keeping that shape intact. You might notice some bubbling—this means we’re doing it right! If the taco starts to unfold, use the tongs to shape it back. Once golden and crispy, remove it and let it drain on a paper towel briefly.
Step 5: Coat with Cinnamon Sugar
While the taco shells are still warm, roll them in a mixture of granulated sugar and ground cinnamon. This sweet, aromatic coating enhances the flavor profile and makes for that irresistible crunch. Make sure to coat both the inside and outside for maximum delight!
Step 6: Assemble the Tacos
Now comes the fun part—assembly! Pipe a generous line of cheesecake filling across the center of each taco shell. Top with 3-4 cherries and a bit of the sweet cherry sauce to create a lovely presentation. For extra flair, consider garnishing with a sprig of mint. Serve these beautiful tacos immediately for a fresh, tasty experience!
Tips for Success
- Always check the oil temperature before frying to ensure the perfect crispy texture.
- Don’t overfill the taco shells; a little goes a long way with the cheesecake filling.
- For an extra pop of flavor, add a splash of almond extract along with the vanilla.
- Keep taco shells warm in the oven on low heat until ready to serve.
- Use fresh cherries when in season for an even more delightful topping.
Equipment Needed for Cherry Cheesecake Tacos
- Deep stockpot or Dutch oven: Essential for frying; a large skillet can work, too.
- Thermometer: Ensures oil is at the right temperature; an instant-read thermometer is perfect.
- Piping bag or Ziploc bag: For filling; a sandwich bag will do if you’re in a pinch.
- Long-handled tongs: Helps shape and fry tacos safely.
- Mixing bowls: Necessary for preparing the cheesecake filling.
Variations of Cherry Cheesecake Tacos
- Berry Medley: Swap out the cherry pie filling for mixed berries. Strawberries, blueberries, and raspberries create a vibrant, tart twist.
- Chocolate Drizzle: After assembly, drizzle melted chocolate over the tacos for an indulgent touch that’s sure to satisfy any sweet tooth.
- Gluten-Free Option: Use gluten-free tortillas to make this dessert safe for those with gluten sensitivities.
- Individual Servings: Instead of tacos, serve the cheesecake filling and cherries in small dessert cups with crushed taco chips on top for a spoonable treat.
- Coconut Bliss: Incorporate shredded coconut into the cheesecake filling for a tropical burst of flavor. Pair it with a pineapple topping for the ultimate island vibe!
Serving Suggestions for Cherry Cheesecake Tacos
- Pair with a scoop of vanilla ice cream for a creamy contrast that balances the flavors perfectly.
- An iced coffee or sweet tea enhances the dessert experience, providing a refreshing sip alongside.
- For presentation, plate the tacos on a colorful dish and sprinkle with additional cherries for a beautiful finish.
FAQs about Cherry Cheesecake Tacos
As you explore the delicious world of Cherry Cheesecake Tacos, you might have a few questions. Let’s tackle some common inquiries to help you on your culinary journey!
Can I make these tacos ahead of time?
While the filling can easily be made ahead of time and stored in the refrigerator, I recommend assembling the tacos right before serving. This keeps the shells crispy and the filling fresh!
How can I store leftover Cherry Cheesecake Tacos?
Store any leftover filling in an airtight container in the refrigerator for up to 3 days. For the taco shells, they’re best eaten fresh but can be kept in a paper towel-lined container for a day or two. Just be aware they may lose their crunch.
Can I switch the fruit topping?
Absolutely! If cherries aren’t your thing, feel free to experiment. You can use other fruits like strawberries or blueberries, or even a mix for a vibrant dessert. Just make sure the filling complements the flavor of your chosen topping!
Are these tacos suitable for special diets?
If you have dietary restrictions, you can easily tailor these tacos. Gluten-free tortillas work well for those avoiding gluten, and you can use dairy alternatives for the filling if needed.
What drinks pair well with Cherry Cheesecake Tacos?
I recommend serving them with a refreshing iced tea or coffee for a great balance. A sweet white wine can also enhance the flavors beautifully, making for a delightful dessert pairing!
Final Thoughts on Enjoying Cherry Cheesecake Tacos
Making Cherry Cheesecake Tacos is not just about satisfying your sweet tooth; it’s about creating memories in the kitchen. From frying those crispy taco shells to biting into the creamy filling, every step is filled with joy. Whether sharing with family or surprising friends, these delightful treats evoke smiles and spark conversations. Each bite is a reminder of how simple ingredients come together to create something extraordinary. So, gather your loved ones, savor the moment, and enjoy this unique dessert that’s sure to become a cherished favorite in your home!
Print
Cherry Cheesecake Tacos
- Total Time: 45 minutes
- Yield: 18 tacos 1x
- Diet: Vegetarian
Description
Cherry Cheesecake Tacos are a delicious twist on the classic dessert, combining creamy cheesecake filling and sweet cherry topping inside crispy, cinnamon-sugar-coated taco shells.
Ingredients
- 1 (8-ounce) package cream cheese, softened
- ⅓ cup powdered sugar
- 2 teaspoons vanilla extract
- 8 ounce tub Cool Whip (frozen whipped topping), thawed
- 1 (21-ounce) can cherry pie filling
- 18 street taco-size flour tortillas
- Vegetable oil or shortening for frying (at least 4 cups)
- 1 cup granulated sugar
- 3 teaspoons ground cinnamon
Instructions
- Preheat the oil to 350°F in a deep stockpot or Dutch oven.
- In a medium mixing bowl, beat together cream cheese, powdered sugar, and vanilla extract until thoroughly combined.
- Add in Cool Whip and continue beating until mixture is smooth and fluffy.
- Transfer mixture to a piping bag fitted with Tip #1M or a gallon-sized Ziploc bag. Set in the refrigerator to stay cold while preparing taco shells.
- When the oil has reached a temperature of precisely 350°F, it’s time to fry the taco shells.
- Using long-handled tongs, pinch together two sides of a tortilla to form a folded taco shape. Holding the sides together, submerge the tortilla into the oil, frying for 1-2 minutes.
- The tortilla will bubble up. If you lose your grip with the tongs, just use them to fold the taco back in half and keep it submerged to brown the inside and outside evenly.
- When the tortilla is lightly browned, remove it from the oil and place it directly in the tray of cinnamon sugar.
- Use a spoon to sprinkle the cinnamon sugar evenly over the tortilla (inside and out) and then set on a paper-towel-lined inverted muffin tin to help the taco shells hold their shape while cooling.
- When taco shells are cooled, pipe a line of cheesecake filling across the center of the taco.
- Top with 3-4 cherries (and sauce) from the can of pie filling.
- Serve immediately.
Notes
- Ensure the oil is at the correct temperature for optimal frying.
- Feel free to adjust the amount of cherries and sauce based on your preference.
- Serve these tacos fresh for the best texture.
- Prep Time: 30 minutes
- Cook Time: 15 minutes
- Category: Dessert
- Method: Frying
- Cuisine: American
Nutrition
- Serving Size: 1 taco
- Calories: 250
- Sugar: 18g
- Sodium: 150mg
- Fat: 11g
- Saturated Fat: 5g
- Unsaturated Fat: 3g
- Trans Fat: 0g
- Carbohydrates: 35g
- Fiber: 1g
- Protein: 3g
- Cholesterol: 30mg