Thick and Chewy Peanut Butter Cookies

Introduction to Thick and Chewy Peanut Butter Cookies
Life gets busy, doesn’t it? Between juggling work, kids, and well-deserved “me time,” it can feel like there’s hardly a moment to pause. That’s why I treasure my Thick and Chewy Peanut Butter Cookies. They’re more than just dessert; they’re a delightful break that transports me back to simpler times. Each bite is a warm hug of nostalgia and comfort. Plus, they’re incredibly easy to whip up and perfect for any occasion! Whether you’re treating yourself after a long day or impressing friends at a gathering, these cookies are sure to bring smiles around your table.
Why You’ll Love This Thick and Chewy Peanut Butter Cookies
These Thick and Chewy Peanut Butter Cookies are a lifesaver for busy bees like us! They mix up in no time, providing instant gratification without any fuss. The sweet, nutty aroma wafting through your kitchen is simply irresistible. Plus, they’re so delightfully chewy that each bite feels like a warm embrace. Whether for family fun or a last-minute treat for guests, you’ll cherish how simple and satisfying they are!
Save this recipe and cook smarter
Keep your favorite recipes in one place, discover easy meal ideas, and plan your week with the free Cooking Layer app.
Free to download • Fast and easy to use
Ingredients for Thick and Chewy Peanut Butter Cookies
Gathering the right ingredients is key to baking perfection! Here’s what you’ll need for these luscious Thick and Chewy Peanut Butter Cookies:
- Unsalted butter: Softened to room temperature; it adds richness and flavor.
- Creamy peanut butter: Stick to traditional varieties for that silky texture. Natural peanut butter can alter the cookie’s consistency.
- Granulated sugar: This is the sweetener that helps achieve a delightful crunch around the edges.
- Brown sugar: Packed brown sugar brings moisture and a deeper flavor, enhancing the chewiness.
- Large egg: Helps bind the ingredients together and contributes to the cookie’s delightful, chewy texture.
- Vanilla extract: A splash of vanilla amplifies the flavors and adds warmth to the baking mix.
- All-purpose flour: The foundation of the cookie, providing structure and a satisfying bite.
- Baking soda: This leavening agent is crucial for achieving that perfect rise and texture.
- Salt: Just a pinch to balance the sweetness and enhance all the yummy flavors.
Feel free to get creative! For example, you can use dark chocolate chunks for an added twist. If you want a nut-free version, consider using sun butter as a substitute. The exact measurements can be found at the bottom of the article for easy reference and printing.
How to Make Thick and Chewy Peanut Butter Cookies
Now that we have our ingredients ready, it’s time to dive into the heart of baking: making those Thick and Chewy Peanut Butter Cookies! Follow these simple steps, and I promise you’ll be rewarded with a batch of cookies that will make your heart sing.
Step 1: Preheat and Prepare
First things first, preheat your oven to 350°F (175°C). This ensures the cookies bake evenly. While it’s heating up, grab a baking sheet and line it with parchment paper. This little trick keeps the cookies from sticking and makes cleanup a breeze. Trust me, you’ll thank yourself later!
Step 2: Cream the Butter and Peanut Butter
In a large bowl, combine the softened unsalted butter and creamy peanut butter. Use a hand mixer or stand mixer to beat them together with the granulated and brown sugars. Mix until the mixture is light and fluffy. This should take about 2 minutes. The batter should lighten in color—a telltale sign of air incorporated into the mixture. This step is crucial for that delightful chewy texture.
Step 3: Combine with Egg and Vanilla
Next, add in the large egg and a splash of vanilla extract. Continue beating until everything is fully combined. The dough should appear smooth and glossy, inviting you to take that first bite. It’s like watching magic happen, right in your kitchen!
Step 4: Mix Dry Ingredients
In a separate bowl, whisk together the all-purpose flour, baking soda, and salt. This ensures an even distribution of the leavening agent. Gradually add this dry mixture to your wet ingredients. Mix on low speed until a thick cookie dough forms, and no flour streaks remain. Don’t worry if it feels a bit stiff; that’s what we want for our chewy cookies!
Step 5: Scoop and Shape the Dough
Now comes the fun part! Take a tablespoon-sized scoop of dough and place it on the prepared baking sheet, keeping them about 2 inches apart. Using a fork, gently press down on each dough ball to create a crisscross pattern. If your fork sticks, you can dip it in a bit of flour or sugar between cookies. This adds a lovely design and enhances the cookie’s texture.
Step 6: Bake to Perfection
Time to pop those cookies in the oven! Bake for 10 to 12 minutes. Keep an eye on them; you want the edges set but the centers to look slightly underbaked. This is your secret to achieving that thick and chewy goodness. Remember, no overbaking! An underbaked cookie is often a perfect cookie in my book.
Step 7: Cooling and Storing
Once baked, let the cookies cool on the baking sheet for about 5 minutes. This helps them set and makes them easier to transfer. After that, move them to a wire rack to cool completely. Want to keep them fresh? Store your cookies in an airtight container at room temperature for up to 5 days. But good luck keeping them around that long!
Tips for Success
- Use room temperature ingredients for easier mixing and better texture.
- Measure flour by spooning it into the cup, leveling it off with a knife for accuracy.
- Don’t skip the cooling time; it helps the cookies firm up perfectly.
- For chewy cookies, avoid overbaking – it’s better to take them out when they look slightly underdone.
- Experiment with add-ins like chocolate chips or nuts for added flavor and texture!
Equipment Needed
- Mixing bowls: A large bowl for wet ingredients and a medium bowl for dry.
- Hand mixer or stand mixer: If you don’t have one, a whisk will work but may take longer!
- Baking sheet: A cookie sheet or a loaf pan can also be used for baking.
- Parchment paper: If unavailable, use a silicone baking mat or grease the baking sheet.
- Measuring cups and spoons: Essential for accuracy; don’t skip these!
Variations
- Nut-Free Option: Substitute creamy peanut butter with sun butter for a nut-free alternative that’s equally delicious.
- Chocolate Lovers: Fold in dark chocolate chips or chunks for a rich chocolate-peanut butter experience.
- Oatmeal Delight: Add ½ cup of rolled oats to the dough for a chewy texture and added flavor.
- Healthier Twist: Swap out half of the granulated sugar with coconut sugar for a lower glycemic index option.
- Spicy Kick: Mix in a pinch of cayenne pepper or cinnamon for a surprisingly delightful flavor contrast.
Serving Suggestions
- Pair these cookies with a tall glass of cold milk for a classic treat.
- Serve warm with a scoop of vanilla ice cream for an indulgent dessert.
- Display them on a colorful plate to brighten up your table.
- Enjoy with a hot cup of coffee or tea for a cozy afternoon snack.
- Wrap a few in cellophane bags for a delightful homemade gift!
FAQs about Thick and Chewy Peanut Butter Cookies
How do I store Thick and Chewy Peanut Butter Cookies?
To keep these cookies fresh, store them in an airtight container at room temperature. They can last for up to 5 days, but I dare you to see how long they truly stick around!
Can I freeze Thick and Chewy Peanut Butter Cookies?
Absolutely! These cookies freeze beautifully. Just place them in a zip-lock bag or airtight container, and you can enjoy them later. They’re great to have on hand for unexpected cravings or surprise guests!
What can I use instead of peanut butter?
If you need a nut-free option, sun butter is a fantastic choice for these Thick and Chewy Peanut Butter Cookies. It maintains that lovely creamy texture, ensuring no one will miss the peanuts!
Why are my cookies too flat?
If your cookies spread too much, it might be due to the butter being too warm. Make sure to cream it just enough until light and fluffy, but don’t let it melt. Also, check that you’re using the correct amounts of flour and baking soda.
Can I make these cookies gluten-free?
Certainly! You can replace the all-purpose flour with a 1:1 gluten-free baking mix. Just ensure that it contains xanthan gum for that perfect chewiness that defines this Thick and Chewy Peanut Butter Cookie experience!
Final Thoughts
Baking these Thick and Chewy Peanut Butter Cookies is not just about enjoying a sweet treat; it’s about creating moments of joy and warmth in your home. As the aroma fills the air, you’ll find yourself lost in memories of laughter and shared stories. Every bite resonates with love, making them perfect for family gatherings or quiet evenings. I hope you find as much happiness in baking these cookies as I do. So gather your ingredients, roll up your sleeves, and let the magic unfold in your kitchen. Enjoy the journey, and happy baking!
Love this recipe?
Save it for later and discover more easy, delicious recipes inside the free Cooking Layer app.
Free to download • Fast and easy to use
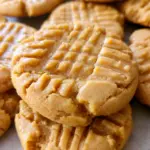
Thick and Chewy Peanut Butter Cookies
- Total Time: 27 minutes
- Yield: 24 cookies 1x
- Diet: Vegetarian
Description
Delicious Thick and Chewy Peanut Butter Cookies that are easy to make and great for any occasion.
Ingredients
- ½ cup unsalted butter, softened
- 1 cup creamy peanut butter (not natural)
- 1 cup granulated sugar
- ½ cup brown sugar, packed
- 1 large egg
- 1 tsp vanilla extract
- 1 ¼ cups all-purpose flour, spooned and leveled
- ½ tsp baking soda
- ¼ tsp salt
Instructions
- Preheat your oven to 350°F (175°C). Line a baking sheet with parchment paper and set aside.
- In a large bowl, beat together the softened butter, peanut butter, granulated sugar, and brown sugar using a hand mixer or stand mixer until light and fluffy, about 2 minutes. The mixture should lighten in color slightly.
- Add the egg and vanilla extract to the butter mixture and beat until fully combined and the dough looks smooth and glossy.
- In a separate medium bowl, whisk together the flour, baking soda, and salt. Gradually add the dry ingredients to the wet mixture and mix on low until a thick cookie dough forms and no flour streaks remain.
- Scoop the dough into tablespoon-sized balls and place them on the prepared baking sheet about 2 inches apart. Use a fork to gently press a crisscross pattern onto the top of each cookie. If the fork sticks, dip it in a little flour or sugar between cookies.
- Bake for 10 to 12 minutes, or until the edges are set and the centers still look slightly underbaked. Do not overbake. Let the cookies cool on the baking sheet for 5 minutes, then transfer to a wire rack to cool completely.
- Enjoy warm for the best chewy texture, or let cool completely and store in an airtight container at room temperature for up to 5 days.
Notes
- For a richer flavor, use freshly ground peanut butter.
- Store cookies in an airtight container to maintain freshness.
- These cookies can be frozen for longer storage.
- Prep Time: 15 minutes
- Cook Time: 12 minutes
- Category: Dessert
- Method: Baking
- Cuisine: American
Nutrition
- Serving Size: 1 cookie
- Calories: 150
- Sugar: 8g
- Sodium: 85mg
- Fat: 7g
- Saturated Fat: 3g
- Unsaturated Fat: 4g
- Trans Fat: 0g
- Carbohydrates: 20g
- Fiber: 1g
- Protein: 3g
- Cholesterol: 15mg