Banana Icebox Cake

Introduction to Banana Icebox Cake
I know how hectic life can get. In the chaos of daily routines, it’s easy to forget to treat ourselves or our loved ones. That’s why I adore making a Banana Icebox Cake! This delightful, no-bake dessert is a breeze to whip up, making it perfect for those days when time feels like a thief. It’s layered with creamy banana goodness and crunchy graham crackers—every bite is a sweet escape. Plus, it requires minimal effort, which means you can spend more time with your family and less time in the kitchen!
Why You’ll Love This Banana Icebox Cake
This Banana Icebox Cake is an absolute dream come true for busy families! It’s incredibly easy to make—just mix, layer, and chill. The flavor? Think sweet, creamy, and utterly satisfying. Plus, there’s no baking involved, which means fewer dishes to clean. It’s a versatile dessert, too—perfect for any occasion, whether it’s a quick weeknight treat or a festive gathering. Your family will be begging for seconds!
Ingredients for Banana Icebox Cake
To create this scrumptious Banana Icebox Cake, you’ll need just a few simple ingredients that you might already have in your pantry. Here’s a quick rundown:
- Instant banana cream pudding mix: This is the star of the show! It brings that rich banana flavor without the hassle of making pudding from scratch.
- Cold milk: Whether you use whole or low-fat, milk is essential for mixing with the pudding. Whole milk, for example, gives a creamier result.
- Whipped topping (Cool Whip): This adds a light and fluffy texture to your cake. You can use any brand you prefer, and homemade whipped cream works too!
- Graham crackers: They provide a crunch that complements the creamy layers. You can opt for honey, cinnamon, or regular graham crackers.
- Fresh banana slices (optional): These not only elevate the flavor but also add a lovely touch of freshness on top. You can use ripe bananas for the best taste!
If you’d like to explore variations or substitutions, feel free to mix things up. Almond milk works well for a dairy-free option, and you can add a dash of vanilla for extra flavor. All the exact measurements for each ingredient are listed at the bottom of the article for your convenience, making it easy to print out!
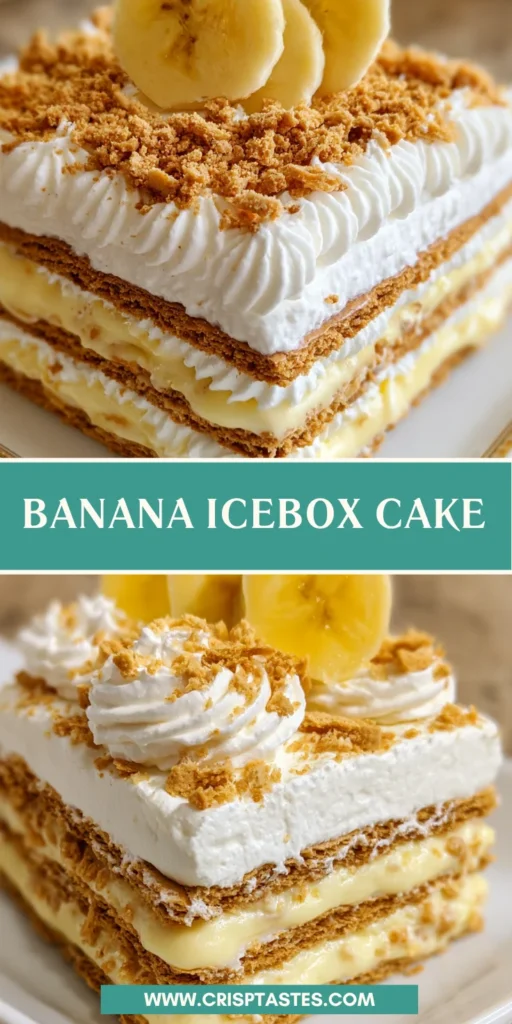
How to Make Banana Icebox Cake
Creating a delicious Banana Icebox Cake is easier than you might think! Follow these simple steps, and soon you’ll have a dessert that’ll have everyone asking for your secret. Let’s dive right in!
Step 1: Prepare the Pudding Mixture
Start by grabbing a large bowl. Here, you’ll mix together two boxes of instant banana cream pudding mix with three cups of cold milk. The key is to whisk them vigorously until everything is smoothly combined. This creates that lusciously creamy base. Trust me, the moment you taste this pudding mixture, you’ll understand why it’s the star of the dish!
Step 2: Fold in Whipped Topping
Next, it’s time to bring in the clouds! Take one container of whipped topping and gently fold it into the pudding mixture. Use a spatula to combine without deflating the fluffy goodness. This lightens the pudding and adds a heavenly texture. If you’ve ever made a cloud float in the sky, then you can handle this step!
Step 3: Layer the Graham Crackers
Now, grab your 9×13-inch baking dish. For the first layer, place about a quarter of the graham crackers at the bottom. You might need to break some to fit perfectly. Think of this layer as the sturdy foundation for your delicious masterpiece. No pressure—just break, layer, and carry on with your sweet creation!
Step 4: Assemble the Layers
Spread one-third of your pudding mixture over the graham crackers, smoothing it out evenly with a spatula. Repeat this layering process two more times. So, graham crackers, pudding, graham crackers, pudding…you get the idea! It’s like building a sweet, creamy tower. The last layer should end with the delicious pudding mixture on top. Your masterpiece is coming together!
Step 5: Final Layering and Refrigeration
For the final touch, place the remaining graham crackers on top. It’s okay if you have a few pieces left over; they can be your little garnish buddies later. Next, spread the last container of whipped topping over it. Make sure to cover it all so no graham crackers peek through. Wrap your dish tightly with plastic wrap and pop it into the fridge for at least six hours—or, preferably, overnight. This chill time lets all the flavors mingle beautifully!
Step 6: Serve with Fresh Bananas
When you’re ready to serve, get those fresh banana slices out! Just before diving in, sprinkle some on top for that extra burst of flavor and a gorgeous presentation. It’s the cherry on top of your banana icebox treat! Enjoy each delightful bite, and watch as your family devours this creamy delight!
Tips for Success
- Make sure to whisk the pudding mixture thoroughly to avoid lumps.
- Using whole milk will enrich the flavor and texture of your cake.
- Feel free to prepare this cake a day in advance for deeper flavors.
- Always cover the dessert well in the refrigerator to maintain freshness.
- For a fun twist, try adding a layer of crushed nuts between layers!
Equipment Needed
- Large mixing bowl: A standard size works, but a bigger one is ideal for whisking.
- Spatula: Use a silicone spatula for folding the whipped topping gently.
- 9×13-inch baking dish: If you don’t have one, any similar-sized dish will suffice.
- Whisk: A hand whisk is perfect, but an electric mixer can save time.
Variations of Banana Icebox Cake
- Chocolate Banana Icebox Cake: Add a layer of chocolate pudding mix for a rich twist on the classic.
- Nutty Delight: Sprinkle crushed walnuts or pecans between the layers for added crunch and flavor.
- Dairy-Free Option: Use coconut milk and dairy-free whipped topping to suit lactose-intolerant friends or family.
- Berry Banana Icebox Cake: Add a layer of fresh raspberries or strawberries for a burst of color and flavor.
- Cinnamon Graham Crackers: Swap regular graham crackers for cinnamon-flavored ones to enhance the dessert’s sweetness.
Serving Suggestions for Banana Icebox Cake
- Pair with a scoop of vanilla ice cream for extra creaminess!
- Serve alongside a refreshing glass of iced tea or lemonade.
- Garnish with a sprinkle of crushed graham crackers for a delightful crunch.
- Top with a drizzle of chocolate sauce for a fancy touch.
- For special occasions, serve on decorative plates with a sprig of mint.
FAQs about Banana Icebox Cake
Can I make Banana Icebox Cake ahead of time?
Absolutely! In fact, making it a day in advance allows the flavors to meld beautifully. Just make sure it’s well covered in the fridge!
How do I store leftovers?
Store any leftover Banana Icebox Cake in an airtight container or tightly covered. It will stay fresh in the refrigerator for up to three days.
Can I use other types of pudding?
Yes! Feel free to get creative! Chocolate, vanilla, or even butterscotch pudding can create tasty variations. Just remember to stick with the same method for layering.
Is this dessert suitable for diets?
While this cake is a delightful treat, it’s not sugar-free or low-calorie. However, you can use substitutes like sugar-free pudding or whipped topping for a lighter version.
What if I don’t like bananas?
No worries! Simply replace the bananas with other fruits like strawberries, peaches, or even blueberries for a fabulous twist on the classic Banana Icebox Cake!
Final Thoughts
Making a Banana Icebox Cake is more than just whipping up a dessert; it’s about savoring life’s simple joys. Each layer of creamy banana goodness brings back fond memories of family gatherings, laughter, and sweet indulgence. I find that this recipe isn’t just a treat for the taste buds but a chance to create lasting memories with those I love. Whether you’re serving it at a picnic or enjoying a quiet evening at home, this delightful no-bake cake is sure to spread smiles all around. So, grab those ingredients, and let the sweet adventure begin!
Print
Banana Icebox Cake
- Total Time: 6 hours 20 minutes
- Yield: 12 servings 1x
- Diet: Vegetarian
Description
A simple and delightful no-bake dessert featuring layers of banana cream and graham crackers.
Ingredients
- 2 (3.4 ounce) boxes instant banana cream pudding mix
- 3 cups cold milk
- 2 (8 ounce) containers whipped topping (Cool Whip)
- 3 sleeves graham crackers
- Fresh banana slices for topping (optional)
Instructions
- In a large bowl, add 2 (3.4 ounce) boxes instant banana cream pudding mix and 3 cups cold milk, whisk until combined.
- Fold in 1 container (8 ounces) of whipped topping. Set aside.
- Place 1/4 of the graham crackers into the bottom of a 9×13-inch baking dish. You may need to break some of the graham crackers up to fit.
- Add ⅓ of the pudding mixture on top and spread it out. Repeat 2 more times.
- Layer the last of the graham crackers on top. You will have a couple of small pieces left over. Keep them for garnish, if desired.
- Spread out the remaining container of whipped topping so none of the graham crackers are exposed. Cover with plastic wrap and place in the refrigerator for at least 6 hours, preferably overnight.
- Top with some fresh banana slices & enjoy!
Notes
- For a richer flavor, use whole milk instead of low-fat milk.
- This dessert can be made a day in advance for more flavor.
- Ensure the dessert is well covered in the fridge to maintain freshness.
- Prep Time: 20 minutes
- Cook Time: 0 minutes
- Category: Dessert
- Method: No-Bake
- Cuisine: American
Nutrition
- Serving Size: 1 slice
- Calories: 220
- Sugar: 15g
- Sodium: 150mg
- Fat: 8g
- Saturated Fat: 4g
- Unsaturated Fat: 3g
- Trans Fat: 0g
- Carbohydrates: 32g
- Fiber: 1g
- Protein: 2g
- Cholesterol: 10mg