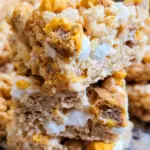
Butterfinger Krispie Treats: Sweet, Crunchy Delight Awaits!

Introduction to Butterfinger Krispie Treats
Life can get pretty hectic, and finding the perfect sweet treat shouldn’t add to the chaos. If you’re like me, you crave something quick and delightful to whip up, and that’s where my Butterfinger Krispie Treats come in! These irresistible bars are a delightful combination of crispy, sweet, and oh-so-crunchy. Whether you need a quick dessert for a family gathering, a lunchbox surprise, or just a reward for surviving another busy day, these treats are your answer! So, let’s embrace the joy of baking together and bring a little sweetness into our lives!
Why You’ll Love This Butterfinger Krispie Treats
These Butterfinger Krispie Treats are the epitome of simplicity and deliciousness. They come together in mere minutes, making them perfect for busy moms like us. You’ll savor the delightful crunch from the rice cereal and the sweet, melty goodness of Butterfinger bars in every bite. Plus, they’re a hit with kids and adults alike, bringing smiles to any gathering. No fancy techniques required—just pure, heavenly indulgence!
Save this recipe and cook smarter
Keep your favorite recipes in one place, discover easy meal ideas, and plan your week with the free Cooking Layer app.
Free to download • Fast and easy to use
Ingredients for Butterfinger Krispie Treats
To create these delectable Butterfinger Krispie Treats, you’ll need just a handful of simple ingredients that are often found in your pantry. Each element plays a crucial role in constructing this mouthwatering dessert.
- Butter: Either salted or unsalted butter works. It adds creaminess and helps all ingredients meld together beautifully.
- Mini Marshmallows: These fluffy delights give the treat its sweet, gooey texture. You could even try using flavored marshmallows for an extra kick!
- Vanilla Extract: A splash of vanilla elevates the flavor, adding a comforting warmth that complements the sweetness.
- Rice Krispie Cereal: The star ingredient! It gives the bars their signature crunch. You can use other crispy cereals, but Rice Krispies deliver the best texture.
- Butterfinger Candy Bars: Chopped into pieces, these bars bring the sweet, chocolatey goodness. Feel free to swap for other chocolate bars if you’re feeling adventurous!
At the bottom of the article, you can find the exact quantities for each ingredient, perfect for a quick printout. Let’s embark on this delicious journey together!
How to Make Butterfinger Krispie Treats
Making Butterfinger Krispie Treats is a breeze! Follow these simple steps for a sweet experience that will leave your loved ones asking for seconds. Trust me; your kitchen will smell divine.
Step 1: Prepare Your Pan
First things first, grab a 9×13-inch pan. Line it with foil and spray it with cooking spray. This little trick makes it super easy to lift your treats out when they’re set. Who wants to struggle with cleanup? Not me!
Step 2: Melt Butter and Marshmallows
Next, place the butter and mini marshmallows in a large microwave-safe bowl. Heat them together on 50% power in one-minute increments, stirring after each round. Aim for smooth and gooey perfection! Getting this part right is crucial for that luscious texture.
Step 3: Combine Dry Ingredients
As those marshmallows melt, measure out your Rice Krispie cereal in another bowl. This way, everything is ready to go once your marshmallow mixture is all melted and glorious. Isn’t it nice to have everything organized?
Step 4: Blend and Mix
Once melted, stir in a teaspoon of vanilla extract into the marshmallow mixture. The aroma will sweep you off your feet! Then, pour in the Rice Krispies and chopped Butterfinger bars. Mix it all together thoroughly! Each piece should be coated in that sticky goodness.
Step 5: Press Mixture into Pan
Here comes the fun part—pour the mixture into your prepared pan! With a bit of cooking spray on your hands, press the mixture down firmly. Make sure it’s compact; this keeps your treats from crumbling later. And be careful; it’s hot!
Step 6: Cool and Slice
Let the bars cool completely in the pan. This wait is essential for letting the flavors blossom and the texture firm up. Once cooled, cut them into squares. Enjoy the sweet anticipation as you prepare to indulge!
Tips for Success
- Keep a watchful eye while melting your marshmallows to avoid burning.
- Use cooking spray on your hands when pressing the mixture into the pan to prevent sticking.
- For an extra pop of flavor, add a pinch of salt to enhance the sweetness.
- Let the bars cool completely before cutting for cleaner edges.
- Store in an airtight container to keep them fresh and chewy.
Equipment Needed
- 9×13-inch baking pan: A standard size for this recipe. You can use any similar-sized dish if needed.
- Large microwave-safe bowl: Perfect for melting and mixing ingredients.
- Spatula or wooden spoon: An essential tool for stirring things up!
- Foil and cooking spray: Optional but helpful for easy cleanup.
Variations of Butterfinger Krispie Treats
- Peanut Butter Twist: Mix in some creamy peanut butter when melting the butter and marshmallows for a rich, nutty flavor.
- Chocolate Drizzle: After slicing the bars, drizzle melted chocolate on top for an extra layer of indulgence.
- Nutty Crunch: Add chopped nuts like almonds or pecans for added crunch and a boost of protein.
- Gluten-Free Version: Swap out the Rice Krispies for gluten-free crispy cereal to accommodate dietary needs.
- Banana Split Style: Incorporate sliced bananas and a hint of strawberry syrup for a fruity twist!
Serving Suggestions for Butterfinger Krispie Treats
- Pair with a scoop of vanilla ice cream for a delightful dessert combo.
- Serve alongside a tall glass of cold milk or hot cocoa for a perfect treat.
- To impress at gatherings, cut the treats into fun shapes using cookie cutters.
- Top with whipped cream and a sprinkle of chocolate shavings for a trendy finish.
FAQs about Butterfinger Krispie Treats
What can I substitute for Butterfinger bars?
If Butterfinger bars aren’t your thing or if you’re looking for a different flavor, try swapping them for Reese’s Peanut Butter Cups or Milky Way bars. Each option adds its unique twist while keeping the sweet and crunch factor alive!
Can I make these Butterfinger Krispie Treats ahead of time?
Absolutely! These treats store well in an airtight container for several days. They make for a great make-ahead dessert, just be mindful of the humidity, as that can affect their texture.
How do I store leftover treats?
To keep your Butterfinger Krispie Treats fresh, store them in an airtight container at room temperature. Make sure they’re completely cooled before packing them away to prevent sticking!
What variations can I try for these treats?
You have plenty of options! Consider adding a sprinkle of sea salt, mixing in nut butter, or even incorporating different candies to customize them. Each variation adds a new flavor journey!
Can I use a different cereal?
Yes! While Rice Krispies give that signature crunch, feel free to try other crispy cereals like Cornflakes or even Special K for a delicious twist. Just ensure they stay crunchy to balance the gooey marshmallows!
Final Thoughts
As you dive into making these Butterfinger Krispie Treats, remember that cooking should be a joyful experience. Each bite embodies happiness, nostalgia, and the ultimate hug in dessert form. The sweet crunch and the delightful flavors can transform any ordinary day into a celebration. These treats are more than just a recipe; they’re a chance to create cherished memories with family and friends. So, gather your loved ones, whip up this simple recipe, and enjoy the smiles that follow. You’ll find that sometimes, the sweetest moments in life are found right in your kitchen!
Love this recipe?
Save it for later and discover more easy, delicious recipes inside the free Cooking Layer app.
Free to download • Fast and easy to use
Butterfinger Krispie Treats
- Total Time: 15 minutes
- Yield: 12 servings 1x
- Diet: Vegetarian
Description
Butterfinger Krispie Treats are a sweet and crunchy dessert that combines marshmallows, butter, and Butterfinger candy bars with rice krispie cereal, creating a delightful treat perfect for any occasion.
Ingredients
- 4 tablespoons (57g) butter, salted or unsalted
- 1 (10 ounce) bag mini marshmallows
- 1 teaspoon vanilla extract
- 6 cups rice krispie cereal
- 2 cups chopped Butterfinger candy bars
Instructions
- Line a 9×13″ pan with foil and spray well with cooking spray. The foil is optional, but it makes it easy to remove the bars to slice.
- Place butter and marshmallows in a large microwave safe bowl. Heat on 50% power in 1 minute increments, stirring after each, until melted and smooth (for about 2-3 minutes in an 1100W microwave).
- Measure the cereal into another bowl while the mixture is heating.
- Once the marshmallows are melted, stir the vanilla into the marshmallow mixture.
- Add the cereal and Butterfinger bars and stir until all are combined with the melted marshmallow.
- Pour the mixture into the prepared pan.
- Spray your hands with cooking spray and carefully press the mixture to compact (the mixture is hot; be careful not to burn yourself!).
- Cool before cutting into squares.
Notes
- To prevent sticking, consider using cooking spray on your hands when handling the mixture.
- These treats can be stored in an airtight container for several days.
- Prep Time: 10 minutes
- Cook Time: 5 minutes
- Category: Dessert
- Method: Microwave
- Cuisine: American
Nutrition
- Serving Size: 1 square
- Calories: 200
- Sugar: 12g
- Sodium: 90mg
- Fat: 8g
- Saturated Fat: 5g
- Unsaturated Fat: 3g
- Trans Fat: 0g
- Carbohydrates: 30g
- Fiber: 1g
- Protein: 1g
- Cholesterol: 15mg