
Crispy Bacon Cheeseburger Pickle Taco Cups

Imagine biting into a perfectly golden tortilla cup filled with juicy seasoned ground beef, gooey melted cheddar cheese, smoky crispy bacon, and crunchy dill pickles. Now add a generous drizzle of creamy homemade cheeseburger sauce. That’s exactly what you get with these irresistible Crispy Bacon Cheeseburger Pickle Taco Cups.
These easy handheld cheeseburger bites combine everything you love about a classic bacon cheeseburger with the satisfying crunch of a crispy taco shell. Instead of using traditional hamburger buns, soft flour tortillas are brushed with seasoned butter, pressed into a muffin pan, and baked until beautifully golden.
Inside each crunchy tortilla shell is a hearty filling of ground beef, garlic, onions, Worcestershire sauce, mustard, ketchup, and crispy bacon. A generous layer of sharp cheddar and Monterey Jack cheese melts over the beef, creating an incredibly cheesy, savory filling.
The finishing touch is what makes these taco cups especially delicious: chopped dill pickles, extra bacon crumbles, fresh green onions, and a tangy homemade burger sauce.
Whether you’re planning a football party, looking for an easy family dinner, or preparing appetizers for a holiday gathering, these bacon cheeseburger taco cups are a crowd-pleasing option.
They’re easy to customize, convenient to serve, and packed with familiar American cheeseburger flavors.
Why You’ll Love These Bacon Cheeseburger Taco Cups
There’s something special about turning a classic cheeseburger into a crispy, bite-sized appetizer.
Crispy tortilla shells: Butter-brushed flour tortillas bake into crunchy golden cups that hold the filling beautifully.
Juicy cheeseburger filling: Seasoned ground beef, onions, garlic, Worcestershire sauce, and mustard create the savory flavors of a traditional cheeseburger.
Smoky bacon: Crispy bacon adds a salty, smoky crunch that complements the melted cheese.
Tangy dill pickles: Chopped pickles provide freshness and acidity that balance the rich beef and cheddar.
Creamy homemade sauce: A simple combination of mayonnaise, ketchup, mustard, and pickle juice brings everything together.
Perfect individual portions: Each taco cup is easy to pick up and enjoy, making this recipe ideal for parties and casual gatherings.
Easy to prepare ahead: You can cook the bacon and beef filling in advance, then assemble and bake the cups when you’re ready to serve.
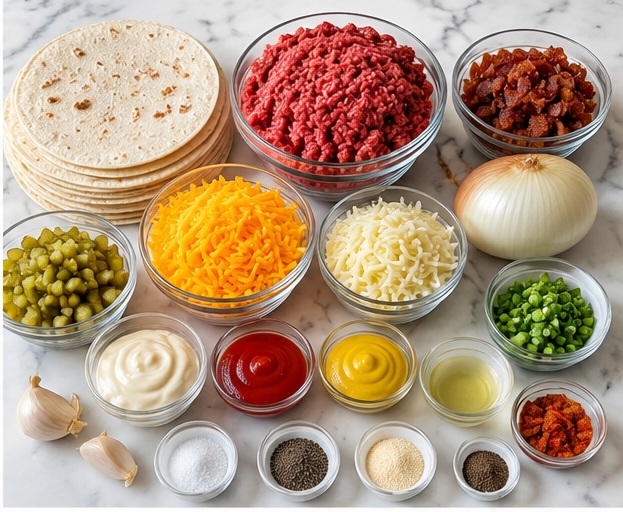
Ingredients You’ll Need
This recipe uses simple grocery-store ingredients divided into four components: the crispy tortilla shells, bacon cheeseburger filling, cheddar pickle topping, and creamy burger sauce.
For the Crispy Tortilla Cups
- 6 medium flour tortillas (8-inch)
- 2 tablespoons unsalted butter, melted
- ½ teaspoon garlic powder
- ¼ teaspoon smoked paprika
- Nonstick cooking spray
Flour tortillas work especially well because they’re flexible enough to press into muffin cups without breaking.
The melted butter encourages browning, while garlic powder and smoked paprika add a subtle savory flavor.
For the Bacon Cheeseburger Filling
- 1 lb (450 g) lean ground beef
- 8 slices bacon, cooked and crumbled
- 1 small yellow onion, finely diced
- 3 garlic cloves, minced
- 1 tablespoon Worcestershire sauce
- 2 tablespoons ketchup
- 1 tablespoon yellow mustard
- ½ teaspoon smoked paprika
- ½ teaspoon garlic powder
- ½ teaspoon onion powder
- ½ teaspoon salt
- ¼ teaspoon freshly ground black pepper
Lean ground beef is ideal because it provides plenty of flavor without releasing excessive grease into the tortilla shells.
The Worcestershire sauce adds depth, while ketchup and mustard create that familiar cheeseburger flavor.
For the Cheddar Pickle Topping
- 1½ cups shredded sharp cheddar cheese
- ½ cup shredded Monterey Jack cheese
- ½ cup dill pickles, finely chopped
- ¼ cup green onions, finely sliced
- 2 tablespoons reserved crispy bacon crumbles
Sharp cheddar delivers a bold cheesy flavor, while Monterey Jack melts smoothly.
For the best texture, shred the cheese yourself rather than using packaged shredded cheese.
For the Creamy Cheeseburger Sauce
- ⅓ cup mayonnaise
- 2 tablespoons ketchup
- 1 tablespoon yellow mustard
- 1 tablespoon finely chopped dill pickles
- 1 teaspoon dill pickle juice
- ½ teaspoon garlic powder
- ¼ teaspoon smoked paprika
This creamy sauce tastes similar to a classic burger spread. It’s tangy, slightly sweet, savory, and perfect for drizzling over warm taco cups.
Optional Garnishes
- Shredded iceberg lettuce
- Diced tomatoes
- Extra cheddar cheese
- Sliced jalapeños
- Fresh parsley
- Extra dill pickle slices
- Ranch dressing
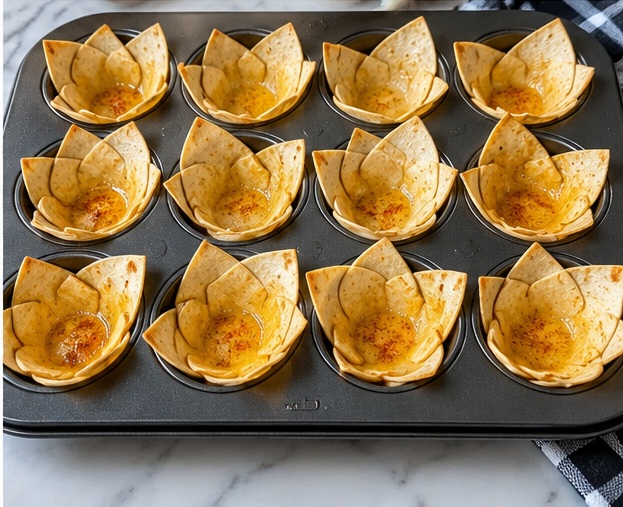
How to Make Crispy Bacon Cheeseburger Pickle Taco Cups
Follow these steps to make crunchy tortilla cups with juicy bacon cheeseburger filling and perfectly melted cheese.
Step 1: Preheat the Oven
Preheat your oven to 375°F (190°C).
Generously grease a standard 12-cup muffin pan with nonstick cooking spray.
Make sure to coat the bottoms and sides of each muffin cavity so the finished tortilla cups release easily.
Step 2: Prepare the Tortilla Shells
Stack the six flour tortillas on a cutting board.
Using a sharp knife or pizza cutter, cut each tortilla into four equal triangles. You should have 24 tortilla pieces.
In a small bowl, combine the melted butter, garlic powder, and smoked paprika.
Lightly brush both sides of each tortilla triangle with the seasoned butter.
Press two overlapping tortilla triangles into each muffin cup, forming a small bowl with raised edges.
Gently press the bottoms into place so the shells can hold the beef filling.
Step 3: Prebake the Tortilla Cups
Place the muffin pan in the preheated oven.
Bake for 7–9 minutes, until the tortilla edges begin turning lightly golden and the cups hold their shape.
Remove the pan from the oven and set it aside.
Prebaking is an important step because it helps the tortilla shells become crispy before the moist cheeseburger filling is added.
Step 4: Cook the Bacon
Place the bacon slices in a large skillet over medium heat.
Cook for approximately 7–10 minutes, turning occasionally, until browned and crispy.
Transfer the bacon to a paper towel-lined plate to drain.
Once cool enough to handle, crumble it into small pieces.
Reserve approximately 2 tablespoons of bacon crumbles for the final topping.
Carefully drain most of the bacon grease from the skillet, leaving about 1 tablespoon to flavor the ground beef.
Step 5: Brown the Ground Beef
Add the lean ground beef to the skillet over medium-high heat.
Break the beef into small crumbles using a wooden spoon or spatula.
Cook for approximately 6–8 minutes, until browned and fully cooked to an internal temperature of 160°F (71°C).
If necessary, carefully drain excess grease from the skillet.
Step 6: Add the Onion and Garlic
Add the finely diced yellow onion to the cooked ground beef.
Continue cooking for approximately 3–4 minutes, stirring occasionally, until the onion softens.
Stir in the minced garlic and cook for another 30 seconds, just until fragrant.
Avoid cooking the garlic too long because it can burn quickly.
Step 7: Season the Cheeseburger Filling
Add the Worcestershire sauce, ketchup, yellow mustard, smoked paprika, garlic powder, onion powder, salt, and black pepper.
Stir thoroughly to coat the ground beef evenly.
Continue cooking for another 2–3 minutes so the flavors combine and excess moisture evaporates.
The filling should be juicy and flavorful but not watery.
Fold most of the crispy bacon crumbles into the seasoned ground beef, keeping the reserved bacon for garnishing.
Step 8: Fill the Tortilla Cups
In a medium mixing bowl, combine the shredded sharp cheddar and Monterey Jack cheese.
Sprinkle a small amount of the cheese mixture into the bottom of each prebaked tortilla shell.
Spoon the warm bacon cheeseburger filling evenly among all 12 cups.
Top each cup generously with the remaining shredded cheese.
The cheese should cover most of the beef filling so it melts into a delicious golden topping.
Step 9: Bake Until Golden and Bubbly
Return the filled muffin pan to the oven.
Bake for 7–10 minutes, or until the cheese is fully melted and the tortilla edges are golden brown and crispy.
Keep an eye on the tortilla edges during the final few minutes to prevent overbrowning.
Remove the pan from the oven and let the cups rest for approximately five minutes.
Step 10: Prepare the Creamy Cheeseburger Sauce
While the tortilla cups bake, prepare the sauce.
In a small bowl, whisk together mayonnaise, ketchup, yellow mustard, finely chopped dill pickles, pickle juice, garlic powder, and smoked paprika.
Mix until smooth and creamy.
Taste and adjust the seasoning if desired.
For a thinner sauce that’s easier to drizzle, add a few extra drops of pickle juice.
Step 11: Add the Pickles and Toppings
Carefully loosen each tortilla cup using a small spatula and lift it from the muffin pan.
Arrange the cups on a large serving platter.
Sprinkle finely chopped dill pickles over the warm melted cheese.
Drizzle each cup with creamy cheeseburger sauce.
Finish with the reserved bacon crumbles, sliced green onions, and any additional toppings you enjoy.
Step 12: Serve Immediately
Serve the crispy bacon cheeseburger pickle taco cups while they’re still warm.
The contrast between crunchy tortillas, juicy ground beef, melted cheddar, smoky bacon, cool pickles, and creamy sauce makes every bite delicious.
Expert Tips for Perfect Cheeseburger Taco Cups
Always Prebake the Tortillas
Prebaking helps the tortilla shells develop a firm, crispy texture. Skipping this step may leave the bottoms soft after the filling is added.
Drain Excess Beef Grease
Too much grease can make the tortilla cups soggy. Drain the beef thoroughly before mixing in the seasonings and bacon.
Use Freshly Shredded Cheese
Freshly shredded cheddar and Monterey Jack generally melt more smoothly than prepackaged cheese.
Chop the Pickles into Small Pieces
Finely chopped pickles distribute their tangy flavor throughout every bite without overpowering the beef and cheese.
Don’t Add Sauce Before Baking
The creamy cheeseburger sauce should be added after the cups come out of the oven. Baking the sauce can change its texture and soften the tortilla shells.
Avoid Overfilling the Cups
Divide the filling evenly among the 12 shells. Overfilled cups can become difficult to remove from the muffin pan.
Delicious Recipe Variations
These crispy cheeseburger taco cups are incredibly versatile.
Spicy Bacon Cheeseburger Cups
Add diced jalapeños to the ground beef mixture and use pepper Jack cheese instead of Monterey Jack.
Finish with hot sauce or spicy mayonnaise.
BBQ Bacon Cheeseburger Cups
Replace the ketchup in the filling with your favorite barbecue sauce.
Add extra bacon and smoked cheddar for a sweet, smoky variation.
Mushroom Swiss Cheeseburger Cups
Sauté finely chopped mushrooms with the onions and replace the cheddar with Swiss cheese.
Loaded Pickle Cheeseburger Cups
Increase the chopped dill pickles and add a small spoonful of pickle relish to the burger sauce for extra tanginess.
Ground Turkey Cheeseburger Cups
Replace the ground beef with ground turkey for a lighter variation.
Cook ground turkey to an internal temperature of 165°F (74°C).
What to Serve With Bacon Cheeseburger Taco Cups
These mini cheeseburger cups are delicious on their own, but pairing them with a few simple sides can turn them into a complete meal.
For a casual family dinner, serve them alongside crispy French fries, sweet potato wedges, onion rings, or a fresh green salad.
If you’re preparing them for game day, pair them with buffalo chicken dip, loaded nachos, mozzarella sticks, or crispy potato skins.
For a lighter meal, serve them with coleslaw, sliced cucumbers, or roasted vegetables.
You can also create a cheeseburger topping station with pickles, lettuce, tomatoes, jalapeños, bacon, and several dipping sauces.
This allows guests to customize their own taco cups.
Make-Ahead Instructions
One of the best features of this recipe is that several components can be prepared ahead of time.
Cook the ground beef filling and bacon up to two days before serving.
Store them in airtight containers in the refrigerator.
The creamy cheeseburger sauce can also be prepared one day ahead and refrigerated separately.
When ready to serve, prepare the tortilla shells, add the filling and cheese, and bake until hot and bubbly.
If the filling is cold, you may need to extend the final baking time slightly. Ensure the filling reaches 165°F (74°C).
For the crispiest texture, avoid assembling the filled tortilla cups too far in advance.
How to Store and Reheat Leftovers
Refrigeration
Allow the cooked tortilla cups to cool slightly, then transfer them to an airtight container.
Refrigerate within two hours of cooking and store for up to 3–4 days.
For the best texture, keep fresh toppings and burger sauce separate.
Freezing
These bacon cheeseburger taco cups can be frozen without the sauce or fresh toppings.
Arrange the baked cups on a baking sheet and freeze until firm.
Transfer them to a freezer-safe container or resealable freezer bag.
Freeze for up to 2 months for best quality.
Reheating in the Oven
Preheat the oven to 350°F (175°C).
Place the tortilla cups on a baking sheet and heat until warmed through, with the filling reaching 165°F (74°C).
The oven helps restore the crisp texture of the tortilla shells.
Reheating in the Air Fryer
Place the tortilla cups in an air fryer basket and heat at approximately 325°F (163°C), checking frequently.
Continue until heated thoroughly to 165°F (74°C).
Add fresh pickles, lettuce, and sauce after reheating.
Frequently Asked Questions
Can I make bacon cheeseburger taco cups ahead of time?
Yes. Prepare the bacon cheeseburger filling up to two days ahead and store it in the refrigerator. Assemble and bake the tortilla cups shortly before serving for the best texture.
Can I use corn tortillas instead of flour tortillas?
Yes, although corn tortillas may crack more easily. Warm them slightly before shaping, and adjust the baking time as needed.
How do I keep tortilla cups crispy?
Prebake the tortilla shells, drain excess grease from the beef, avoid watery filling, and add pickles and sauce immediately before serving.
What cheese works best?
Sharp cheddar and Monterey Jack make an excellent combination. Colby Jack, pepper Jack, and American cheese are also delicious options.
Can I make these without bacon?
Absolutely. Simply omit the bacon and cook the ground beef with a little olive oil instead of reserved bacon grease.
Can I use ground turkey?
Yes. Ground turkey works well with the same seasonings. Cook it thoroughly to 165°F (74°C).
Are these taco cups spicy?
No. The original recipe is savory and mildly smoky. Add jalapeños, cayenne pepper, or hot sauce if you prefer a spicy version.
Can I double this recipe for a party?
Yes. Double all ingredients and use two standard 12-cup muffin pans to make 24 taco cups.
Can I serve these as a main dish?
Definitely. Two taco cups per person, served with fries, coleslaw, or a salad, make a satisfying meal.
Final Thoughts
These Crispy Bacon Cheeseburger Pickle Taco Cups are a delicious combination of everything that makes a classic bacon cheeseburger irresistible.
From the buttery golden tortilla shells and savory ground beef to the melted cheddar, smoky bacon, tangy dill pickles, and creamy homemade burger sauce, every bite is loaded with flavor.
They’re perfect for game-day parties, potlucks, family dinners, or anytime you’re craving something cheesy, crunchy, and satisfying.
Serve them fresh from the oven, add your favorite toppings, and watch how quickly they disappear.
Print
Crispy Bacon Cheeseburger Pickle Taco Cups
Description
Golden crispy tortilla cups filled with seasoned ground beef, smoky bacon, melted cheddar, crunchy dill pickles, and creamy homemade cheeseburger sauce.
Ingredients
Tortilla Cups
- 6 medium flour tortillas
- 2 tablespoons melted butter
- ½ teaspoon garlic powder
- ¼ teaspoon smoked paprika
- Nonstick cooking spray
Bacon Cheeseburger Filling
- 1 lb lean ground beef
- 8 slices crispy bacon, crumbled
- 1 small yellow onion, diced
- 3 garlic cloves, minced
- 1 tablespoon Worcestershire sauce
- 2 tablespoons ketchup
- 1 tablespoon yellow mustard
- ½ teaspoon smoked paprika
- ½ teaspoon garlic powder
- ½ teaspoon onion powder
- ½ teaspoon salt
- ¼ teaspoon black pepper
Cheddar Pickle Topping
- 1½ cups shredded sharp cheddar
- ½ cup shredded Monterey Jack
- ½ cup chopped dill pickles
- ¼ cup sliced green onions
- 2 tablespoons reserved bacon crumbles
Creamy Burger Sauce
- ⅓ cup mayonnaise
- 2 tablespoons ketchup
- 1 tablespoon yellow mustard
- 1 tablespoon chopped dill pickles
- 1 teaspoon pickle juice
- ½ teaspoon garlic powder
- ¼ teaspoon smoked paprika
Instructions
- Preheat the oven to 375°F and grease a 12-cup muffin pan.
- Cut the tortillas into quarters.
- Combine melted butter, garlic powder, and smoked paprika.
- Brush the tortilla triangles with seasoned butter.
- Press two overlapping tortilla triangles into each muffin cup.
- Prebake for 7–9 minutes until lightly golden.
- Cook bacon until crispy, then drain and crumble.
- Reserve 2 tablespoons of bacon and about 1 tablespoon of bacon grease.
- Brown ground beef in the skillet until fully cooked to 160°F.
- Add diced onion and cook until softened.
- Stir in minced garlic and cook for 30 seconds.
- Add Worcestershire sauce, ketchup, mustard, and seasonings.
- Cook for another 2–3 minutes and drain excess grease.
- Fold most of the bacon into the beef mixture.
- Combine shredded cheddar and Monterey Jack.
- Sprinkle some cheese into each tortilla shell.
- Fill with the bacon cheeseburger mixture.
- Top with remaining cheese.
- Bake for 7–10 minutes until bubbly and golden.
- Whisk together all cheeseburger sauce ingredients.
- Let the baked cups rest for five minutes.
- Remove from the muffin pan.
- Add chopped pickles, sauce, bacon, and green onions.
- Serve immediately.
Notes
- Prebake tortillas for extra crispiness.
- Use lean ground beef to reduce excess grease.
- Add fresh toppings only after baking.
- Refrigerate leftovers for 3–4 days.
- Freeze without sauce or fresh toppings for up to 2 months.
- Reheat leftovers to 165°F (74°C).
- Prepare the beef filling up to 2 days ahead for easier assembly.