Crispy Garlic Ranch Bacon Cheeseburger Cheddar Potato Cups
Bacon Cheeseburger Potato Cups bring the best parts of a loaded burger into a crisp, handheld hash brown shell. Each little nest holds savory ground beef, smoky bacon, and melted cheddar and Monterey Jack. Ranch dressing, pickles, and green onions add a cool, tangy finish after baking.

These cups start with refrigerated shredded hash browns, so there is no peeling or grating. A standard muffin pan gives them their shape, while a hot first bake helps the potato edges turn golden. The filling cooks on the stovetop while the shells bake, making the recipe practical for a game day spread or a casual family dinner.
The recipe makes 12 cups, or six servings of two cups each. Allow about 20 minutes for preparation and approximately 40 minutes for cooking, with some overlap between the oven and skillet steps. The most useful cues are dry potatoes, browned shells, and a filling without excess liquid.
Why You’ll Love These Bacon Cheeseburger Potato Cups
The contrast makes these cups satisfying: crunchy potato edges, tender beef, creamy cheese, and fresh toppings in every bite. Garlic seasons both the shells and the filling, and ranch seasoning brings familiar burger-night flavor without making a separate sauce.
Individual portions are easy to arrange on a platter. Keep the ranch and pickles alongside the cups when serving a crowd so everyone can finish their own. The cooked filling can also be prepared ahead, which leaves only shaping, baking, and assembly for serving day.
What Are Bacon Cheeseburger Potato Cups?
Think of these as loaded hash brown cups filled with the flavors of a bacon cheeseburger. Shredded potatoes are mixed with egg, Parmesan, butter, oil, and seasonings, then pressed against the bottoms and sides of muffin cavities. Baking sets that mixture into hollow nests.
The shells are made entirely from the seasoned shredded potato mixture. Keep the potato strands visible when shaping them; they create the craggy edges that brown in the oven. The beef filling is cooked separately before it goes into the shells, and a brief second bake melts the cheese.
Ingredients You’ll Need
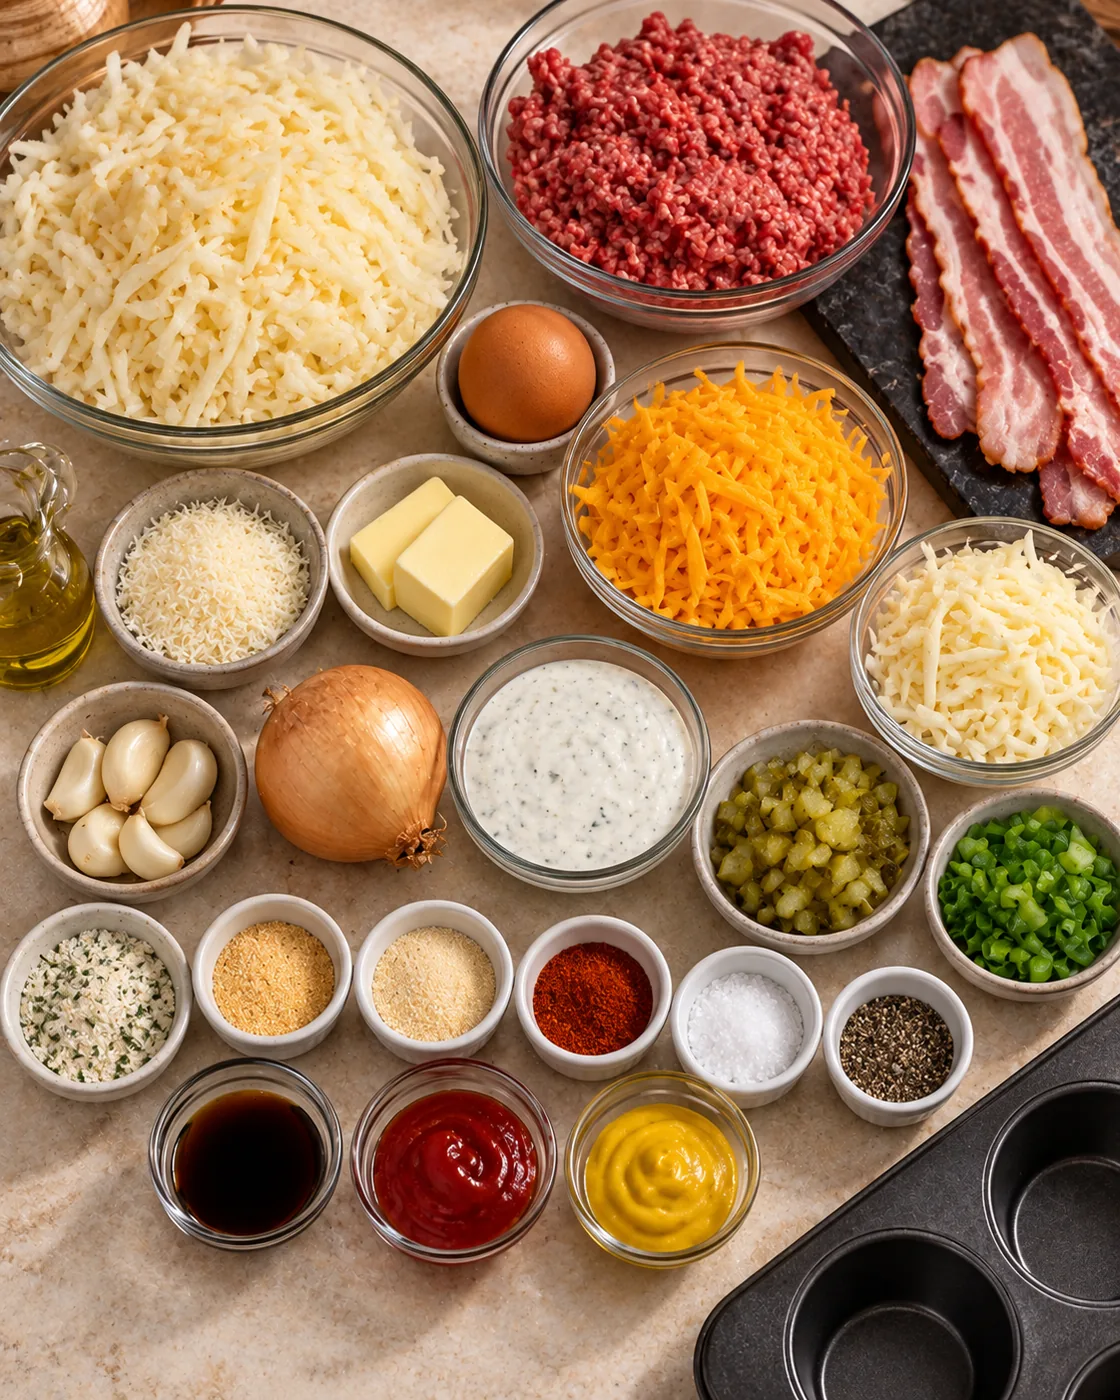
The complete measurements appear in the recipe card below. For the shells, gather refrigerated shredded hash browns, egg, grated Parmesan, unsalted butter, olive oil, fresh garlic, garlic powder, onion powder, smoked paprika, salt, pepper, and nonstick spray.
The filling uses lean ground beef, eight slices of bacon, yellow onion, more fresh garlic, Worcestershire sauce, ketchup, yellow mustard, dry ranch seasoning, smoked paprika, black pepper, and salt to taste. Reserve two tablespoons of crumbled bacon from those same eight slices for finishing.
For the topping, you need sharp cheddar, Monterey Jack, ranch dressing, chopped dill pickles, and green onions. The two cheeses melt together into a creamy layer, while the dressing and pickles go on after baking. Extra ranch, tomatoes, parsley, jalapeños, lettuce, cheddar, and burger sauce are optional garnishes.
Ingredient Notes and Easy Substitutions
Use the specified refrigerated shredded hash browns for the base recipe. Check that they are plain potatoes rather than an already seasoned mixture. Squeezing them dry matters even when the package looks fairly dry, because trapped moisture can keep the shells soft.
Grate the cheddar and Monterey Jack from blocks when convenient for a smoother melt. Packaged shredded cheese is workable, but its coating can affect how evenly it melts. Grated Parmesan helps bind and season the potato mixture; it belongs in the shells, rather than in the cheese topping.
Ground turkey can replace beef as a variation, provided it is cooked to its appropriate safe temperature. Mild cheddar can replace sharp cheddar for a gentler flavor, although the original combination gives a more pronounced cheeseburger taste. Keep shredded hash browns as the shell ingredient for every version.
Ranch mixes, bacon, Parmesan, and Worcestershire sauce all contribute salt. Start with the stated seasonings and taste the fully cooked filling before adding more salt. Choose a ranch dressing you enjoy cold, since it is added at serving time.
How to Make Crispy Garlic Hash Brown Cups
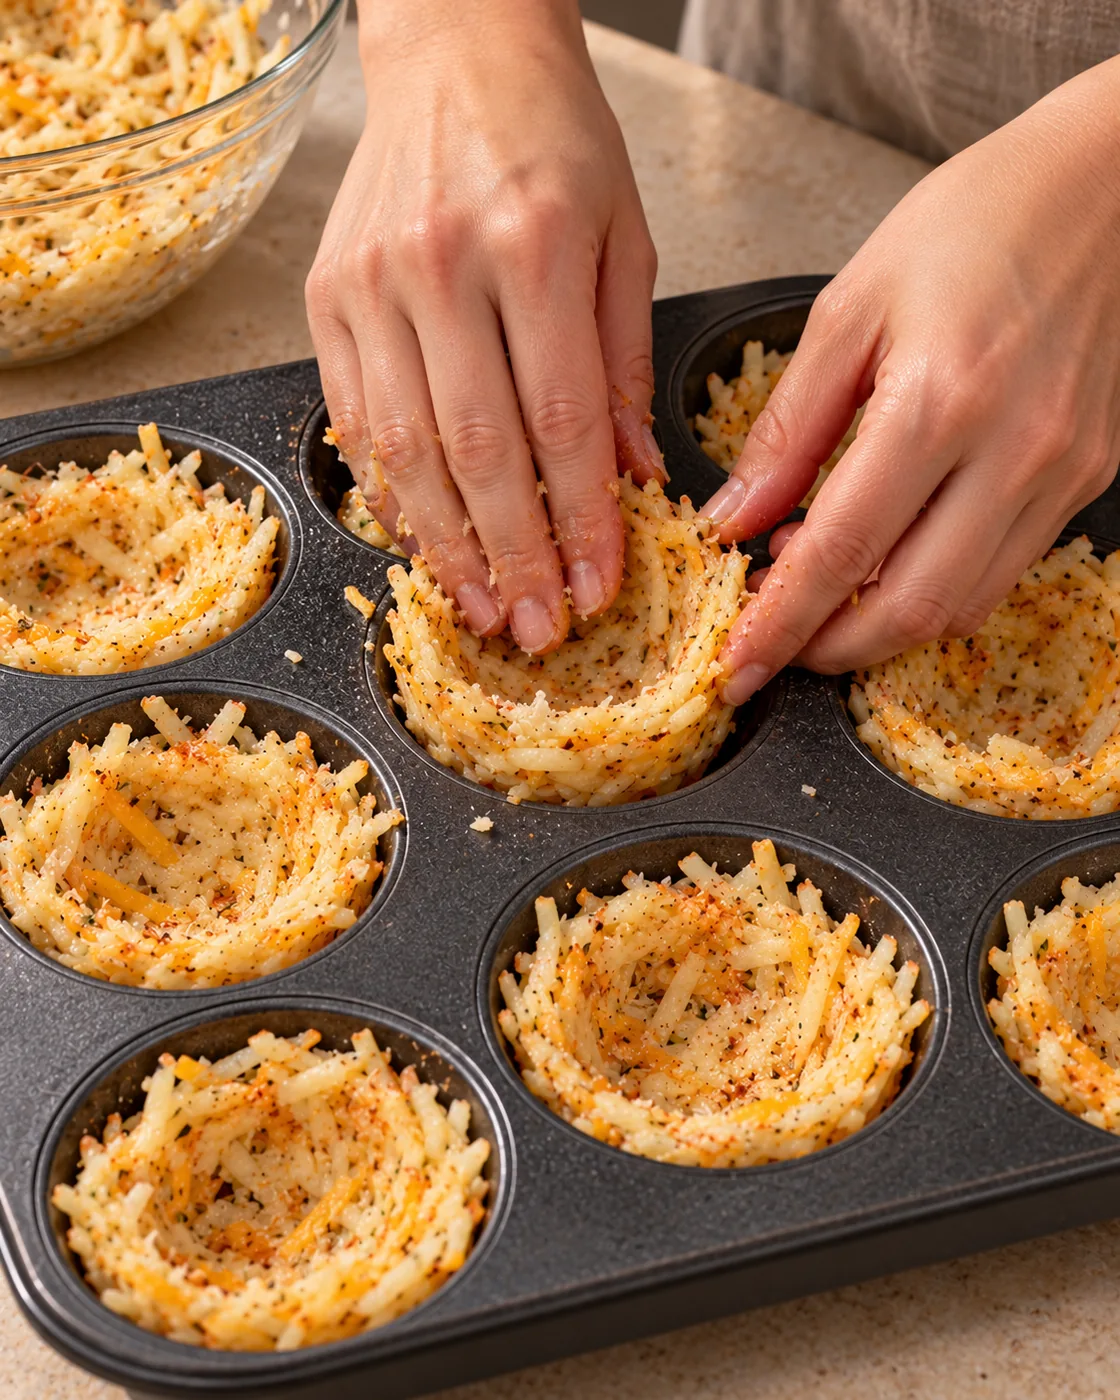
Heat the oven to 425°F and generously coat a standard 12-cup metal muffin pan with nonstick spray. Pay attention to the sides and upper edges, where the potato strands can cling. Place the hash browns in a clean kitchen towel and squeeze firmly over the sink.
Combine the dried potatoes with the beaten egg, Parmesan, melted butter, olive oil, minced garlic, garlic powder, onion powder, smoked paprika, salt, and black pepper. Toss thoroughly so the binders and seasonings reach all the strands. Divide the mixture evenly among all 12 cavities before shaping.
Press each portion firmly across the bottom and up the sides, leaving a hollow center for filling. Aim for similar thickness from cup to cup. A thick mound at the bottom cooks more slowly, while very thin gaps can make a shell fragile.
Bake for 22–28 minutes, until the edges look golden brown and crisp. Check near the earlier end of the range, since muffin pans and ovens vary. Leave the baked shells in the pan; they still need that support during filling and the second bake.
Preparing the Ranch Bacon Cheeseburger Filling
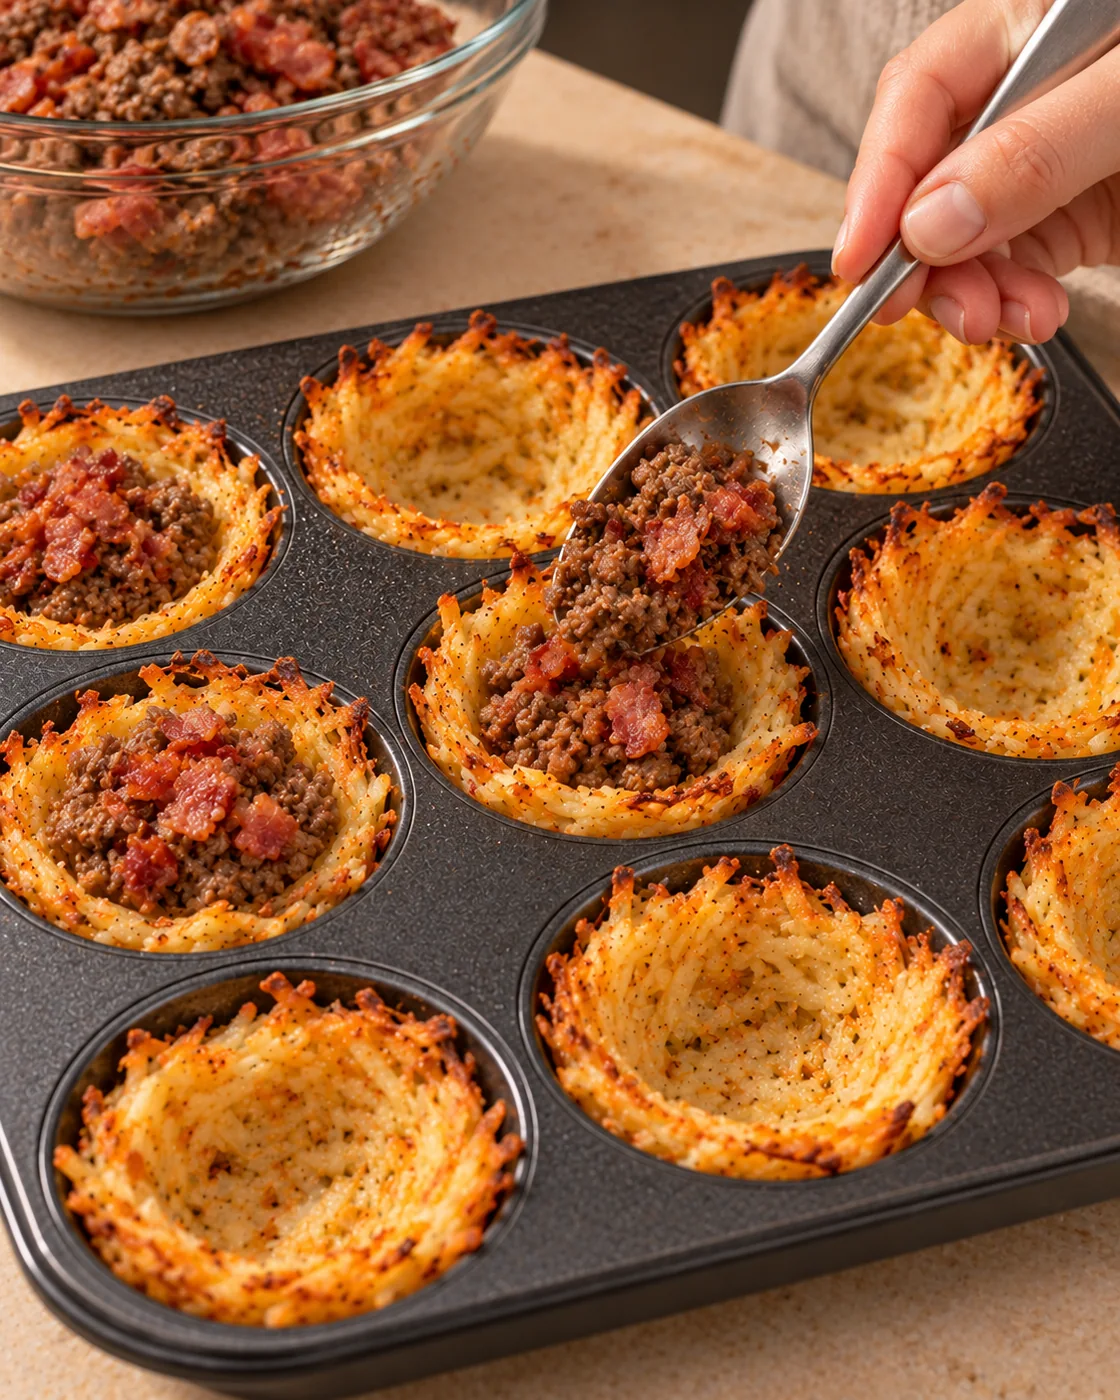
Cook the bacon over medium heat until crisp, transfer it to paper towels, and crumble it once cool enough to handle. Set aside approximately two tablespoons for garnish. Leave about one tablespoon of bacon grease in the skillet and remove the excess carefully.
Add the ground beef and cook for 6–8 minutes, breaking it into fine crumbles. Add the diced onion and cook another 3–4 minutes. Stir in the minced garlic for about 30 seconds, then add Worcestershire, ketchup, mustard, ranch seasoning, smoked paprika, and pepper.
Fold in the remaining bacon and cook for another 2–3 minutes to reduce excess moisture. Drain unwanted grease if needed. The filling should be moist enough to taste juicy but should not leave a puddle when pushed aside with a spoon. Taste only after the beef is fully cooked, then adjust salt.
Assembling and Baking the Potato Cups
Mix the cheddar and Monterey Jack in a bowl. Spoon the warm beef filling into the prebaked potato shells, distributing it evenly. Keep the filling inside the nests so loose pieces do not burn against the pan. Sprinkle the cheese mixture generously over each portion.
Reduce the oven temperature to 375°F. Return the muffin pan to the oven for 6–9 minutes, until the cheese has melted and looks bubbly. The beef is already cooked, so this stage finishes the assembled cups and melts the topping.
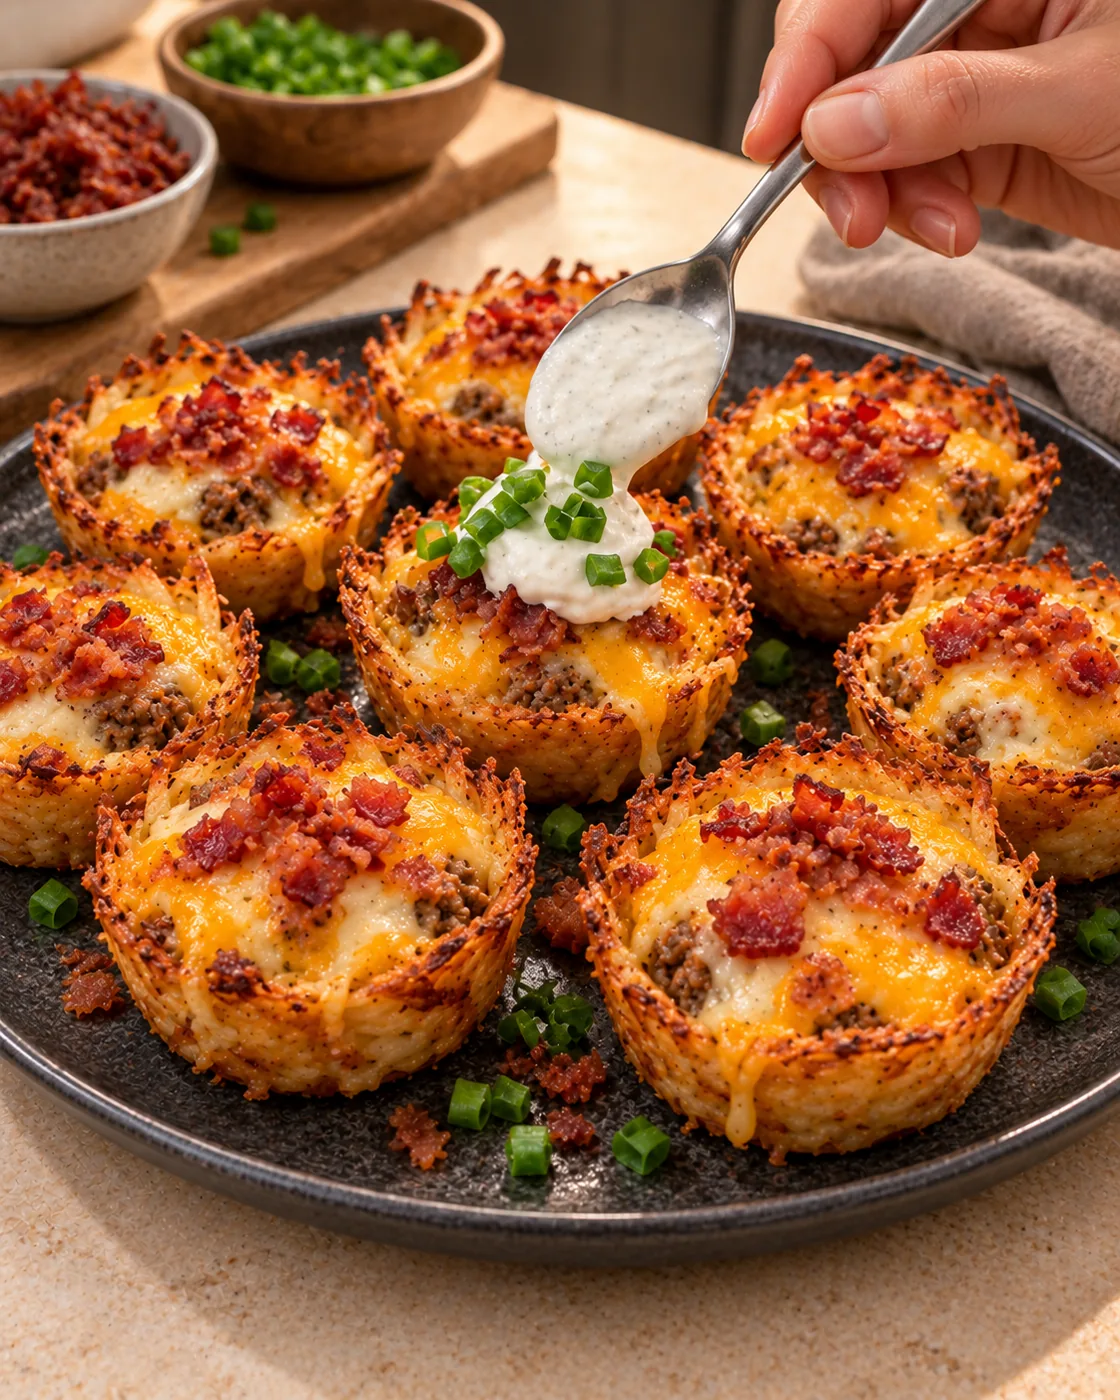
Rest the cups in the pan for approximately five minutes. Loosen the edges carefully with a small spatula and lift them onto a dark serving platter. Add the chopped pickles, ranch dressing, reserved bacon, and green onions after baking. Serve immediately for the best contrast between warm cheese and crisp potato edges.
Secrets to Extra-Crispy Hash Brown Shells
Moisture control begins before the pan reaches the oven. Squeeze the potatoes in batches if one large bundle is difficult to wring out. Open the towel, redistribute the shreds, and squeeze again if the center still feels wet. Thorough drying helps the potato mixture brown more readily.
Firm shaping also matters. Press the shreds together enough to form a continuous shell, while leaving their irregular tips around the rim. Use all 12 cavities to keep portions consistent. Avoid packing the entire portion into the base and leaving only a few loose strands on the sides.
Let the shells develop color before filling them. Pale potatoes will soften further under the warm beef. Drain excess moisture from the filling and save liquid toppings for the platter. Even well-baked shells gradually soften after assembly, so plan to serve them promptly.
Expert Tips for Perfect Results
Have the cheese shredded and the cold garnishes chopped before the shells finish baking. That makes assembly quicker and keeps the filling warm. Finely diced onion and small beef crumbles fit neatly into the nests without forcing the potato walls apart.
Use a small spoon to divide the filling, then make a second pass to even out the portions. If a few stray potato strands brown faster than the rest, judge the overall shell rather than waiting for every edge to match. A metal muffin pan generally encourages better browning than silicone.
The five-minute rest helps the cups settle, but do not leave them cooling in the pan for an extended period. Slide the spatula around each shell before lifting. Support the bottom during transfer instead of pulling on the delicate crispy rim.
Common Mistakes to Avoid
Wet hash browns are the most common obstacle to crisp shells. Another is skipping the first bake: raw potato nests need time to set before they can hold the beef and cheese. Follow both oven temperatures so the shells brown first and the topping melts afterward.
Overfilling can hide the crisp edges and make the cups difficult to lift. Divide the filling evenly and keep it within each nest. Adding ranch or pickles before the final bake introduces moisture too early. Save those toppings until the cups are ready to serve.
Do not add the reserved garnish bacon as an extra eight-slice batch. It comes from the bacon already cooked for the recipe. Taste before salting, and avoid assuming browned beef alone proves doneness; use a food thermometer when checking ground meat.
Delicious Variations and Topping Ideas
For a spicy version, add sliced jalapeños after baking or serve hot sauce at the table. Diced tomatoes and shredded lettuce give the cups a fresh burger finish. Drain and pat wet toppings dry so they do not quickly soften the potato shells.
For a different cheese accent, replace part of the cheddar with pepper Jack while keeping the total cheese quantity the same. Offer burger sauce alongside the ranch if desired. Add only a modest amount of dressing to each cup, then let guests add more.
Keep optional garnishes separate when serving children or a group with mixed preferences. That also makes it easier to refrigerate any untouched cups without cold toppings already added.
What to Serve with Cheeseburger Potato Cups
Two cups make a hearty serving alongside a crisp green salad, cucumber slices, or steamed vegetables. A tangy slaw also works well with the rich beef, cheese, and bacon. For appetizers, serve single cups with small plates and napkins.
On a party table, balance these warm cups with a fresh vegetable platter or another bright, crunchy side. Put ranch and pickles in small bowls nearby. Bring out smaller batches as needed rather than dressing every cup far ahead of serving.
Make-Ahead and Meal Prep Tips
Prepare the cooked filling up to two days ahead and refrigerate it in a covered container once cooled promptly. Shred the cheeses and prepare the garnishes separately. Keep the potatoes uncombined until you are ready to shape the shells, since a mixed potato base can release moisture while standing.
On serving day, bake fresh shells and warm the refrigerated filling thoroughly before assembly. The short cheese-melting bake should not be relied on to heat a cold, dense filling. For best texture, assemble close to mealtime and add the ranch and pickles just before eating.
Storage, Freezing, and Reheating
Refrigerate leftovers promptly in a covered container and use within 3–4 days. Store fresh garnishes separately whenever possible. The shells will lose some crispness during storage, but oven reheating helps restore the edges better than a microwave.
Freeze cups without ranch, pickles, green onions, or other fresh toppings for up to two months. Freeze them individually on a tray, then transfer to a freezer container. Thaw overnight in the refrigerator before reheating for more even warming.
Reheat at 375°F until the filling reaches 165°F, checking the center with a thermometer. Timing depends on the starting temperature and size of the cups. Add fresh ranch and garnishes afterward. Avoid repeated cooling and reheating; warm only the portions you intend to eat.
Frequently Asked Questions
Can I use mashed potatoes or tortillas for the shells?
Keep shredded hash browns for this recipe. Their strands create the crisp nests and recognizable texture. Mashed potatoes, tortillas, pastry, and other wrappers require different formulas and baking instructions.
Why did my potato cups stick?
The pan may have needed more spray, or the shells may not have set before removal. Grease every cavity well, bake until golden, and allow the five-minute rest. Loosen the sides gently before lifting from underneath.
Can I make these in a mini muffin pan?
The recipe is designed for a standard 12-cup pan. Mini cavities change the yield, filling capacity, and cooking time. Use the standard pan for the stated quantities and timing.
Is the ranch dressing baked with the cheese?
No. The dry ranch seasoning cooks in the beef filling, while the prepared ranch dressing is added after baking. Chopped dill pickles also go on at the end.
How do I know the beef is safely cooked?
Ground beef should reach 160°F before serving, following federal safe cooking temperature guidance. Check with a food thermometer rather than relying only on color. If using ground turkey as a variation, cook it to 165°F. Reheated leftovers should reach 165°F.
Final Thoughts
These garlic ranch potato cups work best when each stage gets its own attention: dry the shredded potatoes, prebake the nests, reduce moisture in the filling, and finish with freshly added toppings. Those simple steps give you crisp edges and a savory, cheesy center. Have the platter ready when the cups leave the oven, and enjoy them while they are warm.
For more burger-inspired meals, try our Bacon Cheeseburger Rice Skillet or Crispy Bacon Cheeseburger Pickle Taco Cups.
Print
Crispy Garlic Ranch Bacon Cheeseburger Cheddar Potato Cups
- Total Time: 1 hour
- Yield: 12 potato cups (6 servings) 1x
Description
Golden shredded hash brown nests filled with ranch-seasoned beef, crispy bacon, cheddar and Monterey Jack, finished with ranch, pickles and green onions.
Ingredients
Crispy Garlic Potato Cups
20 oz refrigerated shredded hash browns
1 large egg, lightly beaten
½ cup grated Parmesan cheese
2 tablespoons unsalted butter, melted
1 tablespoon olive oil
3 garlic cloves, finely minced
1 teaspoon garlic powder
½ teaspoon onion powder
½ teaspoon smoked paprika
½ teaspoon salt
¼ teaspoon black pepper
Nonstick cooking spray
Ranch Bacon Cheeseburger Filling
1 lb (450 g) lean ground beef
8 slices bacon, cooked and crumbled (reserve 2 tablespoons for topping)
1 small yellow onion, finely diced
3 garlic cloves, minced
1 tablespoon Worcestershire sauce
1 tablespoon ketchup
1 teaspoon yellow mustard
1 tablespoon dry ranch seasoning mix
½ teaspoon smoked paprika
½ teaspoon black pepper
Salt, to taste
Cheddar Ranch Topping
1½ cups shredded sharp cheddar cheese
½ cup shredded Monterey Jack cheese
⅓ cup ranch dressing
¼ cup chopped dill pickles
2 tablespoons chopped green onions
2 tablespoons crispy bacon crumbles, reserved from the cooked bacon
Optional Garnishes
Extra ranch dressing
Diced tomatoes
Fresh parsley
Sliced jalapeños
Shredded lettuce
Extra shredded cheddar cheese
Burger sauce
Instructions
1. Prepare the hash brown cups: Preheat the oven to 425°F (220°C). Generously grease a standard 12-cup muffin pan with nonstick cooking spray. Place the shredded hash browns in a clean kitchen towel and squeeze firmly to remove as much moisture as possible. In a large bowl, combine the dried hash browns, beaten egg, Parmesan, melted butter, olive oil, minced garlic, garlic powder, onion powder, smoked paprika, salt, and pepper. Mix until evenly combined. Divide evenly among the 12 cavities. Press firmly against the bottoms and sides to create hollow potato nests. Bake for 22–28 minutes until the edges are golden brown and crispy.
2. Prepare the bacon cheeseburger filling: Cook the bacon in a skillet over medium heat until crispy. Transfer to paper towels and crumble. Reserve approximately 2 tablespoons for garnishing. Leave approximately 1 tablespoon of bacon grease in the skillet. Add ground beef and cook for 6–8 minutes, breaking it into small crumbles, until fully browned. Add diced onion and cook for 3–4 minutes. Stir in minced garlic and cook for approximately 30 seconds. Add Worcestershire sauce, ketchup, yellow mustard, ranch seasoning, smoked paprika, and black pepper. Fold in the remaining cooked bacon. Cook another 2–3 minutes to reduce excess moisture. Drain excess grease as needed. Ensure ground beef reaches 160°F (71°C), then taste before adding additional salt.
3. Assemble and bake: Combine shredded cheddar and Monterey Jack in a bowl. Remove baked shells from the oven and keep them inside the muffin pan. Spoon the warm bacon cheeseburger filling into each cup. Sprinkle the cheese mixture generously over the filling. Reduce the oven to 375°F (190°C). Return the pan to the oven and bake for 6–9 minutes until the cheese is melted and bubbly.
4. Finish and serve: Remove the pan and rest approximately 5 minutes. Carefully loosen the edges with a small spatula and transfer cups to a serving platter. Sprinkle with chopped dill pickles, drizzle with ranch dressing, and add the reserved bacon and chopped green onions. Add optional toppings if desired. Serve immediately while the shells are crispy and the cheese is warm.
Notes
Remove excess moisture from the shredded hash browns before baking. Prebake shells before filling. Drain excess grease and moisture from the beef. Add fresh pickles and ranch after baking. Yield: 12 potato cups; 6 servings of 2 cups. Oven temperatures: 425°F, then 375°F. Cook and total times are approximate; filling cooks while shells bake. Refrigerate leftovers promptly for 3–4 days. Freeze without fresh toppings for up to 2 months. Reheat at 375°F until the filling reaches 165°F (74°C). Prepare filling up to 2 days ahead. The 2 tablespoons garnish bacon come from the original 8 slices, not extra bacon.
- Prep Time: 20 minutes
- Cook Time: 40 minutes
- Category: Appetizer, Main Course
- Method: Oven-Baked
- Cuisine: American-Inspired
Nutrition
- Serving Size: 2 potato cups