Easter Egg Cheesecake Jars: Delight in This Easy Recipe!

Why Easter Egg Cheesecake Jars Are So Popular
There’s something undeniably charming about Easter Egg Cheesecake Jars. Maybe it’s the layered pastel colors, or maybe it’s the fact that they look like something straight out of a bakery display—yet require no baking at all. Either way, these little desserts have quickly become a favorite for Easter celebrations, and it’s not hard to see why.
First off, they’re incredibly convenient. Traditional cheesecakes can be time-consuming and a bit intimidating, especially if you’re worried about cracks, water baths, or getting the texture just right. But these jars skip all of that. No oven, no stress—just simple mixing, layering, and chilling.
They’re also perfectly portioned. Instead of slicing a large cheesecake and hoping for even pieces, each jar is its own individual dessert. That makes serving easier, cleaner, and honestly, more fun. Everyone gets their own little treat, and there’s no fighting over who got the bigger slice.
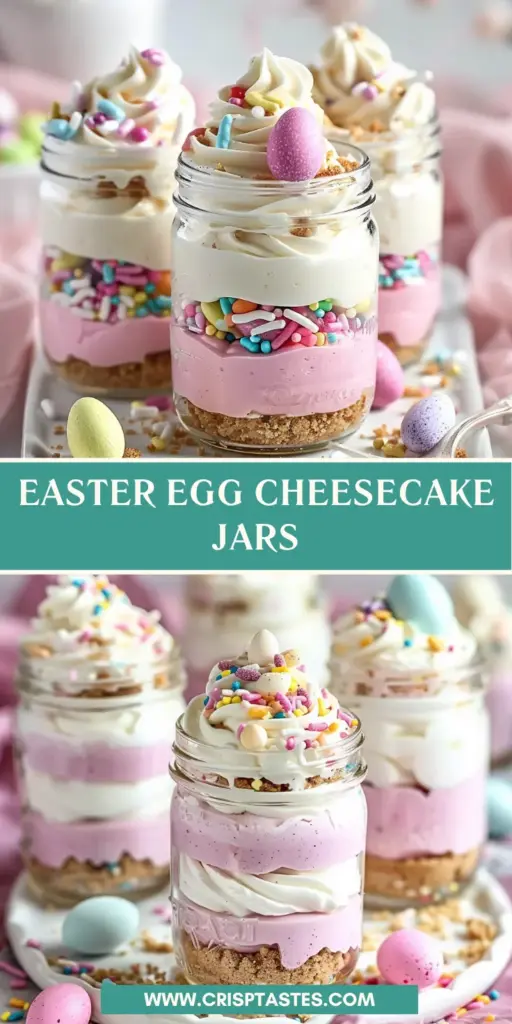
And then there’s the visual appeal. The soft pink and white layers, topped with whipped cream and candy eggs, create a dessert that feels festive without needing extra decoration. It’s the kind of dish that instantly brightens a table.
What really makes these cheesecake jars special, though, is how they balance simplicity with elegance. They’re easy enough for beginners but still impressive enough to serve at a holiday gathering. And once you make them once, they quickly become a go-to recipe.
The Charm of No-Bake Desserts
No-bake desserts have a special kind of appeal. They’re quick, forgiving, and perfect for moments when you want something homemade without spending hours in the kitchen.
With these cheesecake jars, you’re skipping the most complicated part of traditional cheesecake—the baking. Instead, you’re relying on whipped cream and cream cheese to create that rich, creamy texture. It’s lighter, smoother, and arguably even more enjoyable.
Another advantage? Flexibility. If you want to adjust flavors, colors, or toppings, you can do so without worrying about how it will affect baking time or structure. It’s a more relaxed, creative process.
And let’s be honest—sometimes you just don’t want to turn on the oven. Whether it’s a busy day or a warm afternoon, no-bake recipes are a lifesaver.
Perfect Individual Treats for Easter Gatherings
There’s something about individual desserts that just feels more special. Maybe it’s the presentation, or maybe it’s the fact that everyone gets their own perfectly assembled portion.
For Easter gatherings, this is especially useful. You can prepare the jars ahead of time, line them up on a tray, and serve them without any last-minute hassle. No slicing, no plating—just grab and enjoy.
They’re also great for kids and adults alike. The colorful layers and candy toppings make them fun, while the creamy cheesecake keeps them satisfying.
Ingredients for Easter Egg Cheesecake Jars
This recipe is built around three main components: the crust, the cheesecake filling, and the toppings. Each one plays a key role in creating that perfect layered dessert.
Crust Ingredients and Their Role
- 1 cup graham cracker crumbs – provides structure and a slightly crunchy base
- 2 tablespoons sugar – adds sweetness
- 4 tablespoons melted butter – binds everything together
This layer acts as the foundation, giving each bite a bit of texture to contrast the creamy filling.
Cheesecake Filling Components
- 8 oz cream cheese – the base of the cheesecake flavor
- ½ cup powdered sugar – sweetens and smooths the mixture
- 1 teaspoon vanilla extract – enhances flavor
- 1 cup whipped cream – adds lightness and volume
- Pink food coloring or strawberry powder (optional) – creates that signature pastel layer
This mixture is what gives the jars their creamy, fluffy texture.
Toppings That Bring It All Together
Sprinkles – add texture and visual appeal
Whipped cream – adds a soft, decorative finish
Candy eggs – bring color and a festive touch
How to Make Easter Egg Cheesecake Jars
Step 1: Prepare the Crust
Let’s kick things off by making that crunchy crust! In a medium-sized bowl, combine the graham cracker crumbs and granulated sugar. This mixture is like the heart of the jars, adding a delightful base. Pour in the melted butter and stir until it resembles wet sand. Once combined, take your mixture and spoon it into mini jars. Press down gently to form an even crust base. This step is crucial for the jars to hold their shape!
Step 2: Make the Cheesecake Filling
Now, onto the star of the show—the cheesecake filling! In a clean mixing bowl, beat the softened cream cheese until it’s nice and smooth. Picture that creamy texture! Add the powdered sugar and vanilla extract, then beat until fluffy. The mixture should be velvety, making your taste buds dance. Gently fold the whipped cream into the cream cheese blend in two batches. This process lightens the filling, giving it that dreamy consistency we all love.
Step 3: Assemble the Layers
It’s layering time! Divide the smooth cheesecake mixture into two bowls. If you want to add a pop of color and flavor, tint one bowl with pink food coloring or a spoonful of freeze-dried strawberry powder. Now, take a spoon or piping bag and layer the pink mixture over the crust in your jars. Follow with the white cheesecake layer on top. Each layer adds not just flavor but visual appeal. You’re creating a charming dessert everyone will admire!
Step 4: Decorate and Chill
Once your jars are beautifully layered, it’s time to add some decoration! Pipe a generous swirl of whipped cream on each jar. This final touch makes them look extra special! Now, scatter those adorable pastel candy eggs on top, along with a sprinkle of rainbow sprinkles for the festive vibe. After decorating, pop the jars in the refrigerator. Let them chill for at least 2 hours; this helps the flavors meld together while firming up the cheesecake.
Step 5: Serve & Enjoy!
After the jars have chilled, it’s time for the best part—digging in! Grab a spoon, and let your family marvel at your creation. Each jar is like a little treasure, waiting to be discovered. Serve them at your Easter gathering and watch the smiles light up the room. Trust me, there’s something joyous about homemade desserts that brings everyone together. So, scoop, savor, and enjoy every delightful bite!
Tips for Success
- Make sure your cream cheese is completely softened for a smooth, lump-free filling.
- For a pretty whipped cream swirl, use a piping bag with a star tip.
- Chilling the jars for a minimum of 2 hours allows the flavors to meld beautifully.
- Feel free to switch up the colors with different gel food colors for a vibrant display.
- Double the recipe for a crowd—it’s a hit at any gathering!
Equipment Needed
For these delightful Easter Egg Cheesecake Jars, all you’ll need are a few basic tools. A mixing bowl is essential for combining your ingredients. Grab some mini jars or dessert cups for serving. A hand mixer helps achieve that creamy texture, but a whisk works in a pinch!
Variations
- For a gluten-free option, substitute graham crackers with gluten-free crumbs or crushed nuts.
- Try adding a layer of fruit compote, like strawberry or raspberry, for added flavor and freshness.
- Replace the vanilla with almond extract for a different twist on the classic taste.
- Consider swapping pastel eggs for chocolate eggs for a richer surprise inside!
- Top with seasonal fruits like berries or edible flowers for a springtime flair.
Serving Suggestions
- Pair with a refreshing glass of iced tea or lemonade to enhance the sweetness of the jars.
- For a festive touch, serve on a beautiful platter adorned with spring flowers.
- Offer fresh strawberries or blueberries on the side for extra fruity enjoyment.
- For adults, consider serving alongside a light white wine or sparkling prosecco.
- Top the jars with edible flowers for an elegant presentation at your Easter table.
FAQs about Easter Egg Cheesecake Jars
As you prepare to whip up these delightful Easter Egg Cheesecake Jars, I know you might have a few questions in mind. Here are some common queries to help you out!
Can I make these jars ahead of time? Absolutely! These no-bake desserts can be prepped a day in advance. Just keep them covered in the fridge.
How long do leftovers last? If you have any jars left, they’ll stay fresh for about 3 days in the refrigerator. Just make sure to cover them tightly!
Can I substitute the cream cheese? Yes! For a lighter version, you can use Greek yogurt or whipped cream cheese. Just ensure it’s smooth for the best texture.
What other toppings can I add? Feel free to get creative! Fresh fruits, chocolate shavings, or even caramel drizzle will elevate these jars!
Final Thoughts
Making and sharing these Easter Egg Cheesecake Jars is more than just preparing a dessert; it’s about creating joyful memories with loved ones. The delight on your family’s faces as they savor each bite is priceless. This no-bake treat beautifully captures the essence of the holiday, combining sweetness and celebration in every jar. I encourage you to dive into this recipe and personalize it as you like. Let your creativity shine and watch as you create delicious memories that will be cherished for years to come. Happy Easter, and may your table be filled with love and laughter!
Print
Easter Egg Cheesecake Jars
- Total Time: 2 hours 30 minutes
- Yield: 4–6 servings 1x
- Diet: Vegetarian
Description
A delightful recipe for Easter Egg Cheesecake Jars that is easy to prepare and perfect for celebrating the holiday.
Ingredients
- 1 cup graham cracker crumbs
- 2 tablespoons granulated sugar
- 4 tablespoons unsalted butter, melted
- 8 oz (1 block) cream cheese, softened
- ½ cup powdered sugar
- 1 teaspoon vanilla extract
- 1 cup heavy cream, whipped to stiff peaks
- Pink gel food coloring or 1 tablespoon freeze-dried strawberry powder (optional)
- Whipped cream (for piping or spooning on top)
- 12–18 pastel candy eggs (2–3 per jar)
- Rainbow or pastel sprinkles (to taste)
Instructions
- In a bowl, combine graham cracker crumbs, sugar, and melted butter. Stir until it resembles wet sand.
- Spoon the crumb mixture into mini jars and press gently to form the crust base.
- In a mixing bowl, beat the cream cheese until smooth. Add powdered sugar and vanilla and beat again until fluffy.
- Fold whipped cream into the cream cheese mixture in two batches until fully combined.
- Divide mixture into two bowls. Tint one with pink food coloring or strawberry powder for a fruity layer.
- Spoon or pipe the pink layer over the crust. Follow with the white layer on top.
- Add a swirl of whipped cream on each jar.
- Decorate with candy eggs and sprinkles. Chill until ready to serve!
Notes
- Ensure cream cheese is completely softened for a smooth texture.
- Use a piping bag for a decorative whipped cream layer.
- Chill the jars for at least 2 hours before serving for best texture.
- Prep Time: 30 minutes
- Cook Time: 0 minutes
- Category: Dessert
- Method: No-Bake
- Cuisine: American
Nutrition
- Serving Size: 1 jar
- Calories: 300
- Sugar: 20g
- Sodium: 150mg
- Fat: 20g
- Saturated Fat: 10g
- Unsaturated Fat: 5g
- Trans Fat: 0g
- Carbohydrates: 30g
- Fiber: 1g
- Protein: 3g
- Cholesterol: 40mg