Easter No-Bake Mini Cheesecakes

Introduction to Easter No-Bake Mini Cheesecakes
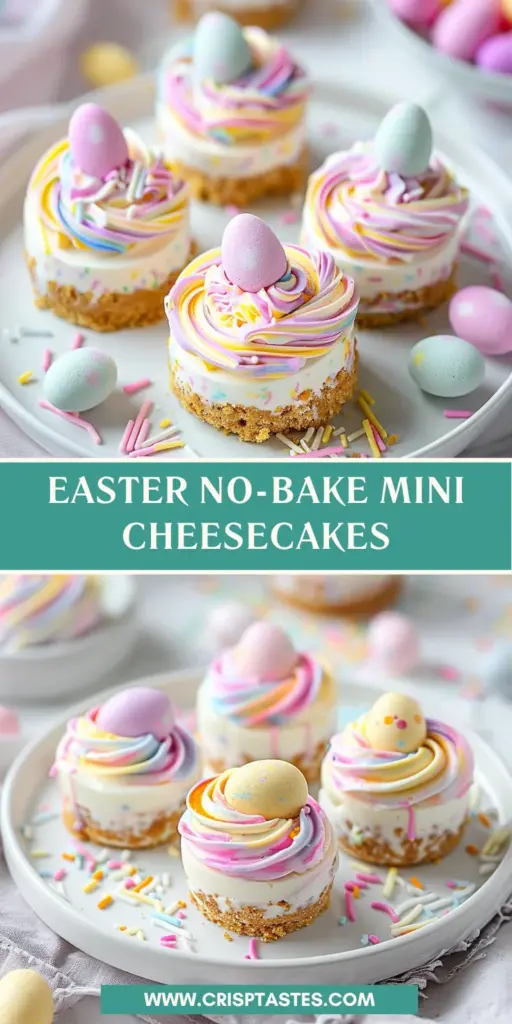
As spring rolls in, I can’t help but feel the excitement in the air. Easter is just around the corner, and what better way to celebrate than with these delightful Easter No-Bake Mini Cheesecakes? These little gems are perfect for those busy days when you want to impress your loved ones without spending hours in the kitchen. With their creamy filling and gorgeous pastel swirls, they bring a sweet touch to any gathering. Trust me, you’ll love how easy they are to whip up, leaving you more time to enjoy the festivities!
Why You’ll Love This Easter No-Bake Mini Cheesecakes
These Easter No-Bake Mini Cheesecakes are not just tasty; they’re a game changer for busy lives. With no baking required, you’ll save valuable time in the kitchen. The creamy filling and crunchy crust create a heavenly balance that tantalizes your taste buds without overwhelming your schedule. Plus, they’re so visually stunning that you’ll feel like a rockstar hostess, all while using pantry-friendly ingredients. It’s dessert bliss made simple!
Ingredients for Easter No-Bake Mini Cheesecakes
Gathering your ingredients is the first step towards making these delightful Easter No-Bake Mini Cheesecakes. Here’s what you’ll need for that sweet, creamy magic:
- Graham cracker crumbs: The backbone of the crust, these add a delightful crunch.
- Granulated sugar: A touch of sweetness to enhance the crust flavor.
- Unsalted butter: This binds the crust together, giving it that satisfying texture.
- Cream cheese: Essential for that rich, creamy cheesecake filling that we all adore.
- Powdered sugar: This brings just the right amount of sweetness to our filling without being grainy.
- Vanilla extract: Adds a warm, aromatic quality to the cheesecake, elevating the flavors.
- Lemon juice: A splash of acidity to balance the sweetness and brighten the filling.
- Heavy whipping cream: The magic ingredient for that light, airy texture in our cheesecake.
- White chocolate chips: Melted for a silky smooth addition to our filling, enhancing the creaminess.
- Pastel food coloring: A fun way to add color to the cheesecakes, making them festive and inviting.
- Mini candy eggs: These serve as a charming decoration on top, adding a festive touch.
- Whipped cream: Perfect for a fluffy garnish, you can use store-bought or homemade, depending on your schedule.
- Rainbow sprinkles: Optional, but who can resist a little extra color and fun?
For the specific measurements needed for each ingredient, you can find that information at the end of the article. Happy mixing!
How to Make Easter No-Bake Mini Cheesecakes
Making these Easter No-Bake Mini Cheesecakes is a fun adventure that requires just a few steps. Let’s dive right in and create these little delights together!
Step 1: Prepare Your Muffin Tin
Begin by lining a muffin tin with cupcake liners or using a silicone mini cheesecake mold. If you’re using the liners, make sure they are snug. This will help your cheesecakes hold their shape nicely when it’s time to serve. Trust me, having these lined will save you from some messy clean-up later!
Step 2: Make the Graham Cracker Crust
In a mixing bowl, combine the graham cracker crumbs, granulated sugar, and melted butter. Mix until all the crumbs are well-coated and look like damp sand. Using about 1½ tablespoons of this mixture, press it firmly into the bottom of each mold. Make sure it’s compact. Once done, pop the tin into the fridge for about 10–15 minutes to chill. This sets the crust nicely, giving it that perfect crunch!
Step 3: Prepare the Cheesecake Filling
Next, grab a large mixing bowl and beat the softened cream cheese until it’s smooth and creamy. This is essential for that velvety texture! Gradually add the powdered sugar, vanilla extract, and lemon juice, mixing until it’s perfectly blended. You want it to be nice and fluffy, so take your time here.
Step 4: Whip the Cream
In a separate cold bowl, whip the heavy cream until stiff peaks form. This means when you lift the whisk, the peaks should stand tall without falling over. The whipped cream gives our cheesecake that light and airy texture we love. Carefully fold the whipped cream into the cream cheese mixture until everything is perfectly combined. Be gentle; we don’t want to lose that fluffy goodness!
Step 5: Assemble the Cheesecakes
Now it’s time for the fun part! Spoon or pipe the delicious filling over the crusts, filling each mold generously. Use a spoon or spatula to smooth the tops, making sure everything looks neat. You want each cheesecake to have that picture-perfect look—so don’t rush this step!
Step 6: Add Colorful Swirls
Divide the melted white chocolate into small bowls. Add a few drops of pastel food coloring to each one, creating your desired colors. Using a toothpick, gently swirl the colored chocolate on top of each cheesecake. This creates that festive look that screams Easter. It’s a small touch, but oh, what a huge difference it makes!
Step 7: Chill and Set
Let your creations chill in the fridge for at least 4 hours, or until they are firm to the touch. This step is crucial! It allows the flavors to meld beautifully and gives the cheesecakes the perfect texture. Trust me, the wait will be worth it!
Step 8: Decorate and Serve
When ready to serve, take each cheesecake out of the fridge. Top with whipped cream, a mini candy egg, and sprinkle a few rainbow sprinkles on top. Voilà! You now have a stunning array of Easter No-Bake Mini Cheesecakes that look as delicious as they taste. Enjoy every delightful bite!
Tips for Success
- Make sure your cream cheese is fully softened; it ensures a smooth filling.
- Chill the cheesecakes long enough; patience pays off in flavor and texture.
- Feel free to mix and match food coloring for unique designs.
- For a quicker option, use premade graham cracker crusts.
- Remember, these can be made a day ahead—great for planning!
Equipment Needed
- Muffin tin or silicone mini cheesecake mold for shaping your treats.
- Mixing bowls—one large for the filling, and another for whipping cream.
- Eelectric mixer or a whisk for creamy results.
- Spatula to smooth out your cheesecake tops.
- Toothpick for creating those cute swirls.
Variations for Easter No-Bake Mini Cheesecakes
- Chocolate Cheesecake: Replace half of the cream cheese with chocolate cream cheese or mix in melted dark chocolate for a rich twist.
- Fruit Flavored: Add pureed strawberries, raspberries, or mango to the filling for a fruity burst. You can also top with fresh fruit instead of candy eggs.
- Gluten-Free Option: Use gluten-free graham cracker crumbs to make a gluten-free crust that still satisfies!
- Dairy-Free Version: Swap out cream cheese for dairy-free cream cheese and use coconut cream instead of heavy whipping cream for a creamy, non-dairy delight.
- Seasonal Spices: Incorporate spices like cinnamon or ginger into the crust or filling for a touch of warmth and flavor, perfect for springtime.
Serving Suggestions for Easter No-Bake Mini Cheesecakes
- Pair with fresh berries for a colorful and refreshing complement.
- Serve alongside a light, bubbly lemonade for a delightful springtime drink.
- Present on a decorative platter, garnished with edible flowers for a beautiful display.
- Drizzle with caramel or chocolate sauce for an extra indulgent touch.
- Consider serving with a dollop of whipped cream on the side for added decadence.
FAQs about Easter No-Bake Mini Cheesecakes
Can I make Easter No-Bake Mini Cheesecakes ahead of time?
Absolutely! These cheesecakes can be made a day in advance. Just keep them chilled in the fridge until you’re ready to serve. This makes them a stress-free dessert option!
What can I use instead of cream cheese?
If you’re looking for a dairy-free option, try using non-dairy cream cheese. For a lighter version, whipped Greek yogurt can also work, although it will change the flavor slightly.
How long do these cheesecakes last in the fridge?
These Easter No-Bake Mini Cheesecakes will stay fresh for about 3–4 days in the fridge. Just be sure to cover them well to prevent them from absorbing other flavors!
Can I freeze the mini cheesecakes?
Yes, you can freeze them! Just wrap each cheesecake tightly in plastic wrap and place them in an airtight container. They’ll keep well for up to 2 months. Thaw them overnight in the fridge before serving!
What other toppings can I use for decoration?
Besides mini candy eggs, feel free to get creative! Fresh berries, chocolate shavings, or even edible flowers can add a festive touch to your Easter No-Bake Mini Cheesecakes!
Final Thoughts
Creating these Easter No-Bake Mini Cheesecakes is not just about making a dessert; it’s about crafting joy and connection during the festive season. Each bite offers a delightful blend of creamy sweetness and crunchy crust, evoking smiles all around. Plus, the vibrant pastel swirls bring a touch of whimsy to your table. Remember, it’s all about making memories with your loved ones, and this simple recipe allows you to do just that. So gather your family, share stories, and enjoy the little moments together. Trust me, these cheesecakes will be a lovely centerpiece for your celebration!
Print
Easter No-Bake Mini Cheesecakes
- Total Time: 4 hours 30 minutes
- Yield: 12 mini cheesecakes 1x
- Diet: Vegetarian
Description
These Easter No-Bake Mini Cheesecakes are a delightful treat featuring a creamy cheesecake filling atop a graham cracker crust, beautifully swirled with pastel colors and topped with mini candy eggs.
Ingredients
- 1 ½ cups graham cracker crumbs
- ¼ cup granulated sugar
- 6 tablespoons unsalted butter, melted
- 16 oz (2 blocks) cream cheese, softened
- ½ cup powdered sugar
- 1 teaspoon vanilla extract
- 1 tablespoon lemon juice
- 1 cup heavy whipping cream, cold
- ½ cup white chocolate chips, melted
- A few drops of pastel food coloring (pink, yellow, lavender, teal)
- 12 mini candy eggs (speckled or pastel)
- Whipped cream (store-bought or homemade)
- Rainbow sprinkles
Instructions
- Line a muffin tin with cupcake liners or use a silicone mini cheesecake mold.
- Mix graham cracker crumbs, sugar, and melted butter in a bowl. Press about 1½ tablespoons into each mold. Chill while you make the filling.
- In a large bowl, beat softened cream cheese until smooth. Add powdered sugar, vanilla extract, and lemon juice. Mix until creamy.
- In a separate bowl, whip cold heavy cream until stiff peaks form. Gently fold into the cream cheese mixture until light and fluffy.
- Spoon or pipe the filling over the crusts, smoothing the tops with a spoon or spatula.
- Divide melted white chocolate into small bowls. Add a drop of pastel food coloring to each. Swirl small amounts on top of each cheesecake using a toothpick.
- Chill for at least 4 hours or until set.
- Once set, top with whipped cream, a mini candy egg, and rainbow sprinkles before serving.
Notes
- Ensure the cream cheese is fully softened for a smooth filling.
- You can customize the colors of the food coloring to suit your preference.
- These cheesecakes can be made a day in advance for ease.
- Prep Time: 30 minutes
- Cook Time: 0 minutes
- Category: Dessert
- Method: No-Bake
- Cuisine: American
Nutrition
- Serving Size: 1 mini cheesecake
- Calories: 250
- Sugar: 22g
- Sodium: 180mg
- Fat: 16g
- Saturated Fat: 10g
- Unsaturated Fat: 5g
- Trans Fat: 0g
- Carbohydrates: 22g
- Fiber: 0g
- Protein: 3g
- Cholesterol: 50mg