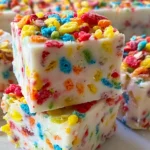
Fruity pebbles fudge

Introduction to Fruity Pebbles Fudge
Hey there, fellow home cooks! If you’re looking for a delightful dessert that can bring smiles to your family’s faces, look no further than fruity pebbles fudge. This vibrant treat is a colorful burst of joy that takes me straight back to my childhood. It’s incredibly simple to whip up, making it perfect for busy moms like us who need to add a little magic to our family’s weeknight routine. With just a few ingredients and minimal time, you can create an unforgettable fudge that everyone will adore.
Why You’ll Love This Fruity Pebbles Fudge
This fruity pebbles fudge is a game-changer for your dessert repertoire. It’s quick and easy, taking less than 30 minutes of your valuable time. The delightful flavor is a sugary symphony that tingles your taste buds, while its vibrant colors make it visually irresistible. Perfect for busy moms, this treat is an instant crowd-pleaser, transforming any dull day into a joyful occasion. Everyone deserves a little sweetness now and then!
Ingredients for Fruity Pebbles Fudge
Gathering the right ingredients is half the fun! For this fruity pebbles fudge, you’ll need:
- 1 cup Flour: This gives the fudge a sturdy base.
- 1 1/4 cup Fruity Pebbles cereal: The star of the show! This adds vibrant color and fruity crunch.
- 3/4 cups Sugar: For that essential sweetness we crave in treats.
- 1 teaspoon Vanilla: A hint of warmth and depth in flavor.
- 1 1/2 cups White Chocolate: The creamy, dreamy heart of our fudge.
- 1/2 cup Butter: For richness and to help everything meld beautifully together.
- 1 can of Eagle-brand Milk: This sweetened condensed milk ensures silky smoothness.
Feel free to get creative! You can substitute gluten-free flour if necessary. Adjust your sugar level to your liking, but don’t skimp on the Fruity Pebbles—it’s what makes this fudge so fun!
How to Make Fruity Pebbles Fudge
Now comes the fun part: bringing this fruity pebbles fudge to life! Each step is simple, and you’ll see how easy it is to create this delightful treat. Let’s dive into the deliciousness!
Step 1: Melt the White Chocolate
Begin your adventure by grabbing a microwave-safe bowl. Add the 1 1/2 cups of white chocolate chips. Microwave them in 15-second intervals, stirring after each burst. This keeps the chocolate from burning and helps it melt evenly. When it’s completely smooth and creamy, you’ll know you’re ready for the next step.
Step 2: Prepare the Flour
In a separate bowl, toss in 1 cup of flour. Pop it into the microwave for just one minute. This step may seem odd, but it helps remove any raw flour taste. After it’s done, give it a good stir, then set it aside, patiently awaiting its turn in this colorful concoction.
Step 3: Mix the Butter, Sugar, and Vanilla
Grab another bowl and mix together 1/2 cup of butter (softened), 3/4 cups of sugar, and 1 teaspoon of vanilla extract. Whisk this trio until it’s well combined. You want a light and fluffy texture that smells oh-so-good! Don’t rush; this part adds depth to your fudge.
Step 4: Combine Ingredients
Now bring all your hard work together! Add the prepared flour into the butter mixture, followed by your melted white chocolate. Stir everything together until it forms a thick batter. At this point, you’ll see the magical transformation taking place. A lovely creamy consistency is developing, and your kitchen will start to smell delightful!
Step 5: Add Fruity Pebbles
The pièce de résistance is upon us! It’s time to add those colorful, crispy fruity pebbles. Gently fold in 1 1/4 cups of fruity pebbles cereal into the fudge mixture. Make sure they’re evenly distributed. This step adds the crunch and the spectacular colors that make your fudge pop. You can almost hear the giggles of your kids as they spot the vibrant hues!
Step 6: Pour and Chill
Now, let’s finish this delicious masterpiece! Spray an 8 x 8-inch dish with cooking spray to ensure easy removal later. Pour your fudge batter into the dish, spreading it out evenly. For an extra touch, sprinkle some additional fruity pebbles on top. This not only looks fantastic but also adds texture with each bite.
Once your fudge is nicely packed into the dish, it’s time to let it chill. Pop it into the refrigerator for at least one hour. This crucial step allows everything to set properly, resulting in the perfect fudge consistency. Go ahead and tidy up your kitchen or put your feet up while you wait!
Tips for Success
To make your fruity pebbles fudge shine, keep these tips in mind:
- Stir the melted white chocolate thoroughly to avoid any lumps, ensuring a smooth texture.
- Let the fudge set completely in the refrigerator for the best consistency.
- Store leftovers in an airtight container. They’ll be good for up to a week, but I bet they won’t last that long!
Equipment Needed
To whip up this fruity pebbles fudge, gather a few essential kitchen tools:
- Microwave-safe bowls: For melting chocolate and mixing ingredients.
- Whisk or spoon: Essential for blending the mixtures smoothly.
- 8 x 8-inch dish: The perfect size for setting your fudge.
- Cooking spray or parchment paper: Choose either for easy removal of your fudge.
Variations
The beauty of fruity pebbles fudge lies in its versatility! You can easily customize it to suit your family’s tastes or dietary needs. Here are some fun variations to consider:
- Add Chocolate Chips: Mix in some mini chocolate chips for a delightful chocolatey twist.
- Gluten-Free Option: Swap out regular flour for gluten-free flour to make this treat suitable for gluten-sensitive family members.
- Dairy-Free Delight: Use dairy-free butter and white chocolate for a vegan-friendly version.
- Nuts for Crunch: Stir in chopped nuts like almonds or pecans for added texture and flavor.
- Flavored Extracts: Experiment with other extracts, like almond or coconut, to elevate the flavor profile.
- Seasonal Sprinkles: Top with festive sprinkles for holidays or birthdays to turn your fudge into a celebratory treat!
Feel free to get creative! Each variation opens up a new world of possibilities, making this fruity pebbles fudge not just a treat, but a delightful adventure in your kitchen.
Serving Suggestions
When it comes to serving fruity pebbles fudge, presentation is key! Here are some delightful ideas to enhance your serving experience:
- Pair with vanilla ice cream for a delightful dessert combo.
- Serve alongside fresh fruit like strawberries or bananas for a refreshing contrast.
- Cut the fudge into fun shapes using cookie cutters for parties.
- Garnish with whipped cream and a sprinkle of fruity pebbles on top.
- Offer fun drinks, like colorful fruit punch, to complement the fudge!
FAQs about Fruity Pebbles Fudge
As you embark on your delicious journey with fruity pebbles fudge, you may have a few questions. Here are some common inquiries and answers to help you along the way:
How should I store fruity pebbles fudge?
Store your fruity pebbles fudge in an airtight container at room temperature. It stays fresh for up to one week. You can also keep it in the refrigerator for even longer shelf life, but trust me—it won’t last that long!
Can I substitute the white chocolate?
Absolutely! While white chocolate offers that creamy sweetness, you can use semi-sweet chocolate or even milk chocolate if you prefer. Just keep in mind that it will alter the flavor. For a dairy-free option, look for vegan chocolate brands.
What if I don’t have sweetened condensed milk?
If sweetened condensed milk isn’t available, you can make your own! Combine 1 cup of milk with 1/4 cup of sugar and simmer on low heat until thickened, stirring constantly for a creamy alternative.
Can I freeze fruity pebbles fudge?
Can I make fruity pebbles fudge ahead of time?
Definitely! This fudge is perfect for make-ahead treats. You can prepare it a day or two in advance. Just ensure it’s stored in an airtight container to maintain its freshness.
Final Thoughts
As we wrap up our adventure with fruity pebbles fudge, I can’t help but smile thinking about the joy it brings to families. This colorful treat isn’t just about pleasing the palate; it’s about creating sweet memories with loved ones. Encouraging kids to join in the fun of cooking fosters creativity and togetherness. So, grab your little helpers and dive into making this delightful fudge together! You’ll be wowed by the laughter, the mess, and the bonding that can happen in your kitchen. Trust me, it’ll become a cherished recipe in no time!
Fruity pebbles fudge
- Total Time: 1 hour 30 minutes
- Yield: 16 pieces 1x
- Diet: Vegetarian
Description
Fruity pebbles fudge is a colorful and delicious treat that’s easy to make, combining fruity flavors with creamy fudge.
Ingredients
- 1 cup Flour
- 1 1/4 cup Fruit Pebbles cereal
- 3/4 cups Sugar
- 1 teaspoon Vanilla
- 1 1/2 cups White Chocolate
- 1/2 cup Butter
- 1 can of Eagle-brand Milk
Instructions
- In a microwave safe bowl, place the White Chocolate, and microwave at 15 second intervals until melted. Stir well until smooth and creamy.
- Place the Flour in a separate bowl, and microwave for 1 minute. Stir and set aside.
- In a separate dish, mix the Butter, Sugar and Vanilla, and stir until well combined.
- Add the Flour to the Butter mixture, and then add the White Chocolate, and stir well.
- Add the Sweetened Condensed Milk and stir until all ingredients are mixed well.
- Add the Fruity Pebbles and stir to mix.
- Spray an 8 X 8 dish with Cooking Spray and pour the Fudge into the dish.
- Sprinkle Fruity Pebbles on top of the Fudge, and place in the refrigerator for at least one hour.
- Cut in 2 X 2-inch pieces and serve.
Notes
- Make sure to stir the White Chocolate thoroughly for a smooth texture.
- Allow the fudge to set completely in the refrigerator for the best consistency.
- This fudge can be stored in an airtight container for up to one week.
- Prep Time: 20 minutes
- Cook Time: 10 minutes
- Category: Dessert
- Method: Microwave
- Cuisine: American
Nutrition
- Serving Size: 1 piece
- Calories: 180
- Sugar: 10g
- Sodium: 50mg
- Fat: 8g
- Saturated Fat: 5g
- Unsaturated Fat: 3g
- Trans Fat: 0g
- Carbohydrates: 25g
- Fiber: 1g
- Protein: 2g
- Cholesterol: 15mg