Hillbilly Pie: Discover the Secret to Old-Fashioned Yum!

Introduction to Hillbilly Pie (Old-Fashioned Poor Man’s Cherry Pie)
Ah, Hillbilly Pie! The mere mention of it can transport me back to my grandmother’s cozy kitchen, filled with warmth and laughter. This Old-Fashioned Poor Man’s Cherry Pie is not just a dessert; it embodies the spirit of home-cooked love. If you’re a busy mom or a professional looking for a sweet escape amidst the chaos, this pie is your answer. It’s simple yet delightful, a quick solution for a hectic day. With just a handful of ingredients, you can impress your loved ones and invoke the charm of grandmother’s recipes. Let’s roll up our sleeves and dive in!
Why You’ll Love This Hillbilly Pie
What’s not to love about this Hillbilly Pie? It’s quick and easy, perfect for busy days when time seems to vanish. The sweet, juicy cherry filling wrapped in a flaky crust creates a symphony of flavors that dances on your taste buds. Plus, it’s versatile! Serve it warm with vanilla ice cream or let it cool to enjoy later. With just a few simple ingredients, you get a dessert that feels like a hug from home.
Ingredients for Hillbilly Pie
Gathering the right ingredients is half the fun of making Hillbilly Pie. This classic dessert relies on a few key players that harmonize perfectly to create that sweet nostalgia. Here’s what you’ll need:
- Cherries: Fresh or frozen, cherries are the star of this pie. They provide that sweet and tart flavor that makes your taste buds sing. When in season, fresh cherries are unbeatable!
- Sugar: A must for sweetness, sugar balances the tartness of the cherries perfectly. You can adjust this based on your taste preferences.
- Cornstarch: This ingredient thickens the cherry filling, ensuring it’s juicy but not watery. If you find yourself out of cornstarch, you can use flour or tapioca as an alternative.
- Vanilla Extract: A splash of vanilla provides a rich depth, elevating the pie’s flavor to a whole new level.
- Lemon Juice: Just a tablespoon can brighten up the cherry flavor and add a zing that makes the pie irresistible.
- Pie Crust: You can save time with a pre-made crust or make your own from scratch if you’re feeling adventurous. Either option works beautifully!
- Butter: A few tiny pieces of butter dotting the cherry filling before baking adds richness and a lovely flavor.
Each of these ingredients brings something delightful to your Hillbilly Pie. For exact measurements, refer to the bottom of the article where they’re provided for easy printing. Now that we’ve gathered our ingredients, let’s get cooking!
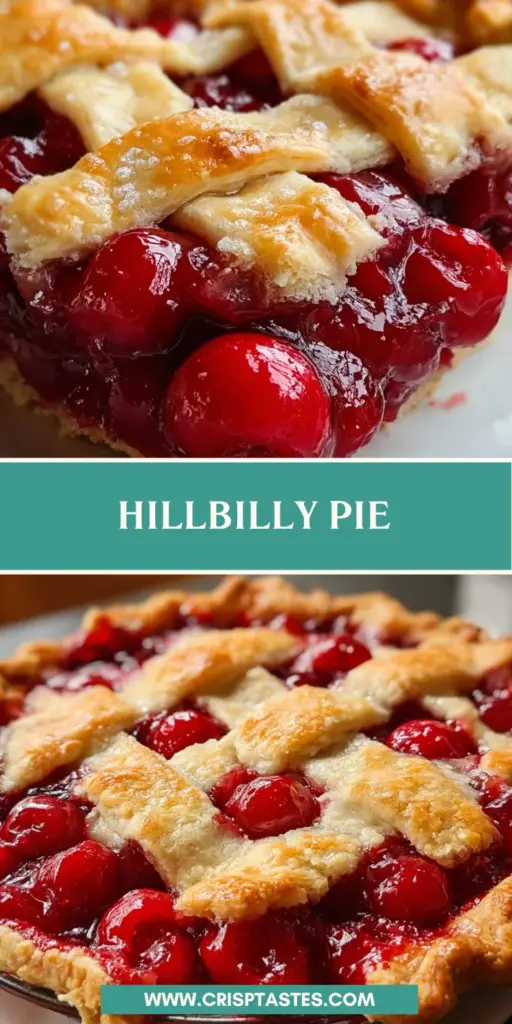
How to Make Hillbilly Pie
Step 1: Preheat the Oven
Let’s kick things off with the most crucial step: preheating your oven to 400°F (200°C). This is more than just routine; it ensures your pie bakes evenly, resulting in a perfectly golden crust. While you prepare your filling, the oven heats up, saving you time and ensuring your pie has that delightful crunch right from the first bite.
Step 2: Prepare the Cherry Filling
In a mixing bowl, toss together your cherries, sugar, cornstarch, vanilla extract, and lemon juice. Make sure to mix them thoroughly; this is where the magic happens. The sugar and lemon juice draw out the cherries’ natural juices, while the cornstarch helps thicken the filling as it bakes. You want a luscious, bubbly filling that hugs every cherry, so don’t skimp on the mixing!
Step 3: Assemble the Pie
Now, let’s bring this sweet masterpiece together! Pour the cherry mixture into your prepared pie crust, spreading it out evenly. Dot the top with small pieces of butter—this adds a richness that takes it over the top. If you’re feeling nostalgic, seal and flute the edges of the crust lovely. If using a top crust, don’t forget to cut some slits for steam to escape!
Step 4: Create Steam Vents
Speaking of slits, take a moment to grab your knife and carefully cut a few in the top crust. This step is essential; it allows steam to release during baking, keeping your filling from becoming watery. Plus, those slits can become beautiful little windows showcasing your bubbly cherry mixture—how’s that for a pie that’s as pretty as it is delicious?
Step 5: Bake the Pie
It’s time to bake your pie! Slide it into the preheated oven and let it work its magic for 30–35 minutes. Keep an eye on it; you want the crust to turn a lovely golden brown and the filling to be bubbling around the edges. The sound of that bubbling will have your family gathering in the kitchen, eager for a slice!
Step 6: Cooling Before Serving
Once baked, resist the urge to cut into it right away! Let your pie cool for at least 15 minutes. This cooling period is vital; it allows the filling to set up a bit, making for easier slicing and a more enjoyable experience. Trust me; your taste buds will thank you for this little moment of patience!
Tips for Success
- Choose fresh cherries when in season for the best flavor.
- Remember to taste the filling before putting it in the oven; adjust sugar if necessary!
- Use a deep-dish pie crust if you have a lot of filling.
- Let the pie cool completely before slicing to avoid a messy cut.
- A scoop of vanilla ice cream on top takes the experience to the next level!
Equipment Needed
- Mixing Bowl: A medium-sized bowl works best; use a large one if you prefer more room.
- Pie Dish: A traditional pie plate is lovely; a glass or ceramic dish can also work.
- Knife: Essential for slicing the top crust and cutting the pie.
- Measuring Cups: Great for accuracy, but eyeballing it can be fun, too!
- Spatula: Perfect for mixing and pouring your cherry filling.
Variations on Hillbilly Pie
- Berry Medley: Mix cherries with blueberries and raspberries for a colorful twist.
- Nutty Crust: Incorporate crushed nuts like pecans or walnuts into your pie crust for added texture and flavor.
- Gluten-Free Option: Use a gluten-free pie crust and cornstarch to make this pie accessible for those with dietary restrictions.
- Spiced Delight: Add a sprinkle of cinnamon or nutmeg into the filling for a warm, cozy flavor profile.
- Peachy Substitute: Swap half of the cherries for fresh peaches for a delightful summertime flavor.
Serving Suggestions for Hillbilly Pie
- Vanilla Ice Cream: A classic pairing that complements the tart cherries beautifully.
- Fresh Whipped Cream: Add a dollop for a light and airy finish.
- Mint Leaves: Garnish the pie with fresh mint for a pop of color and flavor.
- Hot Beverages: Serve with coffee or warm tea for a cozy dessert experience.
- Presentation: Slice and serve in individual plates with a scoop of ice cream beside it for a delightful display.
FAQs about Hillbilly Pie
Curious about this delightful dessert? Here are some frequently asked questions that will help you master the art of Hillbilly Pie!
Can I use frozen cherries instead of fresh?
Absolutely! Frozen cherries work wonderfully and save you time. Just remember to drain any excess liquid before mixing them into the filling to avoid a soggy pie.
What can I substitute for cornstarch?
If you’re out of cornstarch, you can use flour or tapioca starch as a thickening agent. Each will yield a slightly different texture, but all will still deliver a tasty filling.
Can I make this pie ahead of time?
Yes! You can prepare the pie and store it in the fridge before baking. Just remember to cover it well to prevent it from drying out. When you’re ready to enjoy, bake it as instructed!
How do I know when my Hillbilly Pie is done baking?
Keep an eye on the crust—it should be golden brown, and the filling should be bubbling through the slits you created. This usually takes about 30-35 minutes at 400°F (200°C).
Is Hillbilly Pie suitable for vegans?
To make this pie vegan, swap the butter with a vegan alternative and use a plant-based pie crust. The filling will remain just as delicious!
Final Thoughts
Hillbilly Pie is more than just a dessert; it’s a journey back to simpler times, filled with warmth and nostalgia. Each slice evokes memories of family gatherings, laughter, and the sweet aroma wafting through the kitchen. This Old-Fashioned Poor Man’s Cherry Pie brings joy not only to your palate but also to your heart. It’s the perfect recipe for busy moms and professionals seeking a little sweetness in their lives. So, whether you’re slicing into it after dinner or serving it with ice cream on a sunny afternoon, let this pie remind you of home, love, and delicious memories.
Print
Hillbilly Pie: Discover the Secret to Old-Fashioned Yum!
- Total Time: 55 minutes
- Yield: 8 servings 1x
- Diet: Vegetarian
Description
Hillbilly Pie is a classic dessert that captures the essence of old-fashioned cooking with a delicious cherry filling and a simple, flaky crust, making it a beloved treat for all.
Ingredients
- 2 cups fresh or frozen cherries
- 1 cup sugar
- 2 tablespoons cornstarch
- 1 teaspoon vanilla extract
- 1 tablespoon lemon juice
- 1 pre-made pie crust
- 1 tablespoon butter, cut into small pieces
Instructions
- Preheat the oven to 400°F (200°C).
- In a mixing bowl, combine cherries, sugar, cornstarch, vanilla extract, and lemon juice. Stir until well combined.
- Pour the cherry mixture into the prepared pie crust.
- Dot the top of the filling with small pieces of butter.
- Cover with another pie crust or use a lattice crust if desired.
- Seal and flute the edges of the crust.
- Cut slits in the top crust to allow steam to escape.
- Bake in the preheated oven for 30-35 minutes, or until the crust is golden brown and the filling is bubbly.
- Let cool before serving.
Notes
- For best results, use fresh cherries when in season.
- This pie can be served warm or cold.
- Serve with a scoop of vanilla ice cream on top for added flavor.
- Prep Time: 20 minutes
- Cook Time: 35 minutes
- Category: Dessert
- Method: Baking
- Cuisine: American
Nutrition
- Serving Size: 1 slice
- Calories: 250
- Sugar: 20g
- Sodium: 180mg
- Fat: 10g
- Saturated Fat: 4g
- Unsaturated Fat: 5g
- Trans Fat: 0g
- Carbohydrates: 36g
- Fiber: 2g
- Protein: 2g
- Cholesterol: 15mg