How Changing My Sourdough Starter Feeding Ratio Transformed My Bread

Why I Started Baking Sourdough at Home
Like many people, my sourdough journey began with curiosity. I loved the idea of making bread from scratch using nothing more than flour, water, salt, and time. There was something almost magical about the process. Watching a simple mixture of flour and water come alive with natural yeast felt like participating in an ancient tradition that had existed for thousands of years. During my first few weeks of baking, I became completely obsessed. I watched countless videos, read baking blogs late into the night, and followed every instruction as carefully as possible.
At first, I thought success simply meant keeping the starter alive. If it bubbled, smelled slightly tangy, and doubled occasionally, I assumed I was doing everything correctly. Most beginner guides recommended the classic 1:1:1 feeding ratio, so that became my routine. Every day, I discarded part of the starter and fed it equal weights of starter, flour, and water. The process felt scientific and precise, which gave me confidence. Still, despite my consistency, the bread I produced never looked like the gorgeous bakery loaves I admired online.
The crusts were decent, and the flavor was acceptable, but the interior told a different story. Instead of an airy crumb filled with irregular holes, my loaves were dense and heavy. Slices felt compact rather than light. At times, the bread even seemed slightly gummy, no matter how long I baked it. I blamed everything except the starter itself. I experimented with different flours, adjusted hydration levels, and practiced shaping techniques repeatedly. Yet the problem remained stubbornly consistent.
What made the experience frustrating was that my dough appeared active during fermentation. It rose somewhat and showed bubbles, but the final oven spring always disappointed me. Looking back now, I understand that my starter simply lacked the strength and balance needed for powerful fermentation. The issue wasn’t my baking ability alone — it was the way I was feeding the living culture at the heart of every loaf.
The Frustration of Dense Homemade Bread
Anyone who has baked sourdough knows how emotionally invested you become in each loaf. Bread baking is slow, patient work. You spend hours mixing, stretching, folding, fermenting, shaping, proofing, and baking. When the final result comes out dense after all that effort, it can feel deeply discouraging. That was exactly where I found myself after months of following the same feeding routine.
My starter always looked “healthy enough” on the surface. It bubbled steadily and developed a pleasant sour smell. Sometimes it even doubled in size after feeding, which made me think it was strong. But when I used it in dough, the results never matched the visual excitement of the starter jar itself. My bread lacked volume. Instead of rising upward confidently, the loaves spread outward during baking. The crumb remained tight and compact, with only tiny uniform holes rather than the dramatic open structure sourdough is famous for.
One of the most confusing parts was the inconsistency. Occasionally I’d produce a loaf that looked promising, only for the next bake to collapse again. This made troubleshooting extremely difficult. I started wondering whether sourdough was simply too complicated for home bakers without professional equipment. Online forums often discussed hydration percentages, autolyse techniques, and expensive Dutch ovens, so naturally I assumed the problem had to be technical.
The flavor also became increasingly sharp and acidic over time. While sourdough should have some tang, my bread often carried an overpowering sourness that overwhelmed everything else. Instead of balanced complexity, the flavor tasted harsh. The starter itself developed a stronger acidic smell between feedings, especially when left in the refrigerator. At the time, I didn’t realize this was a sign that the microorganisms inside the starter were running out of food too quickly.
That realization changed everything for me later. I learned that a starter can appear active while still being underfed. Tiny bubbles and mild expansion don’t necessarily mean the yeast population is thriving. Sometimes the starter survives rather than flourishes. That was exactly what was happening in my kitchen for months without me realizing it.
Understanding the Traditional 1:1:1 Feeding Ratio
What the Ratio Actually Means
The classic 1:1:1 sourdough feeding ratio is one of the most widely recommended methods for beginners. The formula is simple: equal parts starter, flour, and water by weight. For example, if you keep 50 grams of starter, you feed it with 50 grams of flour and 50 grams of water. The simplicity makes it easy to remember, which explains why so many tutorials rely on it.
In theory, this ratio works perfectly fine for maintaining an active sourdough culture under ideal conditions. It provides fresh nutrients while refreshing the microbial balance inside the jar. For bakers who bake frequently and keep their starter at room temperature, the ratio can perform reasonably well. The problem is that many beginners assume it is the universal “best” feeding method, regardless of baking schedule, room temperature, flour type, or storage habits.
What I eventually discovered is that the ratio dramatically affects fermentation speed and microbial behavior. A smaller feeding ratio like 1:1:1 means the mature starter makes up a large percentage of the mixture. Since the existing yeast and bacteria population is already substantial, fermentation happens quickly. The starter rises fast, consumes nutrients rapidly, and becomes acidic sooner.
At first glance, fast fermentation sounds beneficial. Watching your starter double quickly feels exciting. But rapid fermentation can become problematic if you aren’t baking daily. The microorganisms exhaust their food supply sooner, causing the starter to weaken over time. In my case, this led to excessive acidity and inconsistent strength. The starter often peaked before I was ready to use it, then gradually collapsed and became sluggish.
I also learned that hydration matters just as much as feeding quantity. Equal flour and water creates a relatively loose starter consistency. While liquid starters ferment quickly, they can encourage faster acid production and weaker gluten development compared to thicker starters. That explained why my starter often smelled aggressively sour despite appearing active.
Understanding these details completely changed how I viewed sourdough maintenance. Feeding ratios aren’t just measurements — they shape the entire behavior and health of the culture.
The Problems I Faced With My Original Starter
Weak Rise and Tight Crumb
The most obvious issue with my old feeding routine was weak fermentation power. Even though the starter showed bubbles, it lacked the strength needed to fully support dough expansion. This became painfully obvious during bulk fermentation. My dough would rise slightly, but not dramatically. Instead of becoming airy and elastic, it often remained dense and heavy despite long fermentation times.
When baked, the loaves reflected those weaknesses immediately. The oven spring was minimal. Rather than bursting upward with energy, the bread spread outward and flattened. The crumb inside looked compressed, with tiny consistent holes instead of the irregular airy pockets associated with artisan sourdough. Slicing into the bread became disappointing because I already knew what I would find before the knife even reached the center.
At one point, I became convinced my shaping technique was the problem. I practiced tension-building methods repeatedly and watched professional bakers shape dough with ease. But no matter how carefully I folded or tightened the dough, the final result barely improved. That’s because shaping can only enhance the strength already present in the dough — it cannot compensate for a weak starter lacking fermentation power.
Another hidden issue was timing. My starter often peaked too quickly after feeding, especially at warmer room temperatures. By the time I mixed dough, it was sometimes already falling back down. This meant the yeast activity had started declining before fermentation even began. I didn’t understand this subtle detail at the time, but it made a huge difference in dough performance.
The emotional impact surprised me too. Baking bread is deeply satisfying when things go well, but repeated disappointing loaves can slowly chip away at confidence. I began second-guessing every step of my process. Yet the solution turned out to be much simpler than complicated shaping techniques or expensive equipment. My starter simply needed more nourishment and a better balance between food availability and fermentation speed.
Excessive Sourness and Acidity
While poor rise and dense crumb were frustrating, the increasing acidity in my bread became an even bigger warning sign that something was off with my starter. At first, I actually thought the strong sour flavor meant I was succeeding. After all, sourdough is supposed to taste tangy, right? But over time, the flavor crossed the line from pleasantly complex into aggressively acidic. Instead of a balanced loaf with nutty wheat flavors and subtle fermentation notes, my bread developed a sharp sourness that lingered long after each bite.
The starter itself also started behaving differently between feedings. A grayish liquid known as hooch sometimes formed on top, especially when left in the refrigerator for a few days. The smell shifted from fresh and yeasty to intensely vinegary. Even though the culture remained technically alive, it clearly wasn’t thriving. What I didn’t understand back then was that the microorganisms inside the starter were essentially running low on food and entering survival mode.
In a sourdough starter, yeast and bacteria live together in a delicate partnership. Yeast creates carbon dioxide, which helps bread rise, while lactic acid bacteria contribute flavor and acidity. When the starter is underfed, the bacteria often dominate because they continue producing acids even after the yeast weakens. The result is a culture that smells active but lacks the lifting power needed for strong fermentation. That perfectly described my situation.
Temperature also made things worse. During warmer months, my starter fermented rapidly under the 1:1:1 feeding schedule. It would peak quickly, collapse, and become acidic long before I was ready to bake. Since I wasn’t feeding it frequently enough to match that speed, the imbalance became more pronounced over time. I noticed that my dough sometimes became sticky and difficult to handle as well, another sign of excessive acid production weakening the gluten structure.
Once I switched to a higher feeding ratio and thicker consistency, the difference in aroma alone shocked me. Instead of harsh vinegar notes, the starter smelled creamy, mildly tangy, and pleasantly yeasty. The flavor of my bread transformed too. The sourness became more refined and balanced, allowing the natural sweetness of the flour to shine through. It was the first time my homemade bread truly tasted like artisan bakery sourdough rather than simply “very sour bread.”
Discovering a Better Feeding Ratio
Learning From Experienced Bakers
My breakthrough came unexpectedly during a late-night deep dive into sourdough discussions online. After months of frustration, I started searching specifically for solutions to weak starters and dense bread. That’s when I noticed something surprising: many experienced bakers weren’t using the standard 1:1:1 feeding ratio at all. Some used 1:2:2, others preferred 1:5:5, and many emphasized adjusting ratios based on baking schedules, room temperature, and desired fermentation speed.
At first, this completely confused me. Most beginner guides present sourdough feeding almost like a rigid formula. Seeing skilled bakers use wildly different methods made me realize there wasn’t just one “correct” approach. Instead, sourdough maintenance was far more flexible and intuitive than I had been led to believe.
One experienced baker explained something that immediately clicked for me: a starter is like a tiny ecosystem. If you constantly give it only a small amount of fresh food relative to its population, the microorganisms burn through resources quickly. The culture survives, but it becomes stressed and overly acidic. Feeding a larger ratio of fresh flour and water gives the yeast more time and nutrients to grow strong before acidity takes over.
That idea changed my entire perspective. Instead of simply trying to keep my starter alive, I began focusing on helping it thrive. I started reading about microbial balance, fermentation timing, hydration levels, and the relationship between acidity and yeast strength. The more I learned, the more obvious it became that my starter had been chronically underfed for months.
Another important lesson came from bakers who maintained thick starters rather than liquid ones. They described stronger rises, milder acidity, and improved dough performance. This caught my attention immediately because my starter had always been fairly loose and pourable under the equal hydration system. I realized consistency itself might be influencing fermentation behavior.
Armed with all this new information, I decided it was finally time to experiment instead of blindly following beginner instructions. That decision ended up transforming not only my starter but my entire relationship with sourdough baking.

Experimenting With a 1:3:2 Ratio
The first time I switched feeding ratios, I honestly didn’t expect dramatic results. I thought maybe I’d notice a small improvement over time. Instead, the change became obvious almost immediately. I began feeding my starter roughly 40 grams of mature starter, 120 grams of flour, and around 80 grams of water, creating a thick paste-like consistency rather than a loose batter.
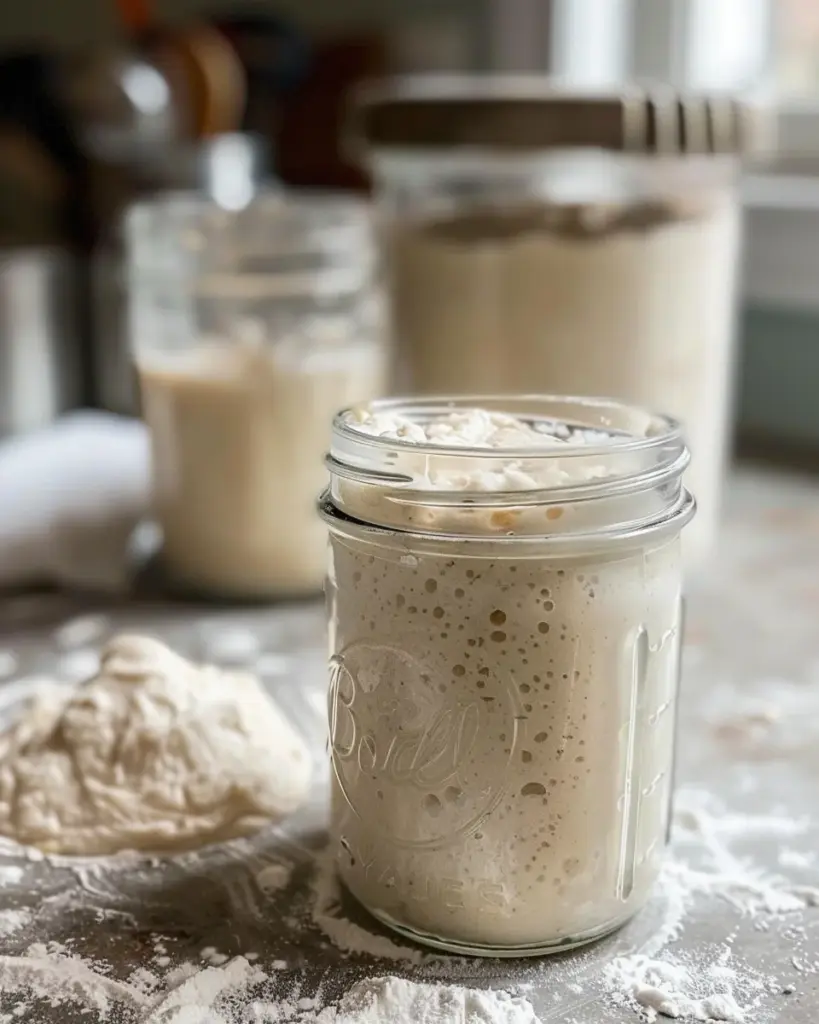
The texture difference surprised me right away. My old starter flowed easily and flattened quickly after stirring, but this new mixture felt dense, elastic, and sturdy. It held shape inside the jar and required more effort to mix thoroughly. At first, I worried I had made it too dry, but experienced bakers often described thick starters as “dough-like,” so I trusted the process.
Within hours, the activity looked different from anything I’d seen before. Instead of tiny uniform bubbles scattered throughout the jar, large pockets of gas formed as the starter expanded upward with noticeable strength. The rise became taller and more stable. Most importantly, the starter maintained its peak longer instead of rapidly collapsing.
The aroma changed too. Rather than sharp acidity, the smell became pleasantly fruity and slightly creamy. It reminded me more of yogurt and fresh dough than vinegar. That subtle shift signaled a healthier microbial balance developing inside the culture.
The real test came during baking. When I mixed dough using the newly strengthened starter, the fermentation behavior changed dramatically. Bulk fermentation became more predictable, the dough felt lighter and airier, and shaping suddenly became easier because the gluten structure held tension better. During baking, the oven spring shocked me. For the first time, my loaves rose upward confidently rather than spreading sideways across the baking surface.
The crumb transformed as well. Instead of dense, tight pockets, I finally achieved the open irregular structure I had admired in artisan sourdough photos for so long. The bread tasted richer, less aggressively sour, and more balanced overall. It honestly felt like I had unlocked an entirely new level of baking simply by changing how I fed the starter.
How a Thicker Starter Changed Everything
The Importance of Starter Consistency
Before changing my feeding ratio, I underestimated how much starter consistency affects fermentation behavior. I focused almost entirely on timing and measurements, assuming hydration level was a minor detail. But once I started maintaining a thicker starter, I realized consistency influences nearly every aspect of sourdough performance — from microbial balance to flavor development and dough strength.
A liquid starter behaves very differently from a thick one. Higher hydration allows microorganisms to move and consume nutrients faster, which accelerates fermentation. That sounds helpful initially because the starter becomes bubbly quickly, but rapid fermentation also means the culture exhausts its food supply sooner. Acidity builds rapidly, and the starter often peaks and collapses within a short window.
My thicker starter behaved in a much steadier, more controlled way. Fermentation slowed slightly, which gave the yeast more time to reproduce and strengthen before acid levels became excessive. Instead of racing through its food supply, the starter developed gradually and predictably. This slower pace created a healthier balance between yeast activity and bacterial acidity.
I also noticed that the texture itself became an incredibly useful visual indicator. A thick starter reveals its strength more clearly because it physically lifts itself upward as gas builds inside. Watching the starter dome beautifully in the jar gave me far more confidence about its readiness for baking. With my old liquid starter, bubbles often appeared active even when the culture lacked real fermentation power.
Another major advantage involved storage. Since the thicker starter fermented more slowly, it survived refrigeration far better than before. Under the old 1:1:1 routine, my starter frequently became overly acidic after just a few days in the fridge. Now it could remain healthy and vigorous for four or five days — sometimes longer — with minimal decline in strength.
This made sourdough dramatically more practical for everyday life. I no longer felt chained to rigid feeding schedules or pressured to bake constantly just to maintain the culture. The starter adapted to my schedule rather than the other way around, which made the entire process feel sustainable instead of stressful.
Why Thick Starters Ferment Differently
The science behind thick starters is surprisingly fascinating. When hydration decreases, fermentation slows because microorganisms move through the mixture less easily. This changes the balance between yeast growth and acid production in important ways. Lower hydration environments generally encourage yeast stability while moderating excessive bacterial acidification.
In practical terms, that means a thicker starter often develops stronger leavening power with less harsh sourness. The yeast population remains healthier for longer periods because food resources are consumed more gradually. Meanwhile, acid production stays balanced rather than overwhelming the culture too quickly.
Temperature stability also improves in thicker starters. Since fermentation moves more slowly, environmental fluctuations have less dramatic impact on timing. My old liquid starter reacted wildly to seasonal temperature changes. In summer, it fermented almost uncontrollably fast. In winter, it became sluggish and inconsistent. The thicker starter proved much more forgiving year-round.
Another benefit involves gluten development inside the starter itself. A thicker mixture allows some gluten structure to form naturally, helping trap gas more effectively. This creates stronger visible expansion and contributes to improved dough performance later during baking. It’s almost like the starter develops its own internal strength before ever reaching the bread dough.
I also found thick starters easier to read visually. The rise line remained distinct, the peak lasted longer, and the collapse happened more gradually. These clues made timing far easier to understand, especially for someone still learning fermentation patterns. Instead of feeling like sourdough was unpredictable magic, I started recognizing clear biological patterns happening inside the jar.
Perhaps the biggest surprise was how much more forgiving everything became. Even when I forgot to feed the starter exactly on schedule, it recovered quickly with fresh flour and water. The culture developed resilience. That resilience translated directly into better bread, more reliable fermentation, and far less stress in my kitchen overall.
The Science Behind Stronger Fermentation
Yeast Activity and Food Availability
One of the biggest lessons I learned through this process was that a sourdough starter is essentially a living colony that depends entirely on its food supply. Before changing my feeding ratio, I treated feeding as a routine task rather than understanding what was actually happening inside the jar. Once I started learning more about fermentation science, everything finally made sense.
Yeast cells consume sugars released from flour and convert them into carbon dioxide and alcohol. That carbon dioxide is what creates rise in both the starter and the bread dough. The problem with my old 1:1:1 feeding routine was that the yeast population consumed available nutrients far too quickly. Since there wasn’t a large reserve of fresh flour relative to the mature starter, fermentation accelerated rapidly and the culture became acidic before the yeast had enough time to build real strength.
When I switched to the 1:3:2 feeding ratio, I essentially expanded the starter’s food supply dramatically. The microorganisms suddenly had access to far more nutrients, which allowed the yeast population to reproduce more effectively before environmental stress took over. Instead of surviving on limited resources, the culture was thriving in abundance.
This directly impacted how my dough behaved during fermentation. Strong yeast activity meant better gas production, which translated into larger bubbles, lighter dough texture, and improved oven spring. The dough no longer felt sluggish or lifeless during bulk fermentation. It expanded confidently and maintained structure instead of collapsing under its own weight.
Another fascinating detail involved timing. A healthier starter maintained peak activity longer because nutrients remained available for a greater period. Under the old feeding method, my starter often peaked quickly and started declining before I even mixed my dough. With the higher feeding ratio, the fermentation window became much more forgiving. I had flexibility instead of racing against the clock.
I also realized that stronger fermentation improved flavor complexity. Healthy yeast activity produces subtle aromatic compounds that contribute depth and richness to bread. My newer loaves developed mild sweetness, nutty notes, and layered flavors that simply didn’t exist before. Instead of one-dimensional sourness, the bread finally tasted balanced and sophisticated.
Understanding the relationship between food availability and microbial health completely changed how I approached sourdough maintenance. I stopped thinking in terms of rigid formulas and started thinking like a caretaker supporting a living ecosystem.
Balancing Bacteria and Acidity
Sourdough fermentation depends on more than yeast alone. Wild yeast and lactic acid bacteria exist together in a delicate partnership, and maintaining balance between them is one of the most important parts of creating a strong starter. Before changing my feeding ratio, I unknowingly allowed acidity to dominate my culture.
Lactic acid bacteria are responsible for the tangy flavor associated with sourdough bread. In healthy amounts, these acids create complexity and depth. But when acidity becomes excessive, problems start appearing quickly. Overly acidic starters weaken gluten structure, reduce yeast performance, and create dense or sticky doughs that struggle to rise properly.
That was exactly what I experienced for months. My starter smelled aggressively sour, the dough often felt weak during shaping, and the final loaves lacked volume. The bacteria were essentially overpowering the yeast because the starter wasn’t receiving enough fresh nutrients often enough.
Increasing the feeding ratio solved this issue by diluting accumulated acids and providing fresh starches for both yeast and bacteria to consume. The larger quantity of flour created a more stable environment where yeast could remain active longer without being overwhelmed by rising acidity. This restored balance inside the starter.
Hydration also played a huge role. Since my new starter consistency was much thicker, acid production slowed naturally. Thick starters tend to favor milder lactic acid development instead of sharp acetic acid production. That shift dramatically improved both flavor and fermentation strength.
The aroma changes alone became incredibly revealing. My old starter often smelled like vinegar or overripe fruit after sitting too long. The new starter smelled creamy, mildly tangy, and pleasantly yeasty almost all the time. Experienced bakers often say you can “smell” starter health, and after this transformation, I finally understood exactly what they meant.
The balance between yeast and bacteria is what gives sourdough its unique personality. Too little acidity and the bread tastes flat. Too much acidity and fermentation suffers. Finding that middle ground through feeding ratios and consistency transformed my starter from merely alive into truly powerful.
Improvements I Noticed in My Bread
Better Oven Spring
The first truly dramatic improvement I noticed after changing my feeding ratio was oven spring. For anyone unfamiliar with the term, oven spring refers to the rapid expansion bread experiences during the first stage of baking. It’s the moment when trapped gases inside the dough expand under heat, causing the loaf to rise dramatically in the oven.
Before strengthening my starter, this stage was consistently disappointing. My loaves spread sideways instead of upward, and the scores I cut into the dough barely opened during baking. The bread often looked flat and compact no matter how carefully I shaped it beforehand.
The difference after switching feeding methods honestly felt shocking. The very first loaf baked with my stronger starter expanded upward with visible force. The score burst open beautifully, forming the classic “ear” that sourdough bakers love to see. Instead of flattening across the baking surface, the loaf held its shape and rose tall with confidence.
What surprised me most was how much easier shaping became once fermentation improved. Previously, I assumed shaping skill alone determined oven spring. But strong fermentation creates internal dough strength naturally. Healthy yeast activity fills the dough with gas gradually, while balanced acidity preserves gluten integrity. The dough becomes more elastic, airy, and capable of trapping expansion during baking.
The visual transformation boosted my confidence immediately. For the first time, my homemade bread actually resembled the artisan loaves I had admired online for so long. Friends and family noticed the difference too. The bread not only tasted better but looked professionally made.
Another major improvement involved consistency. Under the old feeding system, occasional successful loaves felt random and unpredictable. After strengthening the starter, results became reliable. The dough behaved similarly from bake to bake, making the entire process far less stressful.
There’s also something deeply satisfying about opening the oven and seeing a beautifully risen loaf after years of frustration. It felt like all the confusing pieces of sourdough baking had suddenly clicked into place. And the amazing part was that the biggest change came not from expensive equipment or advanced techniques, but from simply feeding the starter differently.
Open Crumb and Improved Texture
While better oven spring was exciting visually, the crumb transformation truly convinced me that changing feeding ratios had revolutionized my bread. Cutting into my first successful loaf after strengthening the starter felt almost surreal. Instead of dense, uniform pockets, the interior displayed the airy irregular holes I had struggled to achieve for so long.
An open crumb isn’t just about appearance. It reflects healthy fermentation, strong gluten structure, and proper gas retention throughout the dough. My old starter lacked the microbial strength necessary to support those conditions consistently. Even when the dough rose somewhat, the internal structure remained weak and compact.
The stronger starter changed the entire texture of the bread. The crumb became lighter, softer, and more delicate without losing chewiness. Each slice felt airy rather than heavy. Toasted bread developed crisp edges while maintaining a tender interior. Sandwiches even tasted better because the bread no longer felt overly dense or gummy.
Hydration management became easier too. Weak starters often struggle with higher hydration doughs because the gluten structure breaks down under excessive acidity. Once my starter strengthened, I could comfortably work with wetter doughs that produced even more open crumb and better texture.
Flavor improved alongside texture. Since fermentation became healthier and more balanced, the bread developed deeper complexity without harsh sourness. Nutty wheat flavors became more noticeable, and the crust caramelized beautifully during baking. Every loaf tasted fuller and more refined.
I also discovered that stronger fermentation improved shelf life. My newer loaves stayed fresh longer and maintained moisture better than the dense breads I made previously. The crumb remained soft for days without becoming rubbery or stale too quickly.
Perhaps the most rewarding part was finally understanding that sourdough success isn’t mysterious luck reserved for professional bakers. So much of the process comes back to starter health. Once the starter became properly nourished and balanced, nearly every other aspect of bread making improved naturally alongside it.
Why This Method Works for Busy Bakers
Less Frequent Feedings
One of the biggest myths surrounding sourdough is that maintaining a starter requires constant attention. Before changing my feeding ratio, I genuinely believed I needed to feed my starter every single day or risk ruining it. That expectation made sourdough feel exhausting at times, especially during busy weeks when baking wasn’t a priority.
The higher feeding ratio completely changed that experience. Since the starter now received significantly more fresh flour and water relative to its size, fermentation slowed down and nutrients lasted much longer. Instead of racing through its food supply in a day, the culture remained stable and healthy for several days at a time.
This was life-changing for my schedule. I no longer felt trapped by rigid maintenance routines. My starter could comfortably stay in the refrigerator for four or five days — sometimes even longer — without becoming weak or excessively acidic. When I wanted to bake, I simply removed it, fed it once or twice, and it bounced back with incredible vigor.
That flexibility removed so much stress from the process. Sourdough became enjoyable again instead of feeling like another daily responsibility. I could bake when inspiration struck rather than planning my entire week around feeding schedules.
The reduced maintenance also minimized waste. Daily feeding routines often require discarding large amounts of starter regularly, which can feel frustrating and wasteful. Since I fed less frequently, I discarded far less flour overall while maintaining a much healthier culture.
For beginners especially, this approach can make sourdough far less intimidating. Many people abandon starters simply because they believe the upkeep is too demanding. But once you understand how feeding ratios influence fermentation speed, maintaining a starter becomes surprisingly manageable.
The convenience factor alone made the feeding change worthwhile for me. Better bread was amazing, but the ability to integrate sourdough naturally into everyday life without constant stress truly transformed my relationship with baking.
Easier Refrigerator Storage
Refrigerator storage became one of the biggest unexpected benefits of changing my sourdough starter feeding ratio. Before switching methods, storing my starter in the fridge often felt risky. Even after just a few days, the starter would develop a harsh acidic smell, accumulate liquid on top, and lose much of its rising strength. Reviving it sometimes took several feedings, and even then, the results felt inconsistent.
Once I adopted the thicker 1:3:2 feeding ratio, everything changed. Because the starter contained more fresh flour relative to the mature culture, fermentation slowed naturally in cold temperatures. Instead of rapidly exhausting its nutrients, the microorganisms remained stable and balanced for much longer periods. The starter no longer collapsed into a sour-smelling slurry after a short stay in the refrigerator.
What amazed me most was how active the starter remained even while chilled. Occasionally, I’d open the refrigerator and notice the starter had continued rising slowly despite the cold environment. That had never happened with my old feeding routine. The culture clearly had more strength and resilience than before.
This improved storage ability made sourdough dramatically more practical for real life. I didn’t have to plan my entire week around starter maintenance anymore. If work, school, travel, or family responsibilities became busy, the starter could simply wait comfortably in the refrigerator until I was ready to bake again. Instead of feeling fragile and high-maintenance, it became dependable and forgiving.
Another advantage involved consistency between bakes. Previously, long refrigerator storage often weakened my starter unpredictably, leading to inconsistent dough fermentation. With the stronger feeding ratio, the starter rebounded quickly after refrigeration with just one feeding. That reliability made baking far less stressful because I could trust the culture to perform well almost every time.
I also noticed fewer signs of imbalance overall. Mold risks decreased, unpleasant odors became rare, and the starter developed a much cleaner, healthier aroma even after days in cold storage. The culture simply seemed more stable in every possible way.
For busy home bakers, this flexibility can completely change the sourdough experience. Instead of treating the starter like a demanding pet requiring constant care, you begin seeing it as a resilient kitchen companion that adapts to your lifestyle rather than controlling it.
Tips for Switching Feeding Ratios Successfully
Changing feeding ratios may sound simple, but I learned quickly that a few small adjustments can make the transition much smoother. One of the biggest mistakes beginners make is focusing too heavily on exact measurements while ignoring how the starter actually behaves. Ratios matter, but observation matters even more.
The first thing I recommend is paying close attention to consistency rather than obsessing over precision. When I switched to a thicker starter, I aimed for something closer to a soft dough or thick paste rather than pancake batter. The mixture should hold shape slightly after stirring but still remain moist enough to mix comfortably. Once you’ve worked with sourdough for a while, you develop an instinct for what healthy texture feels like.
Temperature awareness is also important. Fermentation speed changes dramatically depending on room conditions. During warmer months, starters ferment faster and may need slightly larger feedings or cooler storage. In colder seasons, fermentation naturally slows, which can extend feeding windows even more. Learning to adjust based on your kitchen environment makes sourdough far less frustrating.
Another helpful lesson involved patience during the transition phase. When I first changed feeding methods, the starter didn’t instantly become perfect overnight. It took several feedings for the microbial balance to stabilize fully. Some bakers panic if the starter behaves differently at first, but temporary changes are completely normal while the culture adapts.
Using quality flour can also improve results significantly. Whole wheat and rye flours contain additional nutrients and microorganisms that often strengthen starter activity naturally. Even adding a small percentage of whole grain flour occasionally can boost fermentation power noticeably.
Container size matters more than many people realize too. A healthy thick starter can rise dramatically, so using a jar with plenty of extra space prevents overflow disasters. Marking the starting level with a rubber band also helps track fermentation progress easily.
Perhaps the most important advice is to stop chasing perfection obsessively. Sourdough is alive, and living systems naturally fluctuate slightly from day to day. The goal isn’t robotic precision — it’s developing familiarity with your own starter’s behavior. Once you begin observing smell, texture, rise patterns, and timing together, maintaining a strong starter becomes surprisingly intuitive.
The beauty of sourdough is that small adjustments often create huge improvements. My entire baking journey transformed because of one relatively simple change in feeding strategy. That realization made me appreciate how deeply connected every part of the sourdough process really is.
Conclusion
Changing my sourdough starter feeding ratio completely transformed not only my bread but also my confidence as a baker. For months, I believed dense loaves, weak rise, and excessive sourness were simply part of the learning process. I experimented endlessly with shaping techniques, hydration levels, and baking methods without realizing the true issue was sitting quietly inside the starter jar itself.
Switching from the traditional 1:1:1 feeding ratio to a thicker 1:3:2 style feeding method gave my starter the nourishment and balance it desperately needed. The improvements became obvious almost immediately. The starter rose higher, smelled healthier, fermented more predictably, and developed the strength necessary to produce airy, beautifully risen loaves with open crumb and balanced flavor.
What surprised me most was how much easier sourdough became overall. The stronger starter required less frequent feeding, tolerated refrigeration better, and adapted naturally to my schedule instead of demanding constant attention. Baking stopped feeling stressful and started becoming enjoyable again.
This experience taught me that sourdough success often depends less on complicated techniques and more on understanding the living culture behind the bread. A healthy starter creates strong fermentation, and strong fermentation improves nearly every aspect of baking automatically.
For anyone struggling with dense bread, weak oven spring, or overly acidic starters, experimenting with feeding ratios can be a game changer. Sometimes the smallest changes produce the biggest transformations. In my case, adjusting how I fed my starter turned sourdough from a frustrating hobby into one of the most rewarding parts of my kitchen routine.
FAQs
1. Why did my sourdough starter improve with a higher feeding ratio?
A higher feeding ratio provides more fresh flour and water relative to the mature starter. This gives yeast and bacteria more nutrients, reduces excessive acidity, and creates stronger fermentation activity. The result is a healthier starter with better rising power.
2. What does a 1:3:2 sourdough feeding ratio mean?
A 1:3:2 ratio means one part starter, three parts flour, and two parts water by weight. For example, you might feed 40 grams of starter with 120 grams of flour and 80 grams of water to create a thick starter consistency.
3. Why does a thicker starter work better for some bakers?
Thicker starters ferment more slowly, which helps maintain a healthier balance between yeast and bacteria. They often produce less harsh acidity, stronger gluten structure, and more reliable fermentation performance.
4. How often should I feed a refrigerated sourdough starter?
With a stronger feeding ratio and thick consistency, many starters only need feeding every four to five days in the refrigerator. Some healthy starters can even go longer depending on temperature and flour type.
5. Can changing feeding ratios improve oven spring?
Yes. A healthier, better-fed starter produces stronger fermentation and more gas retention in dough. This improves oven spring, loaf volume, crumb structure, and overall bread texture significantly.