Marshmallow Easter Bars

Introduction to Marshmallow Easter Bars
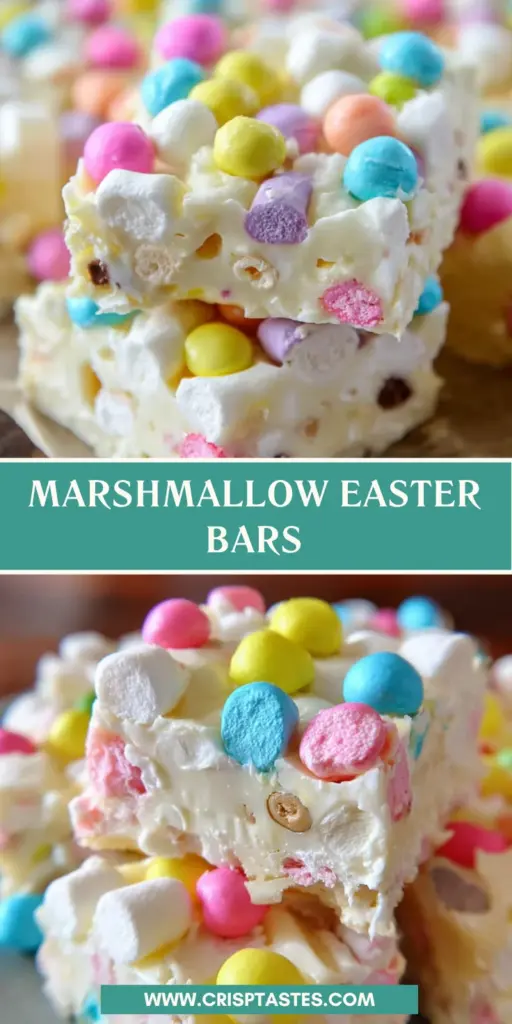
As spring blooms, what better way to celebrate than with delightful Marshmallow Easter Bars? These sweet treats combine soft, fluffy marshmallows and creamy chocolate, making them irresistible! I know how hectic life can get, especially for busy moms and professionals, so these no-bake bars are the perfect quick solution for a cheerful dessert. Whether you’re hosting an Easter gathering or simply want to bring joy to your loved ones, this recipe is sure to impress. Get ready to experience a burst of spring flavor in each bite!
Why You’ll Love This Marshmallow Easter Bars
You’ll adore Marshmallow Easter Bars for their amazing simplicity. They come together in just 30 minutes, making them a lifesaver on those busy days when time is scarce. Plus, the combination of chocolate and marshmallows is a classic that appeals to all ages. Whether you need a festive treat for kids or a nostalgic dessert for adults, these bars will hit the sweet spot every time!
Ingredients for Marshmallow Easter Bars
Gathering the ingredients for your Marshmallow Easter Bars is half the fun! Here’s what you’ll need:
- White Chocolate Chips or Candy Melts: These create a delightful, creamy base. You can use whichever suits your preference. Candy melts add vibrant colors!
- Shortening: This is optional but helps achieve a smoother texture if you choose chocolate chips. It makes the chocolate silky.
- Mini Marshmallows: Fluffy and sweet, they form the heart of your bars. This is where that chewy goodness comes from!
- Sixlets in Easter Colors: These colorful candies bring a pop of fun and a crunchy texture to each bar. Feel free to substitute with any favorite candy!
For exact quantities, check at the bottom of the article, where you can also find a printable version of the recipe. This makes creating these treats even easier!
How to Make Marshmallow Easter Bars
Now comes the fun part—making those delicious Marshmallow Easter Bars! Follow these simple steps, and you’ll see how easy it is to create these festive treats. Let’s get that sweet party started!
Step 1: Prepare Your Baking Dish
First, grab an 8×8 baking dish. Line it with parchment paper, letting some hang over the edges. This will make it super easy to lift out your bars later. Sometimes, a small detail like this is a game changer!
Step 2: Melt the Chocolate
Next, let’s melt our chocolate. Use a double boiler for this—just fill a pot with a bit of water and set a heat-safe bowl on top. Add your white chocolate and let it melt slowly. Stir gently until it’s as smooth as silk. If you’re using chocolate chips, add a tablespoon of shortening for that extra creaminess.
Step 3: Mix in the Marshmallows
Remove the melted chocolate from the heat and allow it to cool for a minute or so. Now, quickly fold in the mini marshmallows and half of those delightful Sixlets. You’ve got to work fast, as the warmth will begin to melt those marshmallows. The mixture should be beautifully combined and mouth-watering at this point!
Step 4: Transfer and Smooth
Once everything is mixed, transfer the gooey goodness into your prepared baking dish. Spread it out evenly and gently smooth the top with a spatula. It’s like spreading a cozy blanket across your dessert—getting it just right feels satisfying!
Step 5: Cool and Cut
Now comes the hardest part: waiting! Place your dish in the freezer for about 20 minutes. This will help firm up the chocolate nicely. Once it’s ready, pull it out, and use the parchment paper to lift the bars out. Cut them into squares, and serve. Trust me, your family will be fighting over the last piece!
Tips for Success
- Work quickly when mixing in marshmallows to keep their fluffy texture.
- Using a double boiler ensures smooth melted chocolate—no clumps here!
- If you can’t find Sixlets, any colorful candy will do; think M&Ms or jelly beans.
- Double-check your parchment paper is securely in place for easy lifting.
- Let the bars cool completely for the best texture before cutting.
Equipment Needed
- Baking Dish: An 8×8 inch dish is ideal, but a 9×9 works too!
- Parchment Paper: For easy serving; aluminum foil can be a substitute if necessary.
- Double Boiler: A heat-safe bowl over a pot of simmering water is a great alternative.
- Spatula: This is essential for mixing and smoothing the chocolate mixture.
- Knife: A sharp knife will help cut the bars into perfect squares.
Variations for Marshmallow Easter Bars
- Peanut Butter Twist: Add a swirl of creamy peanut butter into the chocolate for a nutty flavor that’s hard to resist!
- Fruit-Infused: Toss in some chopped dried fruits like cranberries or apricots for added texture and sweetness.
- Dark Chocolate Delight: Swap the white chocolate for dark chocolate chips for a rich, decadent twist that pairs beautifully with marshmallows.
- Gluten-Free Version: Ensure your candies and chocolate are certified gluten-free to keep these treats safe for everyone.
- Mini Egg Surprise: Substitute the Sixlets with mini chocolate eggs for a festive Easter feel that kids will love!
Serving Suggestions
- Pair with Ice Cream: Serve your Marshmallow Easter Bars with a scoop of vanilla or chocolate ice cream for an indulgent treat.
- Festive Platter: Arrange bars on a colorful platter adorned with spring flowers or Easter decorations for an eye-catching presentation.
- Leisurely Beverage: A chilled glass of lemonade or iced tea complements the sweetness beautifully.
- Gifting: Wrap individual bars in cellophane and tie with a ribbon for delightful Easter gifts!
FAQs about Marshmallow Easter Bars
Curious about Marshmallow Easter Bars? Here are some common questions I often hear, along with my answers. Let’s clear up any doubts!
Can I make Marshmallow Easter Bars ahead of time?
Absolutely! You can prepare these bars a day in advance. Just keep them stored in an airtight container in the refrigerator to keep them fresh.
What if I don’t have a double boiler?
No problem at all! You can create one using any heat-safe bowl over a pot with simmering water. Just make sure the bowl doesn’t touch the water.
Can I substitute different candies for the Sixlets?
Yes! Feel free to use any colorful candy you like, such as M&Ms or even gummy candies. It’s a perfect way to personalize your bars!
How do I store leftover Marshmallow Easter Bars?
Store any leftovers in an airtight container at room temperature for up to a week. If they last that long, that is!
Can I use regular marshmallows instead of mini marshmallows?
While mini marshmallows are perfect for even distribution, you can use regular marshmallows. Just chop them into smaller pieces to help with mixing!
Final Thoughts
Making Marshmallow Easter Bars is truly a delightful experience. The joy of creating these sweet treats brings a sense of nostalgia and warmth, reminding me of happier times spent with family. Each chewy bite bursts with fun and color, perfect for brightening up any spring day. I love how simple they are to whip up, yet they have a magical effect that makes gatherings more special. Whether you’re sharing them with loved ones or keeping them all to yourself—who could blame you?—these bars are a delicious way to celebrate life’s little moments and the beauty of the season.
Print
Marshmallow Easter Bars
- Total Time: 30 minutes
- Yield: 16 squares 1x
- Diet: Vegetarian
Description
Marshmallow Easter Bars are delightful treats perfect for spring, combining chocolate, marshmallows, and colorful candies.
Ingredients
- 1–1/2 cups white chocolate chips or candy melts
- 1 tbsp shortening (only if using chocolate chips)
- 3–1/2 cups mini marshmallows
- 4.5 oz Sixlets in Easter colors
Instructions
- Line an 8×8 baking dish with parchment and set aside.
- Melt your chocolate in a double boiler until it’s smooth and silky.
- Remove from heat and allow to cool for 1-2 minutes.
- Add marshmallows and half the container of Sixlets; stir to coat.
- Work quickly as the marshmallows will start to melt in the warm chocolate.
- Transfer to the prepared pan and smooth out the mixture.
- Top with additional Sixlets.
- Place in the freezer to firm up the chocolate quickly for 20 minutes.
- Remove from the freezer and cut into squares; serve.
Notes
- Ensure to work quickly when mixing marshmallows to prevent them from melting too much.
- Using a double boiler helps achieve a smooth texture for the chocolate.
- Prep Time: 10 minutes
- Cook Time: 10 minutes
- Category: Dessert
- Method: No-Bake
- Cuisine: American
Nutrition
- Serving Size: 1 square
- Calories: 150
- Sugar: 15g
- Sodium: 50mg
- Fat: 7g
- Saturated Fat: 4g
- Unsaturated Fat: 2g
- Trans Fat: 0g
- Carbohydrates: 20g
- Fiber: 0g
- Protein: 1g
- Cholesterol: 5mg