Peanut Butter Icebox Cake

What Makes Peanut Butter Icebox Cake So Irresistible?
The Magic of No-Bake Layered Desserts
There’s something almost magical about a dessert that requires no oven, no complicated techniques, and still turns out looking like something from a bakery display. That’s exactly what makes a Peanut Butter Icebox Cake so special. It’s one of those recipes that feels effortless but delivers big results—rich layers, creamy textures, and a flavor combination that’s hard to forget.
The beauty of an icebox cake lies in its simplicity. Instead of baking, you rely on time. As the cake chills, the layers soften and meld together, transforming simple ingredients like graham crackers and whipped cream into something that feels completely different. The crackers absorb moisture and become soft and cake-like, while the creamy layers settle into a smooth, sliceable texture.
It’s almost like letting the fridge do all the hard work for you. You assemble, chill, and then—hours later—you’re rewarded with a dessert that looks impressive and tastes even better.
Another reason people love this type of dessert is how forgiving it is. You don’t have to worry about overbaking, underbaking, or precise timing. Even if your layers aren’t perfectly neat, the final result still turns out delicious. It’s the kind of recipe that builds confidence, especially if you’re not super experienced in the kitchen.
And let’s be honest—there’s something satisfying about opening the fridge the next day and knowing you’ve got a ready-to-eat dessert waiting for you. No reheating, no extra steps—just slice and enjoy.
Why Peanut Butter and Chocolate Always Win
If there’s one flavor combination that never goes out of style, it’s peanut butter and chocolate. It’s rich, comforting, and just the right balance of sweet and salty. This icebox cake leans into that pairing in the best possible way.
The peanut butter layer brings a creamy, nutty depth that feels both indulgent and familiar. It’s smooth, slightly salty, and pairs beautifully with the sweetness of the other ingredients. Then comes the hot fudge sauce, adding that deep chocolate richness that ties everything together.
What makes this combo so effective is contrast. Peanut butter is dense and bold, while chocolate adds sweetness and depth. Together, they create a flavor that feels complete—like neither one could exist without the other.
And then you add Reese’s candy pieces into the mix, and suddenly you’ve got texture, crunch, and little bursts of extra sweetness in every bite. It’s not just a cake anymore—it’s an experience.
Ingredients for Peanut Butter Icebox Cake
This Peanut Butter Icebox Cake is truly a magical combination of flavors and textures. Here’s what you’ll need to create this dreamy dessert:
- Graham Crackers: The sturdy base! They add that delightful crunch and subtle sweetness, forming the perfect layers for your cake.
- Hot Fudge Sauce: Rich and decadent, this sauce infuses every bite with chocolatey goodness. You can easily switch it up for any chocolate sauce you love!
- Heavy Whipping Cream: Essential for that light, fluffy whipped topping and the cheesecake layer. It brings charm and airiness to the cake.
- Challenge Cream Cheese: The cream cheese adds that luscious, creamy texture. Look for softened cream cheese for easy mixing!
- Peanut Butter: A must-have for that rich, nutty flavor. Choose your favorite brand, whether creamy or crunchy!
- Powdered Sugar: This sweetens the cheesecake without adding any graininess, ensuring a smooth finish.
- Vanilla Extract: A splash of vanilla brings depth to the flavors, making everything just sing.
- Reese’s Candy: Chopped up to sprinkle into the layers, these chocolate-peanut butter gems add an unexpected crunch and extra sweetness.
- For the Whipped Topping: You’ll need more heavy whipping cream, alongside powdered sugar and vanilla extract. This makes your top layer silky and irresistible!
- Graham Cracker Crumbs: For the crumble, these add a beautiful finishing touch, boosting the texture and bringing everything together.
- Melted Challenge Unsalted Butter: This binds the graham cracker crumbs, making them easy to sprinkle over the top.
- Sugar: Just a hint to sweeten the crumble and enhance its crunchiness.
Ingredients with exact quantities are listed at the bottom of the article, available for easy printing. Feel free to get creative with toppings and substitutions. Experiment with flavors, and you might just discover your own twist on this indulgent delight!
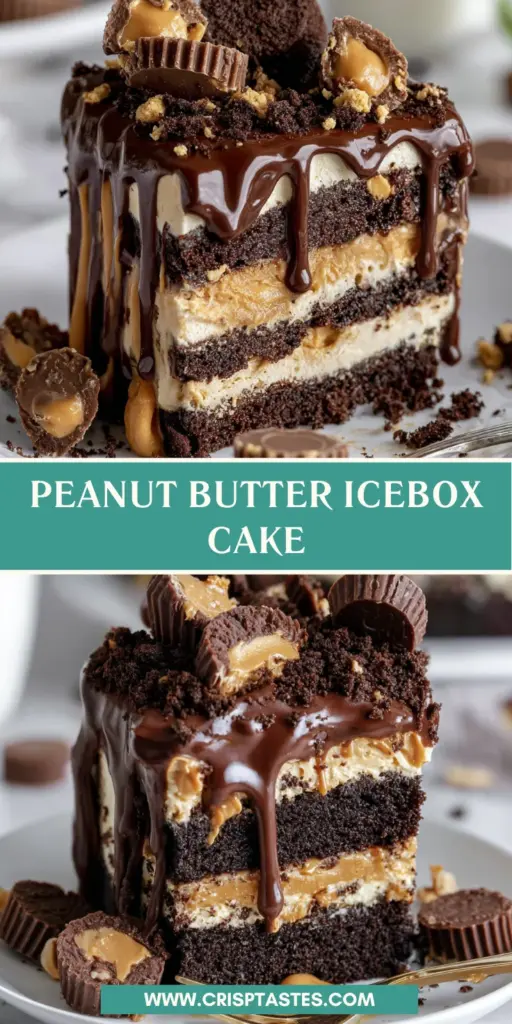
How to Make Peanut Butter Icebox Cake
Now that you have all your ingredients, let’s dive into making this Peanut Butter Icebox Cake. This dessert is as simple as it sounds, and I’m here to guide you through each mouthwatering step. You’ll be savoring slices of creamy peanut butter goodness in no time!
Step 1: Prepare the Base
Start by laying your graham crackers in a single layer across the bottom of a 9 x 13 baking dish. Don’t stress if you need to break some to fit; it adds character!
Step 2: Add the Hot Fudge
Spread half of the hot fudge sauce over the graham cracker base. The fudge brings a warm, chocolatey richness that perfectly complements the peanut butter layers. Resist the urge to eat it straight from the jar… or don’t—that’s your call!
Step 3: Whip the Cream
In a mixing bowl, whip your heavy cream until stiff peaks form. Set it aside gently, making sure you don’t deflate it. This whipped cream will elevate your layers, making each bite feel light and fluffy!
Step 4: Create the Cheesecake Mixture
In another bowl, beat your softened Challenge cream cheese for about 2 to 3 minutes until it’s light and fluffy. Add in peanut butter, beat it until combined, then sprinkle in that powdered sugar. Keep beating until you have a smooth, creamy dream. Finish with a splash of vanilla extract for that extra flair!
Step 5: Assemble the Layers
Now it’s layering time! Spread half of your cheesecake mixture on top of the hot fudge sauce. Top this with another layer of graham crackers. Follow with the remaining hot fudge sauce and then the rest of the cheesecake mixture. Finally, finish with a last layer of graham crackers. So good, right?
Step 6: Make the Whipped Topping
Take your heavy whipping cream, powdered sugar, and a little vanilla extract, and whip them together until you reach stiff peaks again. This luscious topping is going to crown your cake with sweetness!
Step 7: Add Graham Cracker Crumble
For the finishing touch, combine the graham cracker crumbs, melted butter, and sugar in a small bowl. Mix until combined and evenly distribute it over the whipped cream layer. This crumbly goodness adds crunch and style!
Step 8: Chill the Cake
Finally, cover your masterpiece and chill it for at least 8 hours. For the best flavors, I recommend letting it sit overnight—it’s definitely worth the wait!
Tips for Success
- Use softened cream cheese for easier mixing — it saves time and effort!
- Chill the cake overnight to let the flavors meld beautifully together.
- Don’t rush the whipping process; achieving stiff peaks in your cream is key!
- Keep extra graham cracker crumbs on hand for a quick topping option.
- Feel free to substitute the hot fudge with any chocolate sauce you love!
Equipment Needed
- 9 x 13 Baking Dish: A must for assembling your layers. A similar-sized pan works too!
- Mixing Bowls: Have a couple on hand—one for the cream, another for the cheesecake mixture.
- Hand or Stand Mixer: This makes whipping cream a breeze, but a whisk works in a pinch!
- Spatula: Perfect for folding in your whipped cream without deflating it.
- Measuring Cups and Spoons: Essential for precision, but eyeballing can add fun too!
Variations of Peanut Butter Icebox Cake
- Chocolate Lovers: Add layers of chocolate cookie crumbs instead of graham crackers for a richer, chocolatey base.
- Nut-Free Version: Substitute peanut butter with almond butter or sunflower seed butter for a nut-free delight!
- Healthy Twist: Use Greek yogurt instead of cream cheese for a lighter filling. You can also swap powdered sugar with a sugar substitute.
- Fruit Infusion: Layer in some sliced bananas or strawberries for an added fruity burst. They complement the peanut butter perfectly!
- Vegan Option: Use dairy-free cream cheese and coconut whipped cream, and substitute graham crackers with vegan-friendly cookies.
Serving Suggestions for Peanut Butter Icebox Cake
- Pair with a scoop of vanilla ice cream for an extra creamy delight.
- Serve alongside a dollop of fresh whipped cream for that touch of elegance.
- Drizzle with more hot fudge sauce and sprinkle crushed Reese’s on top for presentation.
- Enjoy with a hot cup of coffee or a glass of cold milk to balance the sweetness.
- For festive occasions, add a sprig of mint or a fresh berry for a pop of color!
FAQs about Peanut Butter Icebox Cake
If you’re like me, you probably have a few burning questions about this delightful Peanut Butter Icebox Cake. Here are some answers to help guide you:
Can I make this Peanut Butter Icebox Cake ahead of time?
Absolutely! In fact, it’s best when made a day in advance. Chilling it overnight allows the flavors to meld beautifully. Just be sure to cover it well in the fridge!
How long does the Peanut Butter Icebox Cake last?
When stored properly in the fridge, it’ll last for about 3 to 5 days. Make sure it’s covered so it maintains its deliciousness! I doubt it will last that long, though!
Can I use low-fat cream cheese?
Yes, you can! Low-fat cream cheese works just fine, though it might make the cake slightly less creamy. You’ll still get that lovely peanut butter flavor!
What other toppings can I use?
You can customize your toppings to your heart’s content! Try crumbled bacon, chopped nuts, or a sprinkle of mini chocolate chips for a fun twist.
Is there a gluten-free version of Peanut Butter Icebox Cake?
Yes! Simply substitute graham crackers with gluten-free cookies or crushed gluten-free crackers. You can still enjoy the layers without the gluten!
Final Thoughts on Peanut Butter Icebox Cake
This Peanut Butter Icebox Cake isn’t just a dessert; it’s a memory-maker. Each slice brings joy to the table, whether you’re celebrating a special occasion or just indulging on a Tuesday night. The harmony of creamy cheesecake, rich fudge, and crunchy graham crackers will have your loved ones clamoring for more. Plus, the ease of preparation means you can share your culinary passion without spending all day in the kitchen. So, roll up your sleeves, invite your family to join in, and let this delightful treat create sweet moments together. Happy baking!
Print
Peanut Butter Icebox Cake
- Total Time: 8 hours 30 minutes
- Yield: 12 servings 1x
- Diet: Vegetarian
Description
A deliciously easy dessert featuring layers of peanut butter cheesecake and hot fudge, topped with whipped cream and graham cracker crumble.
Ingredients
- 18 oz graham crackers (enough for three layers – you will need 4 sleeves)
- 1 1/2 cups hot fudge sauce
- 1 1/2 cups heavy whipping cream
- 20 oz Challenge cream cheese, softened
- 1/2 cup peanut butter
- 1/2 cup powdered sugar
- 1 tsp vanilla extract
- 16 Reese’s full size, coarsely chopped
- 1 cup heavy whipping cream (for whipped topping)
- 2 tbsp powdered sugar (for whipped topping)
- 1/2 tsp vanilla extract (for whipped topping)
- 1 cup graham cracker crumbs (for crumble)
- 2 tbsp Challenge unsalted butter, melted (for crumble)
- 2 tbsp sugar (for crumble)
Instructions
- Lay graham crackers in a single layer across the bottom of a 9 x 13 baking dish, breaking apart as necessary.
- Spread half of the hot fudge sauce on top of the graham crackers. Set aside.
- Using a stand mixer or hand mixer, whip heavy cream until stiff peaks form. Set aside.
- In a separate bowl, beat cream cheese for 2 to 3 minutes on medium-high speed until light and fluffy. Add peanut butter and beat until combined.
- Add powdered sugar and beat until no lumps remain. Beat in vanilla extract.
- Fold in whipped cream. Fold in chopped Reese’s.
- Spread half of cheesecake mixture on top of hot fudge sauce.
- Add a layer of graham crackers, remaining half of hot fudge sauce, and remaining cheesecake mixture. Top with another layer of graham crackers.
- Using a stand mixer or hand mixer, whip heavy whipping cream, powdered sugar, and vanilla extract until stiff peaks form for the topping.
- Spread whipped cream on top of graham crackers.
- Combine graham cracker crumbs, melted butter, and sugar in a small bowl for the crumble. Mix to combine and sprinkle over the top of the cake.
- Cover and chill for at least 8 hours.
- Top with additional Reese’s candy before serving, if desired.
Notes
- For best results, chill the cake overnight to allow flavors to meld.
- Feel free to use any chocolate sauce of your choice if hot fudge sauce is not available.
- Additional toppings can be added according to personal preference.
- Prep Time: 30 minutes
- Cook Time: 0 minutes
- Category: Dessert
- Method: No-bake
- Cuisine: American
Nutrition
- Serving Size: 1 slice
- Calories: 450
- Sugar: 30g
- Sodium: 300mg
- Fat: 25g
- Saturated Fat: 15g
- Unsaturated Fat: 5g
- Trans Fat: 0g
- Carbohydrates: 50g
- Fiber: 2g
- Protein: 8g
- Cholesterol: 80mg