Pull Apart Stuffing Ring: A Must-Try Holiday Delight!

Introduction to Pull Apart Stuffing Ring
As the holiday season approaches, I find myself reminiscing about the gatherings filled with laughter, love, and food. One dish that has become a staple in my kitchen is the Pull Apart Stuffing Ring. It’s the perfect solution for busy moms and professionals like me, offering a delightful way to serve stuffing that guests can pull apart easily. With its beautiful presentation and cozy flavors, it impresses everyone at the table. Whether you’re preparing for a big family dinner or a casual potluck, this dish will elevate your holiday spread and warm hearts.
Why You’ll Love This Pull Apart Stuffing Ring
This Pull Apart Stuffing Ring is a delightful way to simplify your holiday cooking. It’s incredibly easy to make, meaning you won’t be sweating over the stove as your guests arrive. The taste is a medley of savory vegetables and herbs, perfectly capturing the essence of the season. Plus, its interactive nature encourages everyone at the table to dig in. You’ll be amazed at how quickly it disappears!
Ingredients for Pull Apart Stuffing Ring
Let’s gather the ingredients for this fabulous Pull Apart Stuffing Ring. Each one plays a vital role in creating that comforting, hearty flavor we all crave during the holidays. Here’s a quick rundown:
- Unsalted Butter: This is our fat base that brings richness and flavor to the stuffing. Be sure to use unsalted to control the saltiness!
- Onion: Diced small, it adds a sweet and savory depth that forms the backbone of the stuffing—the ultimate aromatic!
- Celery: Another aromatic, celery’s crunch lends structure and a refreshing taste to balance the other flavors.
- Sage, Thyme, and Rosemary: These fresh herbs elevate the dish, delivering that classic holiday essence. Use as much as you like; they all have unique profiles!
- Salt and Black Pepper: Essential for seasoning; keep them to your preference for the right flavor punch. Remember, you can always add more, but you can’t take it out!
- Garlic: Finely minced, garlic rounds out the flavor with an aromatic kick that’s simply irresistible.
- Large Egg: This works as a binder, helping hold everything together. Just remember to let the mixture cool first!
- Flat Leaf Parsley: Offering a fresh hint and vibrant color, parsley brightens the stuffing both in flavor and presentation.
- Refrigerated Biscuit Dough: The star ingredient! Quartering these brings the pull-apart magic—soft and fluffy with a golden crust.
- Optional Herbs for Garnishing: Extra sage, thyme, or rosemary on top give a fancy touch before serving, making it even more inviting.
For exact measurements, feel free to check the bottom of the article where you can find everything you need available for printing. Now, let’s get ready to create this beautiful Pull Apart Stuffing Ring!
How to Make Pull Apart Stuffing Ring
Step 1 – Preheat and Prepare the Pan
First things first—let’s get that oven preheated to 325°F! This step is essential for achieving that golden crust we all love. While the oven warms up, grab a 9-inch Bundt pan and give it a generous spray with cooking oil. This is a crucial step to ensure our Pull Apart Stuffing Ring makes a flawless exit from the pan later. Trust me; nothing’s worse than having it stick and ruin your presentation. So, take a moment to prep your pan properly, and let’s move on to the next delicious step!
Step 2 – Sauté the Vegetables
Now, in a large sauté pan, melt the butter over medium-high heat. Add the diced onion and celery, along with our lovely herbs—sage, thyme, and rosemary. Sauté these aromatic veggies for about 4 to 5 minutes, stirring often. This step is vital, as it allows the flavors to bloom and fill your kitchen with that heavenly scent. You want the onions to become translucent and soft, marrying the flavors together beautifully. Once fragrant, we’ll invite garlic to the party for just another minute. Your kitchen will smell like a holiday dream!
Step 3 – Combine Ingredients
After sautéing, it’s time to cool the mixture slightly—about five minutes will do. This is key to avoid scrambling the egg we’re about to add. Once cool, transfer the buttery goodness to a mixing bowl. Whisk in the egg until well combined. Next, toss in the quartered biscuit dough, mixing gently to coat each piece with that herby vegetable goodness. The dough should soak up all those flavors! Keep mixing until everything is bound together, ready to be layered in our pan.
Step 4 – Layer the Mixture in the Pan
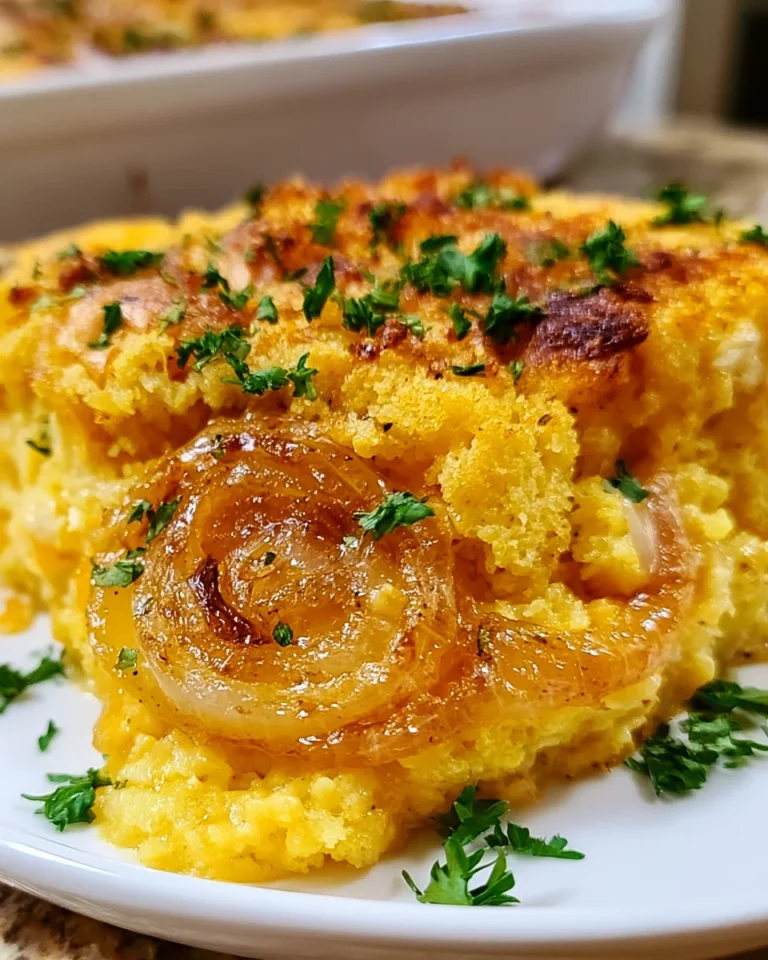
Now, let’s create layers of deliciousness! Start by spooning about half of your biscuit-vegetable mixture into the prepared Bundt pan. Make sure to distribute it evenly. Then, sprinkle half of the minced parsley for that fresh burst of color and flavor. Now, repeat this layering process with the remaining mixture and parsley. The parsley not only brightens up the stuffing but also adds freshness to every bite. Layering carefully ensures that each piece, when pulled apart, is a party of flavor!
Step 5 – Bake to Perfection
Cover your masterpiece with nonstick foil and slide it into the oven. Bake for 30 minutes. After that, carefully peel back the foil and let it bake for an additional 15 to 20 minutes. This step is crucial for achieving that perfect golden color. To make sure it’s done, check the internal temperature, aiming for 160°F. Once it’s ready, take it out and allow it to cool for five minutes. This resting time helps set everything in place. Excitement builds as we gear up for the grand reveal!
Tips for Success
- Always cool your vegetable mixture slightly before adding the egg to prevent scrambling.
- Use fresh herbs for a vibrant flavor; dried herbs can work in a pinch, but fresh is best!
- Don’t skip the layering; it ensures every pull-apart piece is packed with flavor.
- Keep an eye on the baking time; all ovens vary, so check early!
- Let the stuffing ring cool slightly before inverting for a clean release.
Equipment Needed
- 9-inch Bundt Pan: A fluted tube pan works too for that beautiful shape.
- Sauté Pan: A non-stick skillet makes sautéing easy; any large pan will do.
- Mixing Bowl: Use any large bowl for combining ingredients.
- Whisk: A fork can work in a pinch for mixing the egg in!
- Spatula: Great for layering the mixture evenly in the Bundt pan.
Variations
- Gluten-Free: Substitute traditional biscuit dough with gluten-free biscuits for a deliciously gluten-free Pull Apart Stuffing Ring.
- Herb Adventures: Experiment with other fresh herbs like dill, chives, or tarragon for unique flavor combinations!
- Add Protein: Stir in cooked sausage or shredded chicken for an extra hearty stuffing ring your family will love.
- Veggie Boost: Throw in diced mushrooms, carrots, or bell peppers for added nutrition and flavor.
- Cheesy Delight: Mix in some shredded cheese, like cheddar or parmesan, for a gooey, flavorful twist.
Serving Suggestions
- Pair with Cranberry Sauce: The tangy sweetness of cranberry sauce complements the savory stuffing perfectly.
- Serve with Gravy: Drizzling warm gravy over the Pull Apart Stuffing Ring adds a luxurious touch.
- Highlight with Salad: A light green salad balances the richness and adds freshness to your meal.
- Sparkling Drink: A glass of sparkling cider or white wine elevates the dining experience.
- Presentation: Garnish with fresh herb sprigs to create an inviting look on the table.
FAQs about Pull Apart Stuffing Ring
Can I use stale bread instead of biscuit dough?
Absolutely! If you have leftover bread, feel free to use it. Just cut it into cubes and adjust the moisture by adding a bit more broth to keep your Pull Apart Stuffing Ring deliciously moist.
How can I store leftovers from the Pull Apart Stuffing Ring?
Store leftovers in an airtight container in the refrigerator for up to 5 days. You can also freeze it for up to 4 months! Simply thaw in the fridge before reheating.
Can I make this stuffing ring in advance?
You can prepare it the day before! Just assemble the Pull Apart Stuffing Ring, cover it tightly, and refrigerate. Bake it fresh right before serving for the best results.
What can I pair with this Pull Apart Stuffing Ring?
This dish pairs wonderfully with turkey, glazed ham, or a fresh green salad. The savory flavors complement a variety of main dishes for any festive gathering.
Can I make a vegetarian version of this stuffing ring?
Yes! The Pull Apart Stuffing Ring is naturally vegetarian as it is, but you can enhance it further by adding more veggies or using vegetable broth instead of chicken broth for additional veggie goodness.
Final Thoughts
Making this Pull Apart Stuffing Ring is not just about serving a dish; it’s about creating joyful memories around the table. With each savory pull, I can almost hear the laughter and warmth filling the room. This recipe brings a sense of togetherness, sparking conversations and hugs amidst delicious bites. It makes busy holiday planning feel a little lighter and brighter. Plus, seeing everyone eagerly dive in reminds me why I love cooking. So why not add this delightful dish to your holiday menu? It’s bound to become a cherished favorite for years to come!
Print
Pull Apart Stuffing Ring
- Total Time: 1 hour 10 minutes
- Yield: 8 servings 1x
- Diet: Vegetarian
Description
A delicious and visually appealing stuffing ring perfect for holiday gatherings, allowing you to pull apart individual servings.
Ingredients
- ½ cup unsalted butter, 1 stick
- 1 small to medium white or yellow onion, diced small
- 2 cups celery stalks, diced small
- 4 large sage leaves, finely minced*
- 2 teaspoons fresh thyme, finely minced*
- 2 teaspoons fresh rosemary, finely minced*
- ½ teaspoon salt, or to taste
- ½ teaspoon freshly ground black pepper, or to taste
- 3 to 4 cloves garlic, finely minced
- 1 large egg
- ½ cup flat leaf parsley, finely minced; divided
- two 8-count cans refrigerated biscuit dough, each can is about 16 ounces, quarter each biscuit**
- Extra sage, thyme sprigs, or rosemary, optional for garnishing
Instructions
- Preheat oven to 325°F and spray a 9-inch (approximately 10 cup) Bundt pan or fluted tube pan very well with cooking spray; set aside.
- In a large sauté pan, add the butter, onion, celery, sage, thyme, rosemary, salt, and pepper. Sauté over medium-high heat for about 4 to 5 minutes, stirring frequently.
- Add the garlic and cook for 1 minute or until fragrant, stirring constantly.
- Transfer the mixture to a large mixing bowl and let it cool for about five minutes.
- Add the egg and whisk to combine.
- Add the quartered biscuit dough pieces and toss to coat evenly.
- Transfer about half of the mixture into the prepared Bundt pan and sprinkle with half of the parsley.
- Repeat the process with the remaining mixture and sprinkle with the remaining parsley.
- Cover the Bundt pan with nonstick foil and bake for 30 minutes.
- Remove the pan from the oven, peel back the foil, and bake for an additional 15 to 20 minutes or until the internal temperature reaches 160°F.
- Remove the Bundt pan from the oven and let it cool on a wire rack for 5 minutes.
- Gently run a butter knife around the edges and invert the Bundt pan over a plate or cutting board.
- Place your serving platter over the exposed area of the Bundt pan and invert again.
- Optionally, garnish the stuffing ring with fresh herbs before serving.
- Serve warm and fresh, pulling it apart or using a serving spoon. Leftovers can be stored airtight in the fridge for up to 5 days or in the freezer for up to 4 months.
Notes
- Don’t skip the cooling process to avoid scrambling the egg.
- The double inversion process improves presentation.
- Check the internal temperature to ensure proper cooking.
- Prep Time: 20 minutes
- Cook Time: 50 minutes
- Category: Side Dish
- Method: Baking
- Cuisine: American
Nutrition
- Serving Size: 1/8 of the ring
- Calories: 250
- Sugar: 2g
- Sodium: 400mg
- Fat: 15g
- Saturated Fat: 9g
- Unsaturated Fat: 4g
- Trans Fat: 0g
- Carbohydrates: 25g
- Fiber: 1g
- Protein: 6g
- Cholesterol: 50mg