Red, White and Blue Mini Cheesecakes

Introduction to Red, White and Blue Mini Cheesecakes
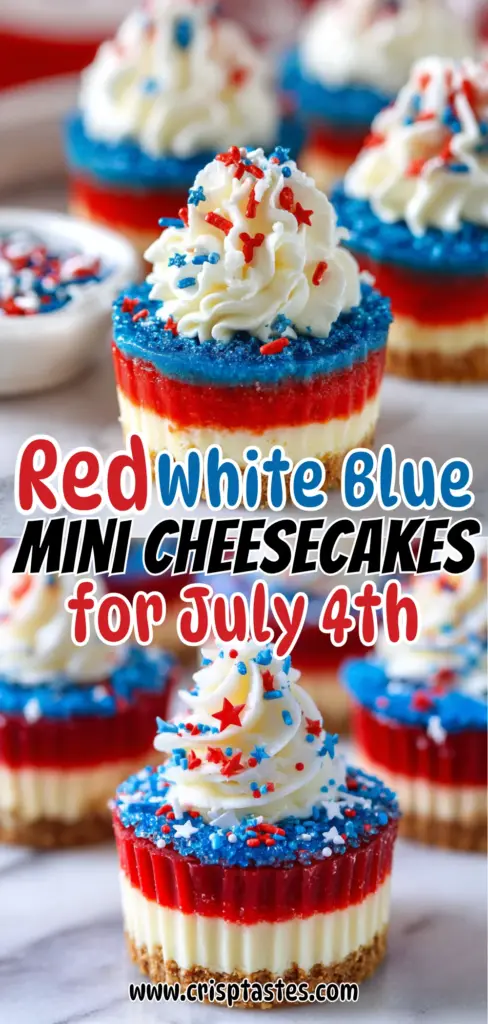
Hey there, fellow dessert enthusiasts! If you’re anything like me, the thought of crafting something delicious yet simple makes your heart flutter. Enter my Red, White and Blue Mini Cheesecakes—a delightful treat that’s not only festive but also a quick solution for those busy days. Whether you’re celebrating a holiday or just want to impress your family with your baking skills, these mini cheesecakes are the way to go! They’re colorful, creamy, and guaranteed to bring smiles all around. Let’s dive into this wonderful world of sweet layers together!
Why You’ll Love This Red, White and Blue Mini Cheesecakes
I know how hectic life can be, especially for busy moms and professionals juggling countless tasks. That’s why these Red, White and Blue Mini Cheesecakes are a game changer! They’re easy to make, allowing you to whip up a stunning dessert in no time. Plus, the creamy texture combined with vibrant flavors creates an explosion of joy in every bite—perfect for elevating any gathering or celebration. Trust me, you’ll be reaching for another slice!
Ingredients for Red, White and Blue Mini Cheesecakes
Before we embark on this delightful baking journey, let’s gather our ingredients. Don’t worry; they’re simple and easy to find, most likely nestled in your pantry. For the crust, we start with vanilla wafer cookie crumbs. They lend a sweet crunch that perfectly contrasts with the creamy filling. You’ll also need a bit of sugar to enhance that sweetness and some melted butter for binding everything together.
Now, onto the filling! Cream cheese is the star here, providing that luscious texture we all adore. A touch of sugar balances the tartness, while flour helps create a smooth consistency. Sour cream adds richness, and vanilla extract gives an aromatic touch that’s simply heavenly. We’ll also incorporate eggs, which help firm up the filling and create a perfect cheesecake.
To achieve our festive colors, blue and red gel icing colors are essential. They give our cheesecakes that vibrant patriotic flair! For the crowning glory, we’ll whip up some heavy cream with powdered sugar and vanilla to create that dreamy topping. Don’t forget the sprinkles—because who can resist a little extra fun?
- 1 cup (134g) vanilla wafer cookie crumbs
- 2 tbsp (26g) sugar
- 4 tbsp (56g) butter, melted
- 12 ounces (339g) cream cheese, room temperature
- 1/2 cup (104g) sugar
- 3 tbsp (24g) flour
- 1/2 cup (115g) sour cream
- 1 1/2 tsp vanilla extract
- 2 eggs
- Blue gel icing color
- Red gel icing color
- 1/2 cup (120ml) heavy whipping cream, cold
- 5 tbsp (36g) powdered sugar
- 1/2 tsp vanilla extract
- Sprinkles
Want to know the exact amounts? They are at the bottom of the article, ready for you to print and take to the kitchen!
How to Make Red, White and Blue Mini Cheesecakes
Step 1: Preheat the Oven
First things first! Preheat your oven to 325°F (162°C). This step is crucial because it helps ensure even baking. While the oven warms up, don’t forget to line your cupcake pan with cute cupcake liners. They not only make cleanup easier but also add that festive touch to your Red, White and Blue Mini Cheesecakes.
Step 2: Prepare the Crust
Now, let’s make the crust. Combine the vanilla wafer cookie crumbs, sugar, and melted butter in a bowl. The butter is your secret weapon, as it binds the crumbs together and creates a deliciously crunchy texture. Divide this mixture evenly among the cupcake liners, pressing it firmly into the bottom. You want a solid base for all that creamy goodness!
Step 3: Make the Filling
For the filling, reduce the oven temperature to 300°F (148°C) and grab a large bowl. Mix cream cheese, sugar, and flour on a low speed until combined. This keeps more air out of the batter and helps prevent cracks later on. Scrape down the bowl’s sides to ensure everything blends nicely. Next, add the sour cream and vanilla extract, and mix until well combined. Your filling should be smooth and creamy!
Step 4: Color the Batter
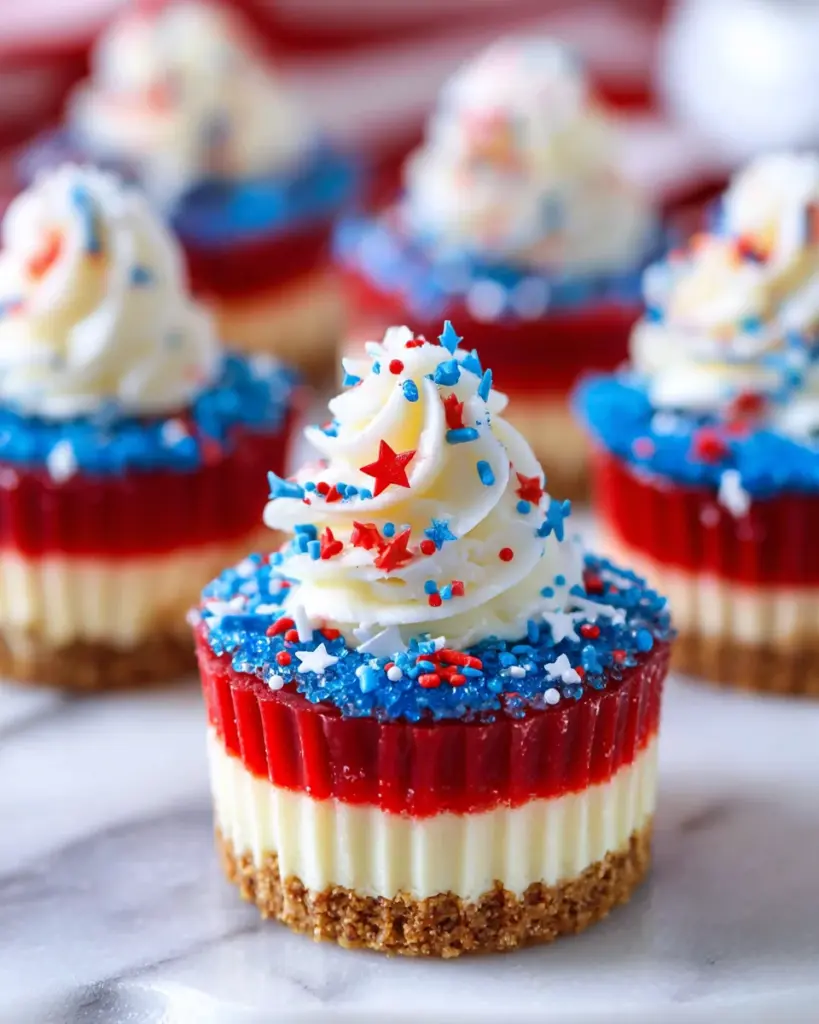
Now comes the fun part! Divide your batter equally into three bowls. Leave one bowl plain for the white layer. Then, try adding red gel icing color to one bowl and blue to the other. Mix until you achieve vibrant colors. It’s like painting, but tastier! The brighter the colors, the more festive your mini cheesecakes will look!
Step 5: Layer the Batter
Layering is where the magic happens. Start off each cupcake liner by adding a tablespoon of the white batter. Follow that with a tablespoon of the red batter, and then top it off with a tablespoon of the blue batter. This technique not only creates a stunning appearance but also ensures each bite is a delicious combination of flavors. Go ahead and fill them to the top!
Step 6: Bake the Mini Cheesecakes
Time to bake! Place your cupcake pan in the oven and bake the mini cheesecakes for 18-20 minutes. When the time is up, turn off your oven and leave the door closed for another 10 minutes. This gentle cooling process helps prevent cracks. After that, slowly crack the oven door and let them cool for another 15-20 minutes before transferring them to the fridge. Coolness is key!
Step 7: Prepare Whipped Cream Topping
For the finishing touch, let’s whip up some heavenly whipped cream! In a large mixing bowl, combine the heavy whipping cream, powdered sugar, and vanilla extract. Whip on high speed until you reach stiff peaks. This means your cream should hold its shape beautifully, ready to crown your mini cheesecakes with that dreamy texture. Who can resist that?
Step 8: Assemble and Chill
Finally, it’s time to assemble! Pipe the stiff whipped cream on top of each mini cheesecake. Then, don’t skimp on the sprinkles—because sprinkles make everything better! Once they’re all decorated, cover the cheesecakes and refrigerate them until you’re ready to serve. This chilling ensures that every slice is perfectly creamy and ready to wow your guests!
Tips for Success
- Make sure your cream cheese is at room temperature to blend smoothly.
- Don’t rush the mixing; keep the speed low to avoid cracks.
- Use a small offset spatula to help smooth out the batter layers.
- Let the cheesecakes cool slowly to prevent sudden temperature changes.
- Experiment with different flavors in the whipped cream for variety!
Equipment Needed
- Cupcake pan (a regular muffin tin works too!)
- Mixing bowls (one large and two smaller ones)
- Electric mixer (a whisk can be used, but it’s a workout!)
- Measuring cups and spoons
- Spatula (a silicone spatula is versatile and easy to clean)
Variations for Red, White and Blue Mini Cheesecakes
- For a fruity twist, add fresh strawberries or blueberries on top of the whipped cream. They’ll bring a burst of flavor!
- Try replacing the cream cheese with Greek yogurt for a lighter option. It adds a tangy flavor while keeping the texture creamy.
- If you’re looking to make them gluten-free, substitute vanilla wafer cookie crumbs with gluten-free cookies or almond flour.
- Experiment with different flavored extracts like almond or lemon to create a unique cheesecake experience!
- Add a hint of chocolate by swirling in melted chocolate with your colored batters for an extra decadent version.
Serving Suggestions for Red, White and Blue Mini Cheesecakes
- Serve these adorable mini cheesecakes on a festive platter adorned with fresh berries for a pop of color.
- Pair them with a scoop of vanilla ice cream for an extra indulgent treat.
- A refreshing mint tea or lemonade complements the creaminess beautifully.
- For presentation, garnish with extra sprinkles or a drizzle of fruit syrup on the plates.
FAQs about Red, White and Blue Mini Cheesecakes
Curious minds want to know! Here are some frequently asked questions about these delightful Red, White and Blue Mini Cheesecakes.
Can I make these mini cheesecakes ahead of time?
Absolutely! These cheesecakes can be made a day or two in advance. Just keep them covered in the fridge until you’re ready to serve.
What if I don’t have gel icing colors?
No worries! You can use regular food coloring instead. Just keep in mind that you may need to adjust the amount to achieve the right vibrant colors.
How do I prevent my cheesecakes from cracking?
To minimize cracks, mix your batter on low speed, avoid overmixing, and allow the cheesecakes to cool gradually in the oven. This process helps keep them smooth!
Can I use a different type of crust?
Certainly! If you’d like, you can swap out the vanilla wafer crumbs for graham cracker crumbs or even crushed Oreos for a fun twist.
Are these mini cheesecakes suitable for kids?
Definitely! Kids will love the colorful layers and whipped cream topping. Just be mindful of any allergies, particularly to dairy.
Final Thoughts on Red, White and Blue Mini Cheesecakes
Making these Red, White and Blue Mini Cheesecakes is like wrapping your loved ones in a sweet embrace. The smiles on their faces tell me it’s worth every effort. These cheesecakes are not just desserts; they’re a way to create joyful memories together. With each creamy layer, you’re not just serving a dish—you’re sharing love and celebration. I hope this recipe brightens your kitchen and brings happiness to your gatherings. So, don your apron, get your family involved, and let the cheesecakes do the talking. Trust me; they won’t disappoint!
Print
Red, White and Blue Mini Cheesecakes
- Total Time: 50 minutes
- Yield: 12 mini cheesecakes 1x
- Diet: Vegetarian
Description
A festive dessert featuring colorful layers of cheesecake topped with whipped cream and sprinkles, perfect for celebrations.
Ingredients
- 1 cup (134g) vanilla wafer cookie crumbs
- 2 tbsp (26g) sugar
- 4 tbsp (56g) butter, melted
- 12 ounces (339g) cream cheese, room temperature
- 1/2 cup (104g) sugar
- 3 tbsp (24g) flour
- 1/2 cup (115g) sour cream
- 1 1/2 tsp vanilla extract
- 2 eggs
- Blue gel icing color
- Red gel icing color
- 1/2 cup (120ml) heavy whipping cream, cold
- 5 tbsp (36g) powdered sugar
- 1/2 tsp vanilla extract
- Sprinkles
Instructions
- Preheat oven to 325°F (162°C). Add cupcake liners to a cupcake pan.
- Combine the vanilla wafer cookies crumbs, sugar and melted butter. Divide the mixture between the cupcake liners (about 2 tablespoons per cup) and press into the bottoms.
- Bake the crusts for 5 minutes then remove from oven. Allow to cool while you make the filling.
- To make the filling, reduce oven to 300°F (148°C). In a large bowl, mix the cream cheese, sugar, and flour until combined (Use low speed to keep less air from getting into the batter, which can cause cracks). Scrape down the sides of the bowl.
- Add the sour cream and vanilla extract. Beat on low speed until well combined.
- Add the eggs one at a time, beating slowly and scraping the sides of the bowl after each addition.
- Divide the batter evenly into three bowls. Leave one as is and color one red and the other blue.
- Layer the colored batter into the crusts, starting with a tablespoon of white batter in each cup, then a tablespoon of red, then a tablespoon of blue. The cups should be mostly full.
- Bake the cheesecakes for 18-20 minutes, then turn off the oven and leave the door closed for another 10 minutes.
- Crack the oven door and allow cheesecakes to cool for 15-20 minutes, then put in the fridge to finish cooling.
- When cheesecakes are cooled, remove them from the pan.
- To make the whipped cream topping, add the heavy whipping cream, powdered sugar and vanilla extract to a large mixer bowl. Whip on high speed until stiff peaks form.
- Pipe the whipped cream onto the tops of the cheesecakes and add sprinkles.
- Refrigerate the cheesecakes in an airtight container until ready to serve. Cheesecakes are best for 2-3 days.
Notes
- Ensure the cream cheese is at room temperature for easy mixing.
- For best results, do not overmix the batter.
- You can use regular food coloring if gel icing color is not available.
- Prep Time: 20 minutes
- Cook Time: 30 minutes
- Category: Dessert
- Method: Baking
- Cuisine: American
Nutrition
- Serving Size: 1 cheesecake
- Calories: 220
- Sugar: 15g
- Sodium: 180mg
- Fat: 14g
- Saturated Fat: 8g
- Unsaturated Fat: 6g
- Trans Fat: 0g
- Carbohydrates: 22g
- Fiber: 0g
- Protein: 3g
- Cholesterol: 50mg