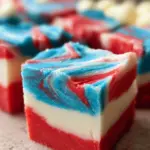
4th of July White Chocolate Fudge: Easy Festive Treat!

Introduction to 4th of July White Chocolate Fudge
The 4th of July is a day filled with celebration, family, and of course, delicious treats. I can’t think of a better way to bring everyone together than with this easy 4th of July White Chocolate Fudge. This festive and vibrant dessert not only looks beautiful on the table but is also quick to whip up. Perfect for busy moms and professionals like us, this treat needs just a few simple ingredients and minimal prep time. Trust me, your loved ones will be wowed—just wait until they take that first bite!
Why You’ll Love This 4th of July White Chocolate Fudge
This 4th of July White Chocolate Fudge is the epitome of easy, tasty desserts. With its quick prep time, you can have it ready in under 30 minutes. Plus, the delightful blend of creamy white chocolate and the sweet pop of colors make it a showstopper at any gathering. It’s that perfect treat you can make ahead of time, so you can enjoy more moments with family and friends!
Save this recipe and cook smarter
Keep your favorite recipes in one place, discover easy meal ideas, and plan your week with the free Cooking Layer app.
Free to download • Fast and easy to use
Ingredients for 4th of July White Chocolate Fudge
Gathering the right ingredients is key to making this delightful 4th of July White Chocolate Fudge. Here’s what you’ll need:
- Sugar: The foundation of sweetness, balancing the rich flavors.
- Unsalted Butter: Provides creaminess and helps achieve that melt-in-your-mouth texture.
- Evaporated Milk: This adds richness and a velvety finish to the fudge, making it irresistible.
- Marshmallow Creme: Acts as a binder and gives the fudge its fluffy consistency.
- White Chocolate Chips: The star ingredient! Adds a sweet and creamy flavor that complements the colors beautifully.
- Red and Blue Food Coloring: Essential for that festive 4th of July look, these colors will brighten your fudge.
Make sure to check your pantry before you head out to shop! You can often find these ingredients at any grocery store. If you want to switch things up, consider using flavored white chocolate or mixing in sprinkles for an extra festive touch. For exact measurements, refer to the end of the article where you’ll find them available for printing.
How to Make 4th of July White Chocolate Fudge
Step 1: Prepare Your Pan
Let’s start by getting your loaf pan ready. Line a 9×5-inch loaf pan with foil, making sure it overhangs the edges. This will help you lift the fudge out later. Next, spray the foil with nonstick cooking spray. This simple step prevents sticking and ensures a clean release. Honestly, nothing is more frustrating than a beautiful fudge that won’t come out nicely! Trust me, you’ll be glad you took the time for this.
Step 2: Mix Ingredients
In a large pot, combine sugar, unsalted butter, and evaporated milk over medium heat. Stir frequently and keep a close eye on it, because the mixture can boil over quickly. Once it begins to boil, continue stirring constantly for about five minutes. This is essential for achieving that creamy texture; no one wants grainy fudge. The bubbling and simmering is like a little dance in the pot—don’t skip an inch!
Step 3: Add White Chocolate and Marshmallow Creme
Now, it’s time to add the dreamy ingredients that give our fudge its signature smoothness. Remove the pot from heat and stir in the marshmallow creme and white chocolate chips. Keep stirring until the mixture is glossy and free of lumps. Melted white chocolate is like magic—it transforms everything into something delicious! Make sure it’s thoroughly combined; every bite should be as heavenly as the first.
Step 4: Color and Divide
Here comes the fun part! Divide the fudge mixture evenly into three bowls. Add a few drops of red food coloring to one bowl, blue to another, and leave the last bowl white. Stir each bowl until the colors are vibrant and inviting. It’s like creating a little piece of art right in your kitchen! This is where the festive 4th of July spirit really starts to shine through. Just imagine those bright colors layered together!
Step 5: Layering the Fudge
Begin the layering process by pouring the red fudge into the prepared loaf pan. Use a spatula to smooth the top. Next, carefully layer the white fudge on top, ensuring it doesn’t mix in with the red. Finally, add the blue on top of the white. Each layer is like stacking a colorful sandwich! For the best presentation, ensure each layer is even. A little patience here will go a long way in achieving that stunning look!
Step 6: Swirling for Effect
Now it’s time to create a masterpiece! Grab a knife and gently swirl through all three layers for a marbled effect. Don’t over-mix; you want the colors to blend beautifully without losing their individuality. Think of it as swirling paint on a canvas—each stroke creates something unique. A few gentle swirls are perfect for that eye-catching design. It’ll look beautiful and add a little drama to your dessert!
Step 7: Cooling Time
Patience pays off here. Let the fudge cool completely at room temperature for at least two hours. This waiting time allows it to set properly for that perfect texture. Once it’s cooled, lift the fudge out of the pan using the foil edges and place it on a cutting board. Cut into squares or rectangles, as big or small as you like. Serve them with pride, knowing you’ve created a festive treat that everyone will love!
Tips for Success
- Measure all your ingredients before starting for a smoother process.
- Keep stirring constantly while cooking to avoid burning the mixture.
- Allow the fudge to cool completely to ensure it sets properly.
- Use a sharp knife to cut, as it helps achieve clean, beautiful squares.
- Store the fudge in an airtight container to maintain freshness.
Equipment Needed
- 9×5-inch loaf pan: Can use any similar-sized dish if necessary.
- Large pot: A deep skillet can also work well for mixing and boiling.
- Spatulas: Rubber or silicone spatulas are great for stirring and scraping.
- Knife: A sharp kitchen knife for cutting the fudge.
- Foil: Parchment paper can be used instead for lining the pan.
Variations
- Nutty Delight: Add chopped nuts, like almonds or pecans, to your fudge mixture for a crunchy texture.
- Chocolate Swirl: Use a mix of white and dark chocolate. Alternate layers for a dreamy, rich chocolate flavor.
- Minty Fresh: Incorporate a few drops of peppermint extract into the white chocolate fudge for a refreshing twist.
- Fruit Fusion: Stir in dried cranberries or cherries for a fruity flavor and added chewiness in your fudge.
- Dairy-Free Option: Substitute regular white chocolate chips with dairy-free alternatives for a vegan-friendly treat.
- Flavor Infusion: Experiment with different extracts like vanilla, almond, or coconut for unique flavor variations.
Serving Suggestions for 4th of July White Chocolate Fudge
- Pair fudge with fresh strawberries or blueberries for a patriotic touch.
- Serve alongside vanilla ice cream to balance the sweetness.
- Display on a festive platter adorned with tiny American flags for that holiday spirit.
- Enjoy with a refreshing lemonade or iced tea for a perfect summer treat.
- Cut into small pieces for a delightful addition to a potluck dessert table.
FAQs about 4th of July White Chocolate Fudge
Can I make this fudge ahead of time?
Absolutely! This 4th of July White Chocolate Fudge stores well. You can make it up to a week in advance. Just keep it in an airtight container at room temperature to maintain its deliciousness.
How should I store leftover fudge?
If you have any leftovers (which isn’t likely!), store them in an airtight container. They’ll stay fresh for up to two weeks. For longer storage, you can freeze the fudge, wrapped tightly to prevent freezer burn.
Can I customize the food colors used?
Definitely! While red and blue work perfectly for the 4th of July theme, you can use any colors that suit your celebration. Imagine pastel colors for spring, or vibrant shades for a summer barbecue—the options are endless!
What can I serve with this fudge?
This festive fudge pairs wonderfully with fresh fruits, like strawberries or blueberries, or even a scoop of vanilla ice cream. It’s a sweet treat that complements many desserts and drinks during your holiday celebrations.
My fudge didn’t set properly. What went wrong?
Improper setting can happen if you didn’t let it cool enough. Ensure you allow at least two hours for cooling before cutting into it. If it’s still too soft, you might need to reheat the mixture briefly and try again!
Final Thoughts
Creating this 4th of July White Chocolate Fudge isn’t just about mixing ingredients; it’s about making memories. The joy on everyone’s faces when they dig into this colorful treat is worth every minute spent in the kitchen. Whether you’re hosting a barbecue or enjoying a quiet celebration with your family, this fudge adds a festive touch. Plus, the simplicity of the recipe means you can spend less time cooking and more time enjoying those precious moments. So go ahead, bring this sweet delight to your table and let the festivities unfold!
Love this recipe?
Save it for later and discover more easy, delicious recipes inside the free Cooking Layer app.
Free to download • Fast and easy to use
4th of July White Chocolate Fudge
- Total Time: 2 hours 25 minutes
- Yield: 16 servings 1x
- Diet: Vegetarian
Description
A delicious and festive 4th of July treat, this white chocolate fudge is easy to make and perfect for celebrating the holiday.
Ingredients
- 2 1/2 cups sugar
- 1/2 cup unsalted butter
- 5 oz evaporated milk
- 2 cups marshmallow creme
- 8 oz white chocolate chips
- Red and blue food coloring
Instructions
- Line a 9×5-inch loaf pan with foil and spray it with nonstick cooking spray. Set aside.
- Prepare your ingredients in 3 bowls with 3 spatulas and food coloring ready, as the fudge will set quickly.
- In a large pot, combine sugar, butter, and evaporated milk over medium heat, stirring frequently. Bring to a boil and stir constantly for 5 minutes.
- Add marshmallow creme and white chocolate chips, stirring until smooth.
- Divide the mixture into 3 bowls; color one with red food coloring, another with blue, and leave the third white. Stir each color.
- Pour the red fudge into the prepared loaf pan, smoothing the top. Then layer the white fudge on top, followed by the blue. Stir each bowl before pouring if needed.
- Use a knife to swirl through all three layers for a marbled effect.
- Let the fudge cool completely for at least 2 hours before cutting.
Notes
- Ensure all ingredients are measured out before starting to streamline the process.
- Letting the fudge cool for the recommended time will help it set properly.
- Prep Time: 15 minutes
- Cook Time: 10 minutes
- Category: Dessert
- Method: Stovetop
- Cuisine: American
Nutrition
- Serving Size: 1 piece
- Calories: 150
- Sugar: 25g
- Sodium: 5mg
- Fat: 5g
- Saturated Fat: 3g
- Unsaturated Fat: 2g
- Trans Fat: 0g
- Carbohydrates: 25g
- Fiber: 0g
- Protein: 1g
- Cholesterol: 15mg