Red, White and Blue Dirt Cups

Introduction to Red, White and Blue Dirt Cups
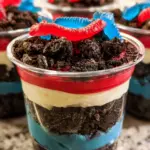
Hey there, fellow dessert enthusiasts! If you’re like me, you know that finding festive treats that are both fun and easy can feel like searching for a needle in a haystack. That’s where these delightful Red, White and Blue Dirt Cups come in! Perfect for celebrations, these vibrant pudding cups are not only a quick solution for a busy day but also an exciting way to impress your loved ones. Layered with colorful pudding and crushed Oreos, they’re sure to bring smiles at any gathering!
Why You’ll Love This Red, White and Blue Dirt Cups
Let’s be real—who has time for complicated desserts? These Red, White and Blue Dirt Cups are not only quick to make, but they also require no baking. You’ll love how easy it is to assemble these colorful cups. With layers of sweet, creamy pudding and crunchy Oreos, each bite feels like a treat! Plus, they’re a playful and festive way to celebrate any occasion.
Save this recipe and cook smarter
Keep your favorite recipes in one place, discover easy meal ideas, and plan your week with the free Cooking Layer app.
Free to download • Fast and easy to use
Ingredients for Red, White and Blue Dirt Cups
Now, let’s gather the ingredients for these fun Red, White and Blue Dirt Cups! Here’s what you’ll need:
- Cheesecake pudding: Two boxes of this luscious mix form the creamy base. It’s rich and adds that classic dessert touch.
- Milk: A crucial ingredient for making the pudding creamy and smooth. Whole milk works best for richness, but feel free to use any milk you prefer.
- Oreo cookies: Crushed for the signature “dirt” layer, these chocolatey bites add crunch and flavor. You can substitute with gluten-free cookies if needed.
- Red and blue gel food dye: These vibrant colors bring our cups to life! For a bolder effect, add a bit more dye.
- Gummy worms: The playful garnish that makes these cups even more fun! Swap them out for any candy you like—think fruit chews or chocolate pieces.
For precise measurements of these ingredients, check the bottom of the article for a handy printable version.
How to Make Red, White and Blue Dirt Cups
Step 1: Prepare the Pudding
Start by grabbing a large mixing bowl and tossing in both boxes of cheesecake pudding. Add the milk and whisk away! You want to mix it until it’s thick and creamy, like a light blanket of sweet goodness. This step is crucial because well-mixed pudding provides a nice foundation for our colorful layers.
Step 2: Divide and Color the Pudding
Once your pudding is ready, it’s time to divide! Scoop 1 cup of pudding into one bowl, and the remaining 1 ½ cups into another. Now, here comes the fun part: add the blue gel food dye to the first bowl. Stir until it’s a vibrant blue. For the other bowl, add the red dye and mix until you get a bold, cheerful red. The colors should pop, making them a feast for the eyes!
Step 3: Layering the Cups
Line up your plastic cups on a flat surface—this is where the magic happens! Start by placing 1 tablespoon of crushed Oreos at the bottom of each cup. Spread it out evenly. Next, add 2 tablespoons of blue pudding on top and gently smooth it out. Follow this with another tablespoon of crushed Oreos, pressing it down lightly. Now, it’s time for 3 tablespoons of the white pudding! Gently spread it to create that beautiful contrast. Repeat with 1 ½ tablespoons of the white pudding. Finally, add 4 tablespoons of the red pudding as the crowning glory. Close it off with 2 tablespoons of crushed Oreos. Trust me, the layers are worth the work, adding texture and delight to each bite!
Step 4: Final Touches
For the finishing touch, top each cup with two gummy worms and a tiny flag. You can get creative with your garnishes here! If you have extra fun candies, feel free to toss them in. Once you’re done, it’s time to dig in!
Tips for Success
- Chill the pudding layers briefly after achieving vibrant colors for a firmer texture.
- Use a pastry bag to layer the pudding if you want cleaner lines between colors.
- Don’t rush the layering; take your time to spread each layer evenly for visual appeal.
- Involve the kids! Let them help with layering for fun family bonding.
- Feel free to customize the pudding flavors—vanilla or chocolate would work great too!
Equipment Needed
- Mixing bowls: Two medium bowls are perfect, or you can use any large bowls you have handy.
- Whisk: A standard whisk works well, but if you have an electric mixer, it’ll speed things up!
- Plastic cups: Any size works, but clear ones showcase the layers beautifully.
- Measuring cups: A must for measuring your ingredients accurately.
- Spoon or spatula: Useful for layering and spreading the pudding.
Variations
- Flavored pudding: Try using chocolate or vanilla pudding instead of cheesecake for a different flavor profile.
- Fruit layers: Incorporate fresh berries or banana slices between the pudding layers for added flavor and nutrition.
- Gluten-free option: Use gluten-free cookies or make your own crushed chocolate-flavored cookie blend.
- Vegan adaptation: Substitute the milk with almond or coconut milk and use dairy-free pudding options.
- Sugar-free version: Look for sugar-free pudding mixes and use a low-calorie milk alternative to reduce sugar content.
Serving Suggestions
- Pair these Red, White and Blue Dirt Cups with fresh fruit skewers for a colorful side.
- Serve alongside lemonade or fruity flavored iced tea for a refreshing drink.
- Use decorative napkins or colorful plates to enhance the festive look.
- Consider a fun table setting with red, white, and blue decorations for holidays.
- Perfect for birthday parties or family gatherings, these cups will steal the show!
FAQs about Red, White and Blue Dirt Cups
Can I make these Red, White and Blue Dirt Cups ahead of time?
Absolutely! You can prepare these pudding cups a day in advance and store them in the fridge. Just wait to add the gummy worms until you’re ready to serve, to keep them fresh and chewy.
Can I substitute the pudding flavor?
Definitely! While cheesecake pudding is a favorite, chocolate or vanilla will work wonderfully too. Feel free to experiment and make it your own!
Are there any dietary adjustments I can make?
Sure! For a vegan option, simply use dairy-free pudding mix and almond milk. You can also use gluten-free cookies to keep it friendly for everyone.
What if I don’t have plastic cups?
No worries! Mason jars work great for serving these dessert cups. Plus, they add a charming touch and allow everyone to see those beautiful layers!
How do I store leftovers?
If you have any cups left after your celebration, cover them well and keep them in the fridge. Enjoy within a couple of days for the best texture and taste!
Final Thoughts
Creating these Red, White and Blue Dirt Cups is more than just making a dessert; it’s about sparking joy and bringing people together. Each colorful layer tells a story, inviting everyone to share in the fun, and celebrate the little moments that make life sweet. Whether you whip them up for a summer picnic or a family gathering, these cups are sure to be a hit. I hope you enjoy the satisfaction of crafting something that not only looks amazing but also tastes delicious. Trust me, you’re going to want to make these again and again!
Love this recipe?
Save it for later and discover more easy, delicious recipes inside the free Cooking Layer app.
Free to download • Fast and easy to use
Red, White and Blue Dirt Cups
- Total Time: 20 minutes
- Yield: 8 servings 1x
- Diet: Vegetarian
Description
A festive and fun dessert recipe perfect for summer celebrations and patriotic holidays.
Ingredients
- 2 boxes cheesecake pudding (3.4 ounces each)
- 4 cups milk
- 19 Oreo cookies (crushed)
- ¼ teaspoon red gel food dye
- ¼ teaspoon blue gel food dye
- 8 red and blue gummy worms
Instructions
- Place both boxes of pudding in a large mixing bowl and add the milk; whisk until pudding has thickened.
- Place 1 cup of the pudding in a separate bowl and 1 ½ cups of pudding in another bowl.
- Add the blue dye to the bowl with 1 cup of pudding and mix thoroughly.
- Add the red dye to the bowl with 1 ½ cups of pudding and stir until thoroughly mixed.
- Line up your plastic cups. Place 1 tablespoon of crushed Oreos in the bottom of each cup and spread evenly.
- Place 2 tablespoons of blue pudding on top and gently spread it evenly.
- Add another tablespoon of crushed Oreos and spread evenly again.
- Add 3 tablespoons of white pudding as the next layer and spread evenly.
- Add 1 ½ tablespoons of white pudding as the next layer and spread evenly.
- Add 4 tablespoons of red pudding as the next layer.
- For the final layer, add 2 tablespoons of crushed Oreos.
- Top with two gummy worms and one flag per cup and enjoy!
Notes
- This dessert is a great option for celebrating the Fourth of July, Memorial Day, or any festive occasion.
- You can customize the toppings and add more fruits if desired.
- Prep Time: 20 minutes
- Cook Time: 0 minutes
- Category: Dessert
- Method: No bake
- Cuisine: American
Nutrition
- Serving Size: 1 cup
- Calories: 250
- Sugar: 20g
- Sodium: 200mg
- Fat: 10g
- Saturated Fat: 4g
- Unsaturated Fat: 2g
- Trans Fat: 0g
- Carbohydrates: 35g
- Fiber: 1g
- Protein: 3g
- Cholesterol: 15mg