Cadbury Egg Fudge

Introduction to Cadbury Egg Fudge
Ah, Cadbury Egg Fudge! This delightful treat brings back sweet memories of hopping into spring. For busy moms and professionals like us, this creamy confection is a lifesaver. It’s a quick solution for those hectic days when you need a sugary pick-me-up. Picture this: a cozy evening spent with your loved ones, sharing indulgent squares of fudge that melt in your mouth. With just a handful of ingredients and minimal effort, you can impress your family and friends. Plus, who can resist the charm of Cadbury Eggs? Let’s dive into this scrumptiously simple recipe!
Why You’ll Love This Cadbury Egg Fudge
This Cadbury Egg Fudge is a game changer in the dessert world. It’s incredibly easy to whip up, even on your busiest days. In just 45 minutes, you’ll have a luscious treat that tastes like a dream. The combination of chocolate and that signature Cadbury Egg creaminess makes it utterly irresistible. Plus, it’s perfect for sharing—whether with family or at a gathering, everyone will be enchanted by its delightful flavor!
Ingredients for Cadbury Egg Fudge
To create this delectable Cadbury Egg Fudge, you’ll need a few simple yet delightful ingredients. Here’s a quick rundown:
- Light corn syrup: This sweet syrup adds that gooey, creamy texture we love.
- Unsalted butter: Softened, it brings richness to the fudge without overpowering the sweet flavors.
- Vanilla extract: A splash of this vanilla love enhances the overall taste beautifully.
- Powdered sugar: The main player here, adding that signature sweetness and smoothness.
- Kosher salt: Just a pinch of salt balances the sweetness and elevates the flavor.
- Milk: A tablespoon helps to achieve the perfect creamy consistency.
- Gel yellow food coloring: Just a drop or two adds a fun pop, mimicking the joyful essence of Cadbury Eggs.
- Milk chocolate: Melted for the rich, chocolatey base, it’s what makes this fudge truly irresistible.
Feel free to play with these ingredients! For instance, you can swap in dark chocolate if that’s more your style. Or, for a nutty twist, try adding crushed nuts or sprinkles to the layers. Want to make it vegan? Look for plant-based substitutes for butter and chocolate. Best of all, exact quantities are at the bottom of the article, ready for printing!
How to Make Cadbury Egg Fudge
Now that we have our delicious ingredients prepared, it’s time to dive into the fun part: making the Cadbury Egg Fudge! Trust me; you’ll love how straightforward this process is. Just follow these step-by-step instructions, and soon you’ll have a heavenly dessert to enjoy.
Step 1: Prepare the Butter and Corn Syrup Mixture
Start by adding the softened unsalted butter and light corn syrup to a mixing bowl. I recommend using an electric mixer for this—it’s a real timesaver! Beat them together until the mixture is creamy and combined. The butter should blend smoothly with the syrup, creating a luscious foundation.
Step 2: Mix in Vanilla, Sugar, and Milk
Next, add a splash of vanilla extract to the bowl. This magical ingredient infuses your fudge with delightful flavor. Gradually mix in the powdered sugar and milk, beating until everything is thoroughly combined. You want a smooth mixture without lumps. If it feels too thick, don’t hesitate to sprinkle in a little more milk.
Step 3: Separate and Color the Fudge Mixture
Here comes the fun part! Take about two-thirds of your creamy mixture and transfer it to another bowl. Then, in the remaining one-third, drop in a tiny bit of gel yellow food coloring. It only takes a drop or two to achieve that sunny hue reminiscent of Cadbury Eggs. Mix until your fudge reaches a cheerful yellow shade.
Step 4: Set Up Your Baking Dish
While your fudge is coming together, line a 9-inch square baking dish with parchment paper. This step is crucial as it makes removing the fudge a breeze. Spread it out neatly, ensuring the parchment covers the bottom and sides. This will prevent any sticking, another small win for your kitchen adventures!
Step 5: Melt the Chocolate
Now it’s time to make the fudge even more decadent! Melt your milk chocolate according to the package instructions. A microwave works wonders here, but I often prefer the double-boiler method to avoid burning. Just be patient, and stir frequently until that chocolate is dreamy and smooth.
Step 6: Layer the Fudge
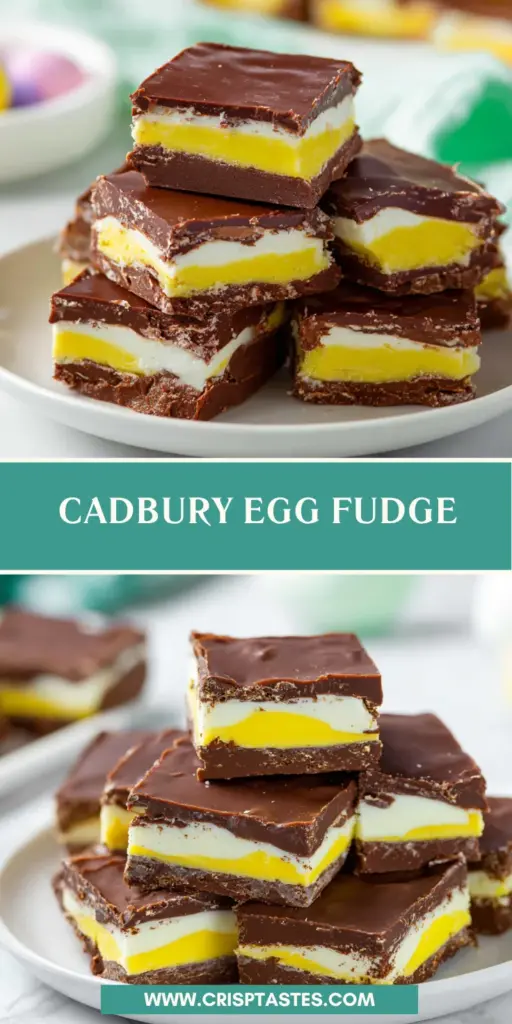
Here comes the star of the show! Pour half of the melted chocolate into the prepared baking dish, spreading it evenly across the bottom. Next, spoon the white fudge mixture on top and spread it out gently. Then, carefully drop the yellow fudge in dollops over the white layer and use a knife to swirl them together a bit for that marvelous marbled effect. Finally, pour the remaining melted chocolate over the top, smoothing it out with a spatula.
Step 7: Chill and Cut the Fudge
Place your beautifully layered fudge in the refrigerator. Allow it to chill for about 30 minutes, or until the chocolate hardens. The hardest part? Waiting! Once set, grab a very hot knife—seriously, hot knives are magic for getting clean cuts. Slice your fudge into square pieces, and store them in a covered container in the fridge. Enjoy every indulgent bite!
Tips for Success
- Use room temperature ingredients for better mixing.
- Keep your workspace organized; it makes everything go smoother.
- When melting chocolate, stir frequently to prevent burning.
- Feel free to add a splash of cream for extra richness.
- Chill the fudge for a bit longer if it doesn’t set perfectly.
Equipment Needed for Cadbury Egg Fudge
- Mixing bowl: Any bowl will do. Just ensure it’s large enough for mixing.
- Electric mixer: A handheld mixer speeds things up, but a whisk works too—if you’re up for the workout!
- 9-inch square baking dish: A standard size is great, but any similar container works.
- Parchment paper: If you don’t have it, a light coating of cooking spray can help with sticking.
- Hot knife: Any sharp knife will do, but heat it under hot water for clean cuts.
Variations of Cadbury Egg Fudge
- Nutty Delight: Add crushed nuts like walnuts or almonds into the fudge for a delightful crunch.
- Cookie Crumble: Fold in crushed Oreo cookies for a unique twist that adds a chocolatey surprise.
- Fruit Fusion: Incorporate dried fruits such as cranberries or cherries for a tart contrast to the sweetness.
- Vegan Version: Use vegan butter and dairy-free chocolate to create a plant-based indulgence without sacrificing flavor.
- Flavored Fudge: Experiment by adding different extracts like almond or coconut for a fun flavor twist.
Serving Suggestions for Cadbury Egg Fudge
- Pair with a hot cup of coffee or tea for a comforting afternoon pick-me-up.
- Serve alongside fresh fruit to balance the sweetness and add a refreshing touch.
- Present on a colorful platter, garnished with mint leaves for an elegant display.
- Wrap individual squares in festive paper for a delightful gift or party favor.
- Enjoy as a topping for vanilla ice cream for an indulgent dessert twist!
FAQs about Cadbury Egg Fudge
As with any beloved recipe, you may have some questions about how to make this delightful Cadbury Egg Fudge. I’m here to help clear things up! Here are a few common queries I often encounter:
Can I use dark chocolate instead of milk chocolate?
Absolutely! Dark chocolate will give your Cadbury Egg Fudge a rich flavor that’s perfect for those who prefer a less sweet treat. Just be sure to melt it the same way as you would the milk chocolate.
How long can I store Cadbury Egg Fudge?
Stored in an airtight container in the refrigerator, your fudge can last up to two weeks. Just make sure to keep it well-covered to maintain its freshness and texture!
Can I freeze Cadbury Egg Fudge?
Yes! For longer storage, simply freeze the squares in a freezer-safe container. Just thaw them in the fridge before serving for the best texture.
Is this fudge suitable for gift-giving?
Definitely! This fudge makes a charming gift when wrapped in decorative paper or placed in a lovely tin. It’s a sweet surprise for any occasion!
What can I add to personalize this fudge?
Feel free to customize it with your favorite mix-ins! Sprinkles, crushed nuts, or even mini marshmallows can give your Cadbury Egg Fudge a unique twist that reflects your tastes.
Final Thoughts
Making Cadbury Egg Fudge is more than just a recipe; it’s a delightful experience that brings joy to the kitchen. The process is simple yet rewarding, allowing you to create a sweet treat that beautifully captures the essence of indulgence. Each bite melts in your mouth, bringing back cherished memories of Easter and family gatherings. Plus, this fudge is perfect for sharing or wrapping up as a thoughtful gift. So gather the ingredients, invite your loved ones to join in, and create sweet moments together. Trust me, this delightful fudge will soon become a beloved go-to treat in your home!
Print
Cadbury Egg Fudge
- Total Time: 45 minutes
- Yield: 16 squares 1x
- Diet: Vegetarian
Description
A rich and creamy fudge featuring Cadbury eggs, perfect for Easter or any special occasion.
Ingredients
- ½ cup light corn syrup
- ¼ cup unsalted butter softened
- 1 teaspoon vanilla extract
- 3 cups powdered sugar
- pinch of kosher salt
- 1 Tablespoon milk
- 1 drop gel yellow food coloring
- 16 ounces milk chocolate melted
Instructions
- In a mixer, beat the butter and corn syrup together.
- Add vanilla, powdered sugar, salt, and milk. Beat until smooth.
- Remove 2/3 of the mixture to a separate bowl, and beat in several drops of yellow food coloring to the remaining mixture.
- Line a 9-inch square baking dish with parchment paper.
- Melt chocolate according to package directions.
- Pour half of the chocolate into the pan to cover the bottom of the dish.
- Spread the white layer over the chocolate.
- Drop the yellow layer over the white layer, spreading gently with a knife.
- Pour the remaining melted chocolate over, spreading evenly.
- Refrigerate until chocolate hardens, about 30 minutes.
- Using a VERY hot knife, cut into squares and store in a covered container in the refrigerator. Enjoy!
Notes
- Make sure to use high-quality chocolate for the best flavor.
- Keep the fudge refrigerated to maintain its firmness.
- You can adjust the amount of food coloring to achieve your desired shade of yellow.
- Prep Time: 15 minutes
- Cook Time: 30 minutes
- Category: Dessert
- Method: Mixing and Baking
- Cuisine: American
Nutrition
- Serving Size: 1 square
- Calories: 150
- Sugar: 20g
- Sodium: 40mg
- Fat: 6g
- Saturated Fat: 3.5g
- Unsaturated Fat: 1g
- Trans Fat: 0g
- Carbohydrates: 22g
- Fiber: 0g
- Protein: 1g
- Cholesterol: 10mg